# Overview

Explain what Proxyman app offers to developers

## 1. Proxyman

Proxyman is a high-performance macOS app that enables developers to view HTTP/HTTPS requests from apps and domains, including iOS devices, iOS Simulators, and Android devices.

<div data-full-width="true"><figure><img src="/files/Ke1361GbhNlXppzVfIZq" alt="Proxyman dashboard for macOS 26"><figcaption><p>Proxyman Dashboard for macOS 26</p></figcaption></figure></div>

### 2. Features

* [x] ✅ Intercept HTTP/HTTPS (SSL) requests from your MacBook, iOS Simulators, iOS devices, and Android devices 📱.
* [x] Built for Apple Silicon Chip and macOS 26 Tahoe
* [x] ✅ 100% written by Apple Swift NIO for high-performance
* [x] 🦋 Modern and intuitive UI.
* [x] 🍸 Liquid Glass UI for macOS 26
* [x] ⭐️ Exclusively native built for macOS. ElectronJS-based for Windows & Linux
* [x] 👑 Comprehensive debugging tools: Compose, Repeat, ...
* [x] 🛠 Advanced Tools: Map Local, Map Remote, Breakpoint, Allow List, Block List, External Proxying, No Caching, Clear Cache, Protobuf, Scripting (Rewrite), and Diff.
* [x] 👨‍💻 Customizable workspace.
* [x] 🖥 Support macOS 12 or later

## 3. Download

* Download the latest [macOS app](https://proxyman.io/release/osx/Proxyman_latest.dmg)
* Download the latest [Windows app](https://proxyman.io/release/windows/Proxyman_latest.dmg)
* Download the latest [Linux app](https://proxyman.com/release/linux/proxyman_latest)
* Download the latest [iOS app](https://apps.apple.com/us/app/proxyman/id1551292695)
* Download via Cask

```bash
$ brew install --cask proxyman
```

## 4. Github

[Proxyman's Repo Github](https://github.com/ProxymanApp/Proxyman) is where you can create tickets for feature requests, discussions, or report bugs and catch up with Proxyman's team quickly and efficiently.

{% hint style="success" %}
We welcome all bug reports and feature requests 😍
{% endhint %}

If you'd notify all Proxyman's release. Please watch the repo

## 4. Milestone

You can check the current [Milestone](https://github.com/ProxymanApp/Proxyman/milestones) in the GitHub repo.


# Changelog

Release notes of Proxyman app, including macOS, Windows and Linux app

You can see the changelog and download an old version at:

* Proxyman for macOS Changelog: <https://proxyman.com/changelog>
* Proxyman for Windows Changelog: <https://proxyman.com/changelog-windows>
* Github Release Page: <https://github.com/ProxymanApp/Proxyman/releases>

{% hint style="success" %}
We recommend using the latest Proxyman version since it includes more features, bugs fix, and better performance.
{% endhint %}


# License

How License works in Proxyman and what is the benefits of using Proxyman PRO Versions

## Proxyman Pro

You can try all debugging tools with the Trial version, which is limited to 2 pinned domains, 2 rules for each debugging tool, and no new tabs.

The **Pro version** comes with:

* A year’s worth of macOS, Windows, and Linux updates
* 1 Mac device per seat
* Premium [Proxyman for iOS](https://proxyman.io/ios) (2 devices per seat)
* Multiple Tabs
* Unlimited Pinned Domains / Apps
* Unlimited rules for all Advanced Debugging Tools (e.g., [SSL Proxying List](https://docs.proxyman.io/basic-features/ssl-proxying), [Map Local](https://docs.proxyman.io/advanced-features/map-local), [Map Remote](https://docs.proxyman.io/advanced-features/map-remote), [Breakpoint](https://docs.proxyman.io/advanced-features/breakpoint), [Allow/Block List](https://docs.proxyman.io/advanced-features/blacklist), [Protobuf](https://docs.proxyman.io/advanced-features/protobuf), [Scripting](https://docs.proxyman.io/scripting/script), [Network Conditions](https://docs.proxyman.io/advanced-features/network-throttling), [Multiple Filters](https://docs.proxyman.io/advanced-features/multiple-filters), [Reverse Proxy](https://docs.proxyman.io/advanced-features/reverse-proxy), [Request/Response Diff](https://docs.proxyman.io/advanced-features/diff), etc).

## Trial Evaluation Duration

* Personal Purpose: No time limit.
* Business Purpose: It's for 2 weeks. After that, please consider purchasing the license.

## Demo Key

If you're a team/company, you can request a 2-week demo key, then please contact <support@proxyman.com>.

## Buy Proxyman License

Please navigate to the [Pricing page](https://proxyman.io/pricing) for purchasing Proxyman Licenses.

## Manage Proxyman License

If you're the owner of the Proxyman license key, you can manage your devices by using the [License Manager](/license-manager).

## Active License

### macOS/Windows/Linux app

1. After purchasing the Proxyman License, you will receive a license key in your mailbox.
2. To activate, please open the Proxyman app (macOS/Windows/Linux) -> Proxyman Menu -> Buy Proxyman Pro.
3. Click on the "Activate License" button and enter your license key

<figure><img src="/files/EGNO61ayuMCHlf4cq709" alt=""><figcaption><p>Activate License Key on macOS/Windows/Linux app</p></figcaption></figure>

### Activate the License key with your Corporate proxy

* Available from Proxyman macOS 5.5.0 or later
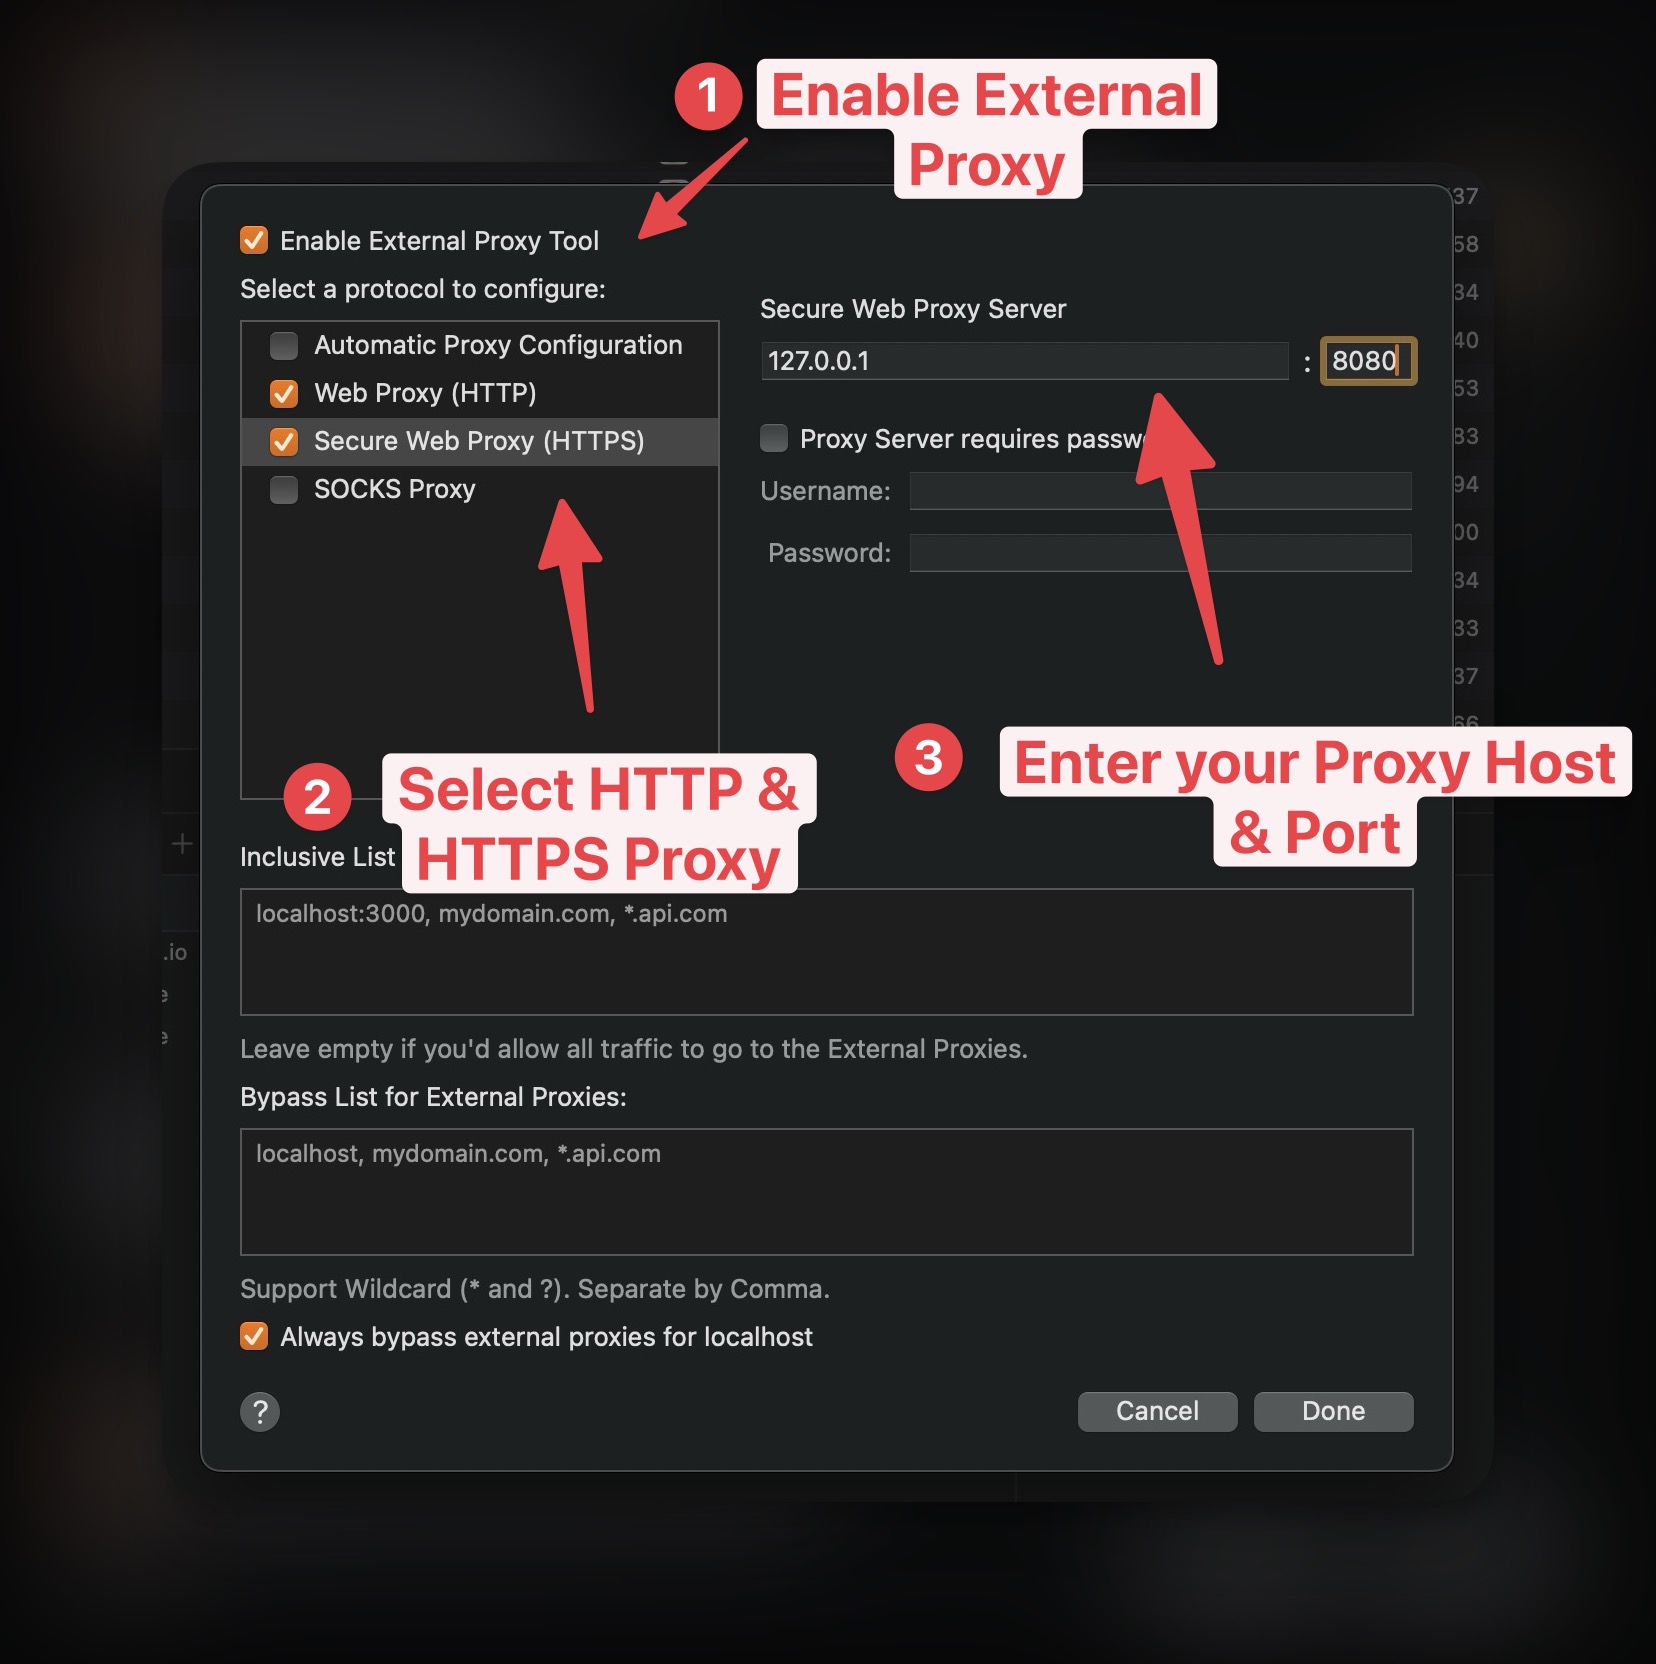
* Some companies have a Corporate Proxy, so can't activate the license key. To make it work, please follow the guide below:

1. Open Tools -> Proxy Setting -> External Proxy
2. Check "Enable External Proxy Tool"
3. Check the HTTP and HTTPS checkboxes
4. For each HTTP and HTTPS: Enter your Proxy Host and Port.
5. If your corporate proxy has the authentication, please enter it.
6. Done ✅
7. Try to activate the License Key again.

<figure><img src="/files/ykIK7yNKNzEbXJaeRkXe" alt="" width="563"><figcaption><p>How to use External Proxy to Activate Proxyman License key</p></figcaption></figure>

### iOS app

Proxyman license key comes with the Proxyman iOS app. 1 seat can be activated on 2 iOS devices.

1. Download the iOS app at App Store: <https://apps.apple.com/us/app/proxyman-network-debug-tool/id1551292695>
2. Open the More Tab (on the Right-Bottom TabBar) -> FaceID & Passcode -> Unlock -> Enter your license key.
3. Done

## Activate License by CLI (macOS Only)

If you have a huge number of licenses, you would like to have an automatic way to activate a license. You can do it too.

1. Download the Proxyman app and copy it to the `/Applications` folder
2. **Open and close the app at least.** It's necessary to set up some configurations.
3. Open Terminal and execute the following cmd:

To **Activate**:

```bash
$ /Applications/Proxyman.app/Contents/MacOS/proxyman-cli activate <key>
```

To **Unlink** device:

```bash
$ /Applications/Proxyman.app/Contents/MacOS/proxyman-cli unlink
```

![](/files/-MgdpIilgkRX37KnFBtu)

### Activate by URL

You can also activate a Proxyman license by the URL:

1. Download and open Proxyman at least 1 time.
2. Open the URL in Safari or Google Chrome.

`proxyman://activate?key=<key>`

### Remove License

You can remove your license from your devices and then activate it on your new devices as long as you have enough available seats.

#### From your current devices

Open Proxyman app -> Proxyman Menu -> License -> Click on the "Unlink this device" button.

#### With License Manager

1. Open the [License Manager](https://proxyman.io/license-manager/access-link)
2. Enter the email address that you've used to purchase a license
3. Open the access link from your email.
4. Click on the device to remove it.

### Activate License with Cooperated Proxy Server

From Proxyman 4.12.0 or later, you can ask Proxyman to use Cooperated Proxy in a Tools Menu -> Proxy Setting -> External Proxy -> Set HTTP / HTTPS Proxy setting.


# License Manager

How to use Proxyman License Manager to manage the license key remotely. Able to add/remove/revoke old devices

License Manager is an easier way to manage your license, which allows you to:

* Display License status (Purchase date, Expiry date, Number of Mac / iOS Seats)
* See a list of devices, which activated by your license key
* Renew / Extend your license key
* Remove Mac or iOS devices

![License Manager](/files/32oI2MMvox1C6W3Yi7S4)

## How to use it?

1. Open the [License Manage](https://proxyman.io/license-manager/access-link)
2. Enter your email, which you purchase a license key.
3. You will receive a `Access Link` from your mailbox.
4. Open it to access the License Manager.

{% hint style="info" %}
If you don't remember which email you purchase Proxyman License, please contact us at <support@proxyman.io>
{% endhint %}


# Raycast

Use Proxyman with Raycast command

## Raycast Store

Proxyman macOS 5.10.0 supports Raycast Command to quickly control Proxyman.

* Toggle System Proxy
* Toggle Map Local Tool
* Toggle Breakpoint
* Toggle Blocklist
* Toggle Allowlist
* Toggle Map Remote
* Toggle Scripting
* Toggle External Proxy
* Toggle SOCKS Proxy
* Toggle Network Condition
* Toggle SSL Proxying List
* Toggle Record Traffic
* Clear Session

<figure><img src="/files/pMKXmFrGGlLbt1JKxT2l" alt=""><figcaption><p>Proxyman and Raycast</p></figcaption></figure>

## Download

* Store: <https://www.raycast.com/noah_tran/proxyman>
* Click on the below button 👇

[![](https://www.raycast.com/noah_tran/proxyman/install_button@2x.png?v=1.1)](https://www.raycast.com/noah_tran/proxyman)


# Command-line

Interact with Proxyman via Command Line.

Proxyman provides a useful command-line tool to enhance your onboarding experience ✅.

You can access the tool at `/Applications/Proxyman.app/Contents/MacOS/proxyman-cli`

## 1. Export Proxyman config

Export all debugging tools rules, such as SSL Proxying List, Breakpoint, Map Local, Scripting, Block List, Allow List, Reverse Proxy, and Network Conditions.

```bash
$ /Applications/Proxyman.app/Contents/MacOS/proxyman-cli export -h

OVERVIEW: Export all debugging tools rules (Breakpoint, SSL Pinning, Map Local, Map
Remote, Scripting, etc).

USAGE: proxyman-cli export [--mode <mode>] --output <output>

OPTIONS:
  -m, --mode <mode>       Export Mode (all = "All debugging tools's rules", enabledRules
                          = "Only enabled rules"). (default: all)
  -o, --output <output>   A Output file to save the config to.
  --version               Show the version.
  -h, --help              Show help information.
```

{% hint style="info" %}
By default, the `export` command will export all rules. To exclude particular rules, please uncheck the "Enabled" column in each debugging tool and use the `-m enabledRules`
{% endhint %}

#### For example:

* Export all debugging tool rules:

`$ /Applications/Proxyman.app/Contents/MacOS/proxyman-cli export -o ~/Desktop/data.json`

* Only export enabled rules:

`$ /Applications/Proxyman.app/Contents/MacOS/proxyman-cli export -m enabledRules -o ~/Desktop/data.json`

## 2. Import Proxyman config

Import Proxyman debugging tools rules that you have exported by the export command.

```bash
$ /Applications/Proxyman.app/Contents/MacOS/proxyman-cli import -h

OVERVIEW: Import config to Proxyman.

USAGE: proxyman-cli import [--mode <mode>] --input <input>

OPTIONS:
  -m, --mode <mode>       Import Mode (append = "Append to the existing rules"),
                          override = "Import and Replace all existing rules". (default:
                          append)
  -i, --input <input>     A input file to import.
  --version               Show the version.
  -h, --help              Show help information.
```

{% hint style="info" %}
By default, new imported rules will be appended to the existing debugging rules. To override all rules, let use `-m override`
{% endhint %}

#### For example:

* Import all debugging rules by appending them:

{% code overflow="wrap" %}

```bash
/Applications/Proxyman.app/Contents/MacOS/proxyman-cli import -i ~/Desktop/data.json
```

{% endcode %}

* Import, but override all my existing rules:

{% code overflow="wrap" %}

```bash
/Applications/Proxyman.app/Contents/MacOS/proxyman-cli import -m override -i ~/Desktop/data.json
```

{% endcode %}

## 3. Activate/Unlink License

Please check out the command for activating and unlinking a license.

{% content-ref url="/pages/-LlQ1dT-LE0mXo4UbmEP" %}
[License](/license)
{% endcontent-ref %}

## 4. Toggle HTTP System Proxy

From Proxyman 4.8.0 and later, we can toggle the Proxy System by command line. It's useful for Raycast Extension

```bash
/Applications/Proxyman.app/Contents/MacOS/proxyman-cli proxy on
/Applications/Proxyman.app/Contents/MacOS/proxyman-cli proxy off
```

Reference: <https://github.com/ProxymanApp/Proxyman/issues/1626#issuecomment-1545862020>

## 5. Clear Session

* We can clear the current Session from the command line. Available for Proxyman 4.12.0 and later.

```bash
/Applications/Proxyman.app/Contents/MacOS/proxyman-cli clear-session
```

## 6. Toggle Debugging Tools

* Toggle Breakpoint, Map Local, and Scripting Tool by command line. Available for Proxyman 4.12.0 and later.

```bash
# Scripting
/Applications/Proxyman.app/Contents/MacOS/proxyman-cli scripting on
/Applications/Proxyman.app/Contents/MacOS/proxyman-cli scripting off

# Map Local
/Applications/Proxyman.app/Contents/MacOS/proxyman-cli maplocal on
/Applications/Proxyman.app/Contents/MacOS/proxyman-cli maplocal off

# Breakpoint
/Applications/Proxyman.app/Contents/MacOS/proxyman-cli breakpoint on
/Applications/Proxyman.app/Contents/MacOS/proxyman-cli breakpoint off
```

## 7. Install the Proxy Helper Tool by command line

From macOS 4.12.0 or later, you can install the Helper Tool without GUI.

{% code overflow="wrap" %}

```bash
sudo /Applications/Proxyman.app/Contents/MacOS/proxyman --install-privileged-components
```

{% endcode %}

## 8. Export Proxyman Log

**Proxyman macOS v5.11.0+ now supports:**

* Export all (ProxymanSession Format)

{% code overflow="wrap" %}

```bash
/Applications/Proxyman.app/Contents/MacOS/proxyman-cli export-log -m all -o "~/desktop/output"
```

{% endcode %}

* Export certain domains (Only Host, no scheme, no port, no paths, and no Query)

{% code overflow="wrap" %}

```bash
/Applications/Proxyman.app/Contents/MacOS/proxyman-cli export-log -m domains -o "~/desktop/output" --domains 'api.twitter.com' --domains 'www.producthunt.com'
```

{% endcode %}

**From Proxyman macOS 5.20.0+, we can export with Raw or HAR format.**

* Export All - RAW Request/Response Format

{% code overflow="wrap" %}

```bash
/Applications/Proxyman.app/Contents/MacOS/proxyman-cli export-log -m all -o "~/desktop/output" --format raw
```

{% endcode %}

* Export All - HAR Format

{% code overflow="wrap" %}

```bash
/Applications/Proxyman.app/Contents/MacOS/proxyman-cli export-log -m domains -o "~/desktop/output" --domains 'api.twitter.com' --domains 'www.producthunt.com' --format har
```

{% endcode %}

* Export certain domains - RAW Request/Response Format

{% code overflow="wrap" %}

```bash
/Applications/Proxyman.app/Contents/MacOS/proxyman-cli export-log -m all -o "~/desktop/output" --format raw
```

{% endcode %}

* Export certain domains - HAR Format

{% code overflow="wrap" %}

```bash
/Applications/Proxyman.app/Contents/MacOS/proxyman-cli export-log -m domains -o "~/desktop/output" --domains 'api.twitter.com' --domains 'www.producthunt.com' --format raw
```

{% endcode %}

**From macOS 6.2.0+, we can export with a flag `--since <last_flow_id>` to only export from this flow ID.**

## 9. Import Custom Root Certificate

* ✅ Import Custom p12 Root Certificate to Proxyman
* Automatically Trust the certificate in System Keychain (sudo required)
* Available from Proxyman macOS 5.15.0 or later

#### Install and trust

{% code overflow="wrap" %}

```bash
/Applications/Proxyman.app/Contents/MacOS/proxyman-cli install-root-cert <certificate_path> --password <your_cert_password> --trust
```

{% endcode %}

#### Install but not trust (you might need to trust it manually in the Keychain)

{% code overflow="wrap" %}

```bash
/Applications/Proxyman.app/Contents/MacOS/proxyman-cli install-root-cert <certificate_path> --password <your_cert_password>
```

{% endcode %}

## 10. Export Current IP and Port

* Available from macOS 7.6.0 or later
* Get the current Listening IP & Port in JSON format

<pre class="language-bash"><code class="lang-bash"><strong>/Applications/Proxyman.app/Contents/MacOS/proxyman-cli proxy-host
</strong></code></pre>

## 11. Add, Remove, Replace the Custom certificates (Client and Server)&#x20;

* Available on macOS 6.10.0 or later ✅
* Support the P12 certificate with a password

{% code overflow="wrap" %}

```bash
/Applications/Proxyman.app/Contents/MacOS/proxyman-cli custom-cert add server ~/Desktop/mycert.p12 --password 123

/Applications/Proxyman.app/Contents/MacOS/proxyman-cli custom-cert add client ~/Desktop/mycert.p12 --password 123 --host myserver.com --port 443

/Applications/Proxyman.app/Contents/MacOS/proxyman-cli custom-cert replace server ~/Desktop/mycert.p12 --password 123 --name mycert.p12

/Applications/Proxyman.app/Contents/MacOS/proxyman-cli custom-cert replace client ~/Desktop/mycert.p12 --password 123 --host myserver.com --port 443

/Applications/Proxyman.app/Contents/MacOS/proxyman-cli custom-cert remove server --name mycert.p12

/Applications/Proxyman.app/Contents/MacOS/proxyman-cli custom-cert remove client --host myserver.com --port 443
```

{% endcode %}

## 12. External Proxy CLI

* Proxyman macOS6.12.0 or later ✅

#### Enable

Enable External Proxy without changing the saved configuration:

```bash
/Applications/Proxyman.app/Contents/MacOS/proxyman-cli external-proxy enable
```

* Enable and configure a proxy mode:

```bash
/Applications/Proxyman.app/Contents/MacOS/proxyman-cli external-proxy enable http --host proxy.example.com --port 8080
/Applications/Proxyman.app/Contents/MacOS/proxyman-cli external-proxy enable https --host proxy.example.com --port 8443
/Applications/Proxyman.app/Contents/MacOS/proxyman-cli external-proxy enable socks --host proxy.example.com --port 1080
/Applications/Proxyman.app/Contents/MacOS/proxyman-cli external-proxy enable pac --url https://example.com/proxy.pac
```

#### Disable

Disable the entire External Proxy feature:

```bash
/Applications/Proxyman.app/Contents/MacOS/proxyman-cli external-proxy disable
```

* Disable only one proxy mode:

```bash
/Applications/Proxyman.app/Contents/MacOS/proxyman-cli external-proxy disable http
/Applications/Proxyman.app/Contents/MacOS/proxyman-cli external-proxy disable https
/Applications/Proxyman.app/Contents/MacOS/proxyman-cli external-proxy disable socks
/Applications/Proxyman.app/Contents/MacOS/proxyman-cli external-proxy disable pac
```

## 13. CRUD for all debugging tools

{% hint style="success" %}
Only available on Proxyman macOS 6.14.0 or later
{% endhint %}

### Supported tools

`block-list`, `allow-list`, `ssl-proxying`, `map-local`, `map-remote`, `breakpoint`, `scripting`, `network-condition`, `reverse-proxy`, `protobuf`, and `dns-spoofing`.

### Common commands

Replace `<tool>` with one of the supported tools and `<id>` with a rule ID from `list` or `get`.

```bash
# Read rules
/Applications/Proxyman.app/Contents/MacOS/proxyman-cli rules <tool> list
/Applications/Proxyman.app/Contents/MacOS/proxyman-cli rules <tool> list --enabled true
/Applications/Proxyman.app/Contents/MacOS/proxyman-cli rules <tool> get <id>

# Change one rule
/Applications/Proxyman.app/Contents/MacOS/proxyman-cli rules <tool> update <id> --name "New name"
/Applications/Proxyman.app/Contents/MacOS/proxyman-cli rules <tool> delete <id>

# Turn a whole tool on or off
/Applications/Proxyman.app/Contents/MacOS/proxyman-cli rules <tool> enable
/Applications/Proxyman.app/Contents/MacOS/proxyman-cli rules <tool> disable

# Turn one rule on or off
/Applications/Proxyman.app/Contents/MacOS/proxyman-cli rules <tool> enable <id>
/Applications/Proxyman.app/Contents/MacOS/proxyman-cli rules <tool> disable <id>
```

`enable <id>` also turns on its tool when needed. Turning off a tool keeps each rule's own enabled setting. Updates change only the fields you send; delete removes the rule right away.

### Create a rule

These are the smallest create commands. Optional flags let you set more fields. Run `/Applications/Proxyman.app/Contents/MacOS/proxyman-cli rules <tool> create --help` to see them.

```bash
/Applications/Proxyman.app/Contents/MacOS/proxyman-cli rules block-list create https://ads.example.com/*
/Applications/Proxyman.app/Contents/MacOS/proxyman-cli rules allow-list create https://api.example.com/*
/Applications/Proxyman.app/Contents/MacOS/proxyman-cli rules ssl-proxying create '*.example.com' --list include
/Applications/Proxyman.app/Contents/MacOS/proxyman-cli rules map-local create https://api.example.com/* --path ./response.json
/Applications/Proxyman.app/Contents/MacOS/proxyman-cli rules map-remote create https://old.example.com/* https://new.example.com/
/Applications/Proxyman.app/Contents/MacOS/proxyman-cli rules breakpoint create https://api.example.com/* --phase both
/Applications/Proxyman.app/Contents/MacOS/proxyman-cli rules scripting create https://api.example.com/* --script-file ./rule.js
/Applications/Proxyman.app/Contents/MacOS/proxyman-cli rules network-condition create --profile 3g
/Applications/Proxyman.app/Contents/MacOS/proxyman-cli rules reverse-proxy create https://upstream.example.com --local-port 8080
/Applications/Proxyman.app/Contents/MacOS/proxyman-cli rules protobuf create https://api.example.com/* --request-type package.Request
/Applications/Proxyman.app/Contents/MacOS/proxyman-cli rules dns-spoofing create example.com 127.0.0.1
```

Common rule flags include `--name`, `--enabled true|false`, `--method`, `--match wildcard|regex`, and `--include-subpaths true|false` when the tool supports them. Names are optional. If you omit an optional value, Proxyman uses that tool's normal default.

### JSON input

For create and update, use `--input <file>` to send a JSON object. Use `--input -` to read JSON from standard input. Do not mix `--input` with field flags.

```bash
printf '%s' '{"url":"https://api.example.com/*","name":"Local API","enabled":true}' \\
  | /Applications/Proxyman.app/Contents/MacOS/proxyman-cli rules map-local create --input -

/Applications/Proxyman.app/Contents/MacOS/proxyman-cli rules map-local update <id> --input ./map-local-change.json
```

When Proxyman is closed, the command returns JSON with `ok: false` and the `app_not_running` error code. Input errors use exit code `2`; other errors use exit code `1`.


# MCP

Explain how to use MCP on Proxyman with Cursor or Claude Code

## 1. What is Proxyman MCP?

**Proxyman MCP** (Model Context Protocol) is a feature that enables AI assistants (Claude, Cursor, and other MCP-compatible tools) to directly interact with the Proxyman macOS app. It allows AI to inspect HTTP traffic, create debugging rules, and control Proxyman - all through natural language conversations.

The architecture consists of two components:

* **MCP HTTP Server** - Runs inside Proxyman app on localhost with token-based authentication
* **MCP CLI Server** - A stdio-based MCP server that AI tools connect to, which forwards commands to Proxyman

{% hint style="info" %}
Check out the [Proxyman SKILL.md](/skill-md) for your AI Agents
{% endhint %}

#### ✅ Example Prompts

* Show me the last 10 API requests to api.example.com
* Create a breakpoint for all POST requests to /api/users
* Export the failed request as a cURL command
* Enable SSL proxying for \*.stripe.com
* Create a new Script to change the status code, headers, body.
* Create Map Local, Breakpoint Tools with given URL

<figure><img src="/files/GXLL0p0IADC2sfq3nn1w" alt="Use Claude Code to create the Script"><figcaption></figcaption></figure>

## 2. Benefits

<table><thead><tr><th width="229.90625">Benefit</th><th>Description</th></tr></thead><tbody><tr><td><strong>AI-Powered Debugging</strong></td><td>Ask AI to analyze captured traffic, find specific requests, or explain API responses</td></tr><tr><td><strong>Hands-Free Rule Creation</strong></td><td>Create breakpoints, map local/remote rules through conversation</td></tr><tr><td><strong>Faster Workflow</strong></td><td>Export cURL commands, filter flows, and manage sessions without switching context</td></tr><tr><td><strong>Secure by Design</strong></td><td>Localhost-only server with per-session token authentication</td></tr><tr><td><strong>IDE Integration</strong></td><td>Works seamlessly with Cursor and other MCP-compatible tools</td></tr></tbody></table>

## 3. How to add Proxyman MCP

1. **Enable MCP in Proxyman**
   * Open Proxyman → Settings → MCP Tab
   * Toggle **Enable MCP Server to start the MCP Server**
2. **Configure your MCP client** (e.g., Cursor, Claude Desktop)
3. Add Proxyman MCP to your Agents:

#### Codex

* Production Version:

```bash
codex mcp add proxyman -- "/Applications/Proxyman.app/Contents/MacOS/mcp-server"
```

* Setapp Version:

```bash
codex mcp add proxyman -- "/Applications/Setapp/Proxyman.app/Contents/MacOS/mcp-server"
```

#### Claude Code

* Production Version:

{% code overflow="wrap" %}

```bash
claude mcp add proxyman --transport stdio -- "/Applications/Proxyman.app/Contents/MacOS/mcp-server"
```

{% endcode %}

* Setapp Version:

{% code overflow="wrap" %}

```bash
claude mcp add proxyman --transport stdio -- "/Applications/Setapp/Proxyman.app/Contents/MacOS/mcp-server"
```

{% endcode %}

#### Manual

Depend on what your AI Agents are, you have to edit the Agent Settings, to use Proxyman MCP. Here is the sample setting.json:

* Production Version:

```json
{
  "mcpServers": {
    "proxyman": {
      "command": "/Applications/Proxyman.app/Contents/MacOS/mcp-server"
    }
  }
}
```

* Setapp Version

```json
{
  "mcpServers": {
    "proxyman": {
      "command": "/Applications/Setapp/Proxyman.app/Contents/MacOS/mcp-server"
    }
  }
}
```

4. **Start using Proxyman MCP**

* Ensure Proxyman is running
* Ask your AI assistant to interact with Proxyman.

## 4. Available Tools

#### Read-Only Tools

| Tool                     | Description                                                                                                      |
| ------------------------ | ---------------------------------------------------------------------------------------------------------------- |
| `get_version`            | Returns Proxyman version and build number                                                                        |
| `get_proxy_status`       | Returns recording state, proxy port, and SSL proxying status                                                     |
| `get_flows`              | Lists captured HTTP/HTTPS flows with optional filters (`limit`, `host_filter`, `method_filter`, `status_filter`) |
| `get_flow_detail`        | Returns full details of a specific flow including headers, body preview, query params, and cookies               |
| `list_rules`             | Lists all debugging rules (breakpoints, map local, map remote, blacklist)                                        |
| `get_ssl_proxying_list`  | Returns SSL proxying include/exclude domain lists                                                                |
| `get_certificate_status` | Returns root certificate installation status                                                                     |

#### Write Tools

| Tool                    | Description                                             | Required Params      |
| ----------------------- | ------------------------------------------------------- | -------------------- |
| `create_breakpoint`     | Creates a breakpoint to pause/inspect matching requests | `url` (pattern)      |
| `create_map_local`      | Returns custom responses for matching URLs              | `url` (pattern)      |
| `create_map_remote`     | Redirects requests from one URL to another              | `from_url`, `to_url` |
| `create_blacklist`      | Blocks requests matching a URL pattern                  | `url` (pattern)      |
| enable\_scripting\_tool | Create Script                                           |                      |
| `enable_ssl_proxying`   | Enables HTTPS decryption for a domain                   | `domain`             |

#### Session Control

| Tool               | Description                                    |
| ------------------ | ---------------------------------------------- |
| `clear_session`    | Clears all captured flows from current session |
| `toggle_recording` | Starts or stops traffic recording              |

#### Flow Operations

| Tool               | Description                                                                                                         |
| ------------------ | ------------------------------------------------------------------------------------------------------------------- |
| `export_flow_curl` | Exports a captured request as a runnable cURL command                                                               |
| `filter_flows`     | Advanced filtering with multiple criteria (url, host, method, status, headers, body) supporting AND/OR combinations |

#### App Control

| Tool            | Description                      |
| --------------- | -------------------------------- |
| `open_proxyman` | Launches Proxyman if not running |
| `quit_proxyman` | Quits the Proxyman app           |

***

## Changelogs

MCP v3 (Proxyman macOS ≥ 6.8.0)

| Name                           | Description                                                                                                                            |
| ------------------------------ | -------------------------------------------------------------------------------------------------------------------------------------- |
| get\_version                   | Get the current Proxyman macOS app version and build number                                                                            |
| get\_proxy\_status             | Get current proxy status including recording state, port number, and SSL proxying status                                               |
| get\_flows                     | Get recent HTTP/HTTPS flows from Proxyman's active session data source                                                                 |
| get\_flow\_detail              | Get detailed information about a specific flow including headers, body, query params, and cookies                                      |
| list\_rules                    | List all active debugging rules (breakpoints, map local, map remote, blacklist, scripting, dns spoofing, network condition, whitelist) |
| get\_ssl\_proxying\_list       | Get the current SSL Proxying configuration including enabled status and domain lists                                                   |
| create\_breakpoint             | Create a new breakpoint rule to pause and inspect/modify requests or responses matching a URL pattern                                  |
| create\_map\_local             | Create a Map Local rule to return a custom response for matching requests                                                              |
| create\_map\_remote            | Create a Map Remote rule to redirect requests from one URL to another                                                                  |
| create\_blacklist              | Create a Blacklist rule to block requests matching a URL pattern                                                                       |
| create\_scripting\_rule        | Create a Scripting rule with custom JavaScript to modify requests/responses                                                            |
| enable\_ssl\_proxying          | Enable SSL Proxying for a specific domain to decrypt HTTPS traffic                                                                     |
| clear\_session                 | Clear all captured flows from the current session                                                                                      |
| toggle\_recording              | Start or stop recording HTTP traffic                                                                                                   |
| export\_flow\_curl             | Export a captured HTTP request as a cURL command                                                                                       |
| filter\_flows                  | Filter captured HTTP/HTTPS flows using advanced filter criteria                                                                        |
| get\_certificate\_status       | Get the current status of Proxyman's root certificate                                                                                  |
| install\_certificate           | Install and trust the Proxyman root CA certificate                                                                                     |
| uninstall\_certificate         | Remove the Proxyman root CA certificate from the Keychain                                                                              |
| inject\_terminal               | Launch a terminal app with Proxyman proxy environment variables injected                                                               |
| get\_terminal\_manual\_command | Get a bash source command for manually setting proxy environment variables                                                             |
| answer\_setup\_question        | Answer setup questions about capturing HTTPS from iOS, Android, browsers, etc.                                                         |
| search\_docs                   | Search the built-in Proxyman setup and troubleshooting doc index                                                                       |
| list\_setup\_workflows         | List the supported setup workflows Proxyman MCP can guide users through                                                                |
| list\_popular\_workflows       | List popular setup workflows using Proxyman's curated fallback ranking                                                                 |
| open\_proxyman\_screen         | Open a specific Proxyman guide or setup screen in the macOS app                                                                        |
| run\_guided\_setup             | Run a one-click automation in Proxyman for browsers or Android emulators                                                               |
| list\_reverse\_proxies         | List configured Reverse Proxy entries                                                                                                  |
| create\_reverse\_proxy         | Create a Reverse Proxy entry for localhost or custom local port routing                                                                |
| generate\_code                 | Generate code from a captured HTTP flow in 18+ languages/frameworks                                                                    |
| create\_dns\_spoofing          | Create a DNS Spoofing rule to redirect a hostname to a different IP address                                                            |
| list\_dns\_spoofing            | List all DNS Spoofing rules and their enabled status                                                                                   |
| update\_dns\_spoofing          | Update an existing DNS Spoofing rule                                                                                                   |
| get\_external\_proxy           | Get the current External Proxy (upstream proxy) configuration                                                                          |
| set\_external\_proxy           | Configure an External Proxy setting for a specific protocol kind                                                                       |
| toggle\_no\_caching            | Toggle the No Caching feature (strips cache-related headers)                                                                           |
| inject\_electron               | Launch an Electron app with Proxyman proxy configuration injected                                                                      |
| open\_proxyman                 | Launch the Proxyman macOS application                                                                                                  |
| quit\_proxyman                 | Quit the Proxyman macOS application                                                                                                    |

### MCP v2 (Proxyman ≥ v6.7.0)

* Built-in knowledge base covering iOS, Android, browsers, terminal, VPN, localhost, and third-party libraries
* New commands: answer\_setup\_question, search\_docs, list\_setup\_workflows, open\_proxyman\_screen, run\_guided\_setup, create\_reverse\_proxy
* MCP resources and prompt templates for chat clients
* Reverse proxy create/list support

### Security

* The server binds to `127.0.0.1` only (no network exposure)
* Per-session cryptographic token stored in `~/Library/Application Support/com.proxyman.NSProxy/mcp-handshake.json`
* The handshake file has `0600` permissions (owner-only access)
* Sensitive data (auth tokens, passwords, API keys) is automatically redacted in responses


# SKILL.md

Official agent skills Proxyman for inspecting, replaying, and debugging HTTP, HTTPS, WebSocket, and app traffic.

## Proxyman Agent Skills

Official agent skills for [Proxyman](https://proxyman.com), a web debugging proxy for inspecting, replaying, and debugging HTTP, HTTPS, WebSocket, and app traffic.

These skills help AI coding agents install Proxyman, connect to Proxyman MCP, and use Proxyman's MCP tools correctly. Proxyman MCP controls a running local Proxyman app; it is not a cloud API.

✅ GitHub Repo: <https://github.com/ProxymanApp/proxyman-SKILL.md>

### Installation

#### Quick install with skills.sh

Install all Proxyman skills:

```bash
npx skills add ProxymanApp/proxyman-SKILL.md/skills
```

Install one skill:

```bash
npx skills add ProxymanApp/proxyman-SKILL.md --skill proxyman-download-setup
npx skills add ProxymanApp/proxyman-SKILL.md --skill proxyman-mcp-setup
npx skills add ProxymanApp/proxyman-SKILL.md --skill proxyman-traffic-debugging
```

#### Manual setup

Clone this repository:

```bash
git clone https://github.com/ProxymanApp/proxyman-SKILL.md.git
```

Then copy the folders under `skills/` into your agent's skills directory.g

| Agent                     | Skills directory     |
| ------------------------- | -------------------- |
| OpenAI Codex CLI          | `~/.codex/skills/`   |
| Claude Code               | `~/.claude/skills/`  |
| Claude Desktop            | `~/.claude/skills/`  |
| Cursor                    | `~/.cursor/skills/`  |
| GitHub Copilot CLI        | `~/.copilot/skills/` |
| GitHub Copilot in VS Code | `~/.copilot/skills/` |

Example:

```bash
mkdir -p ~/.codex/skills
cp -R skills/* ~/.codex/skills/
```

Each skill folder must contain its `SKILL.md` file. Restart or reload your agent after copying the files.

### Skills

| Skill                        | Description                                                                                                                                              |
| ---------------------------- | -------------------------------------------------------------------------------------------------------------------------------------------------------- |
| `proxyman-download-setup`    | Download, install, launch, and prepare Proxyman on macOS, Windows, or Linux.                                                                             |
| `proxyman-mcp-setup`         | Connect your coding agent to Proxyman MCP using the bundled stdio bridge.                                                                                |
| `proxyman-traffic-debugging` | Use Proxyman MCP for traffic debugging and full MCP operations: flows, rules, Compose, WebSocket, certificates, setup guidance, exports, and automation. |

### Which skill should I use?

* Use `proxyman-download-setup` if Proxyman is not installed yet.
* Use `proxyman-mcp-setup` if Proxyman is installed but your agent cannot see Proxyman MCP tools.
* Use `proxyman-traffic-debugging` after MCP is connected and you want your agent to inspect traffic, diagnose missing capture, create rules, replay requests, or operate Proxyman through MCP.

### Requirements

* Proxyman must be installed and running before MCP tools can work.
* In Proxyman, open Settings > MCP and enable MCP Server.
* MCP uses Proxyman's bundled stdio bridge, not a cloud API or a fixed HTTP URL.
* On Windows, the bridge is normally `mcp-server.exe` beside `Proxyman.exe`; on Linux AppImage builds, launch Proxyman once so it can prepare `${XDG_CONFIG_HOME:-$HOME/.config}/Proxyman/bin/mcp-server`.
* Keep "Redact Sensitive Data Before Sending to AI" enabled unless you explicitly need raw secrets in MCP output.


# Security Compliance

Describe all security Compliance from Proxyman, such as SOC 2

### Exciting News: Proxyman Achieves SOC 2 Type 2 Compliance!

<figure><img src="/files/AZmhRbqFjI4pi5B8MDh2" alt=""><figcaption><p>Proxyman is now SOC 2 Compliant</p></figcaption></figure>

## What is SOC 2 Type 2 Compliance?

SOC 2 is a stringent audit by the AICPA. A Type 1 report confirms our security controls are well-designed at a specific time, evaluating five key criteria:

* **Security**: Protects against unauthorized access.
* **Availability**: Ensures system availability for use.
* **Processing Integrity**: Guarantees complete and accurate processing.
* **Confidentiality**: Safeguards confidential information.
* **Privacy**: Handles personal data per our privacy policy.

## Why SOC 2 Type 2 Compliance Matters

In today's digital world, strong security is essential. For a debugging proxy tool managing sensitive data, SOC 2 compliance:

* Validates security controls.
* Shows commitment to data protection.
* Offers independent verification.
* Demonstrates adherence to industry standards.

## What Does This Mean for You?

### **As a Customer**

* **Enhanced Security**: Your data enjoys robust protection.
* **Privacy Assurance**: Your information is handled responsibly.
* **Transparency**: Security practices are verified.
* **Trust**: Confidently use Proxyman in enterprises.

### **As a Reseller**

* **Credibility**: Assure customers of our security.
* **Enterprise-Ready**: Easily recommended to security-focused organizations.
* **Compliance**: Meet vendor assessment needs.
* **Documentation**: Access for sales support.

## Privacy Statement

#### You can find our [Privacy Policy](https://proxyman.io/privacy)

## What's Next?

This milestone is the first step. Our focus includes:

* Maintain SOC 2 Type 2 compliance.
* Conducting regular audits.
* Continuously enhancing security practices.

For more about our security and privacy policies, visit our Privacy Policy, Terms of Service, and SDLC Policy. Questions? Reach us at <support@proxyman.com>


# Team Workspace

Explain what is the Team Workspace of Proxyman is

## 1. What’s it?

Team Management is the workspace feature that lets you manage who can access your workspace, what role they have, and how many seats you’re using.

{% hint style="info" %}
This feature is only available for the **Team Subscription plan** (seat-based)
{% endhint %}

<figure><img src="/files/Dy6DC3mnrhsUCxHYA8Og" alt="Team Management with Proxyman Team Workspace"><figcaption></figcaption></figure>

#### Roles (role-based access)

#### Admin

* Full access to everything: licenses, logs, team, and workspace settings
* Can view seat usage, invite members, bulk invite, change roles, remove members, and revoke invitations
* Only admins can access the Team page

#### Developer

* Can view the license key and all shared logs within the team
* Cannot access the Team management page (admin-only)

***

## 2. Benefit

* Centralized access control: keep workspace access managed in one place.
* Safer collaboration: assign roles so teammates only have the permissions they need.
* Seat visibility: see used / total seats, pending invitations, and remaining capacity.
* Fast onboarding: invite one person or bulk invite up to 50 emails at a time.
* Reduced mistakes: invitations expire in 24 hours, and bulk invite automatically

***

## 3. How to use it

#### Open the Team page (admin-only)

1. Sign in as an Admin.
2. Go to Settings → Team.

If you’re not an admin, you’ll see an “Admin access required” message.

#### Check seat usage (Team plan)

* Review the Seat Usage card:
* Used / Total seats
* Available seats
* Pending invitations
* When seats are low or full, the UI warns you before inviting.

#### Invite a single member

1. Click Invite Member.
2. Enter the teammate’s email.
3. Choose a role:

* Developer (license key + shared logs)
* Admin (full access)

1. Click Send Invitation.

Notes:

* Invitation links expire in 24 hours.
* If there are 0 seats available, inviting is blocked and you’ll be prompted to add seats.

<figure><img src="/files/XekGtWPe73Q37zpP1Ie1" alt="Invite your teammates with admin or developer roles"><figcaption></figcaption></figure>

#### Bulk invite (up to 50)

1. Click Bulk invite.
2. Paste emails comma-separated (max 50).
3. Choose a role for all invited emails.
4. Click Schedule invitations (sent shortly to avoid spam filters).

After scheduling, the UI shows how many were scheduled and which ones were skipped (with reasons like no seats, already registered, already invited).!Bulk invite dialog (placeholder)

#### Change a member’s role (admin-only)

1. In Team Members, open the role dropdown for a member.
2. Select Developer or Admin.

The current user’s own role is displayed but not editable from this page.

#### Remove a team member (admin-only)

1. In Team Members, open the actions menu for a member.
2. Click Remove member and confirm.

Result: the member loses access to all workspace resources.

#### Revoke a pending invitation (admin-only)

1. In Pending Invitations, click the trash icon for an invitation.
2. Confirm Revoke.

Result: the invite link becomes unusable.

#### Buy more seats (Team plan)

* Click Buy More Seats (or Extend Seats when you hit seat limits).
* Complete the seat upgrade flow.
* The page refreshes seat usage and team data after success.

<figure><img src="/files/K9OgE7g2I6A8XE4JSQat" alt=""><figcaption></figcaption></figure>


# Share Log online

How to share HAR, Proxyman Log to your teammates, and preview it online

## 1. What’s it?

Proxyman HTTP Logs is the workspace feature that lets you upload, store, and share Proxyman HTTP capture files so you (and your team) can review issues with consistent context.

Supported uploads:

* .proxymanlogv2, .proxymansessionv2, .har
* Max file size: 50 MB per upload

### Upload from Proxyman app

1. Make sure you've already logged into your Team Workspace
2. In Proxyman app -> Select your request that you'd like to export -> Right-Click -> Export -> Share Log Online

* Redact Sensitive Data: Auto-redact your cookie or Authorization headers before sharing
* Add Note
* Change the name of the log
* Grant permission who can see this log

3. Click Share to share to your workspace

<figure><img src="/files/yJA6iNOUzbjC41qNuLyu" alt="" width="563"><figcaption></figcaption></figure>

### Upload from Workspace website

1. Visit <https://workspace.proxyman.com/logs> -> Click on the Browse File button -> Select the Proxyman Log that you've already exported from your Mac.

{% hint style="info" %}
To export Proxyman Logs on Proxyman app: In Proxyman app -> Select your request that you'd like to export -> Right-Click -> Export -> Proxyman Log
{% endhint %}

2. Adding an optional note (Markdown supported)

<figure><img src="/files/Yib8Wz3rCe9R5kkKSeBT" alt="Add note to your log" width="563"><figcaption></figcaption></figure>

3. Setting sharing permissions

<figure><img src="/files/9fVw2Ng9tCttSE3JMWkM" alt="" width="563"><figcaption></figcaption></figure>

### Sharing & permissions model

Each log can be shared as:

* **Private**: only permitted viewers can access (default when no sharing is set)
* **Team**: all workspace members can view
* **Specific users**: only selected teammates can view (by email)
* **Public**: anyone with the share link can view

Important rules:

* A log has a share link: /shared/\<log-id>
* Only the uploader can change sharing settings for that log (others can view if they have access, but can’t change permissions)

#### Roles (role-based access)

* Admin
* Full workspace access (licenses, logs, settings, team)
* Can view logs they have access to
* Can manage sharing only for logs they uploaded (uploader-only rule still applies)
* Developer
* Can view logs shared with them (via Team, Specific users, or Public link)
* Can upload logs and manage sharing only for logs they uploaded

\> Team Subscription plan note: “Team” and “Specific users” sharing is designed for Team-plan workspaces where you have teammates in the workspace (seat-based access).

***

### 2. Benefit

* Fast collaboration: upload a capture once, share it with your team instantly.
* Clear context: add a note (Markdown supported) to explain what to look for.
* Flexible sharing: keep logs private, share to the whole team, specific teammates, or publicly via link.
* Simple organization: see filename, size, uploader, sharing state, and relative upload time in one table.
* Storage safety: when quota is exceeded, the UI tells you how to recover (delete old logs or contact support to upgrade quota).

<figure><img src="/files/WkduhZmRL74ylLtVWri4" alt="Sharing Log with your teammates"><figcaption></figcaption></figure>

***

### 3. How to use it

#### 1. Upload a log

You can upload in two ways:

* Click “Upload Log” / “Browse Files”
* Drag & drop the file into the drop zone

The page validates:

* File type (.proxymanlogv2, .proxymansessionv2, .har)
* File size (≤ 50 MB)

#### 2. Add a note (optional)

After upload completes, a dialog opens to add a note:

* Supports basic Markdown (bold/italic/code/lists/links)
* Has a character limit (the UI will block saving if you exceed it)
* You can preview the rendered Markdown before saving

#### 3. Configure sharing

After the note dialog closes, the Share Log dialog opens. You can:

* Toggle Public Access (anyone with the link can view)
* Toggle Team Access (all team members can view)
* Add Specific Users (only teammates in the workspace; you must invite them first)

Then click Save Changes. Notes:

* You can only add emails that belong to teammates already in your workspace
* Only the uploader can change these settings

#### View, download, copy link, or delete

In Your Shared Logs, each log supports:

* Open the log details: click the filename (goes to /logs/\<log-id>)
* Manage Sharing
* Add/Edit Note
* Download
* Copy Share Link (copies /shared/\<log-id>)
* Delete (with confirmation; cannot be undone)

#### If the storage quota is exceeded

If you hit the workspace storage limit during upload, you’ll see Storage Quota Exceeded with options to:

* Delete old log files to free space
* Contact <support@proxyman.com> to upgrade storage quota


# Proxyman for iOS

A standalone Proxyman for iOS, directly capture HTTP/HTTPS from iPhone without a Mac

## 1. Proxyman for iOS

### Features

* ✅ Capture all network traffic (HTTP/HTTPS) from your iOS Devices (No Macbook required).
* Proxyman for iOS is a **standalone** app and works **independently** with Proxyman for macOS.
* View HTTP/HTTPS Requests and Responses in plain text.
* FaceID and Passcode to protect your sensitive data.
* Share logs to Proxyman for macOS.
* Split View (Two Side Panel) for iPad.
* Debugging Tool: Map Local, Breakpoint, Block List, SSL Proxying List, No Caching.
* and more...

### Download

* AppStore: <https://apps.apple.com/us/app/proxyman/id1551292695>
* Requires iOS 15+

### Screenshots

<figure><img src="/files/ivn2j7Ii3HLiYqWEjrlX" alt=""><figcaption></figcaption></figure>

<figure><img src="/files/8U2zjS4hTgwJ7geAVtBZ" alt=""><figcaption></figcaption></figure>

## 2. Proxyman VPN

### How does it work?

Proxyman for iOS creates a local VPN on your devices, then proxying all traffic from your iOS devices to a local Man-In-The-Middle Server.

### What data does Proxyman use?

1. **HTTP/HTTPS Request and Response data**

Proxyman captures and decrypts HTTP/HTTPS data (Including Headers, Body, URL, Host, etc )to display them in plain text

2\. **Device Name**

To generate a self-signed Root Certificate. Proxyman does not use pre-generated or shared certificates.

{% hint style="info" %}
Proxyman records the request/response data and stores it on the l**ocal SQLite database** in your iOS Devices.

Proxyman **does not send** your data to any remote servers or third parties.

Your data always remains **private** to you.
{% endhint %}

## 3. Activate Premium Proxyman for iOS

If you have a valid macOS License, you can unlock Premium Proxyman for iOS. 1 seat can redeem for 2 iOS Devices.

To activate, please Download Proxyman for iOS (AppStore) -> Open More Tab (on the Right-Bottom TabBar) -> FaceID & Passcode -> Unlock -> Enter your license key.


# Map Local for iOS

How to use Map Local Tools for Proxyman iOS. Useful to mock a Response with a given Request

## What's it?

Map Local is a tool to help iOS developers to:

* Map the URL with any pre-defined Response. It allows you to quickly test out with new Response without waiting for the real Endpoint from your Backend Server.
* You can modify the Status Code, Headers, and Body.

<figure><img src="/files/968kpDom8RWbMA9zq1LB" alt=""><figcaption><p>Map Local on iOS</p></figcaption></figure>

## Tutorial

Please check out the Map Local for iOS Tutorial:

{% content-ref url="/pages/6LeVW6Fwk63yH4TL4qpb" %}
[Map Local for iOS Tutorial](/proxyman-ios/tutorial-for-ios/map-local-for-ios-tutorial)
{% endcontent-ref %}


# Breakpoint for iOS

How to use Breakpoint Tools for Proxyman iOS. Useful to change the Request and Response, including Status Code, URL, Headers, and the Body

## 1. What's it?

Breakpoint is a tool to help developers:

* Modify the Request Content: URL, Method, Header, and the Body
* Modify the Response Content: Status Code, Headers, and the Body

on the fly, without depending on Proxyman for macOS.

<figure><img src="/files/dj8bW1Q7xU8xefhm4Ks4" alt=""><figcaption></figcaption></figure>

## 2. Tutorial

Please checkout the Breakpoint for iOS Tutorial.

{% content-ref url="/pages/Qonz4hirET8m6QnWeNYU" %}
[Breakpoint for iOS Tutorial](/proxyman-ios/tutorial-for-ios/breakpoint-for-ios-tutorial)
{% endcontent-ref %}


# Tutorial for iOS


# Map Local for iOS Tutorial

## M**anipulate HTTP(s) response on iPhone using Proxyman Map Local Tool**

Since version 2.0.0, Proxyman has introduced Map Local Tool which enables developers to use the content of local files as a response to your requests, as they match with your rules.

<figure><img src="/files/kTG0ZOTl5kJPvtefdQ4K" alt=""><figcaption></figcaption></figure>

Map Local Tool could significantly boost your speed development and provide the capability to rapidly test on several edge-cased without explicitly updating the data in your server. It’s also the must-have tool for QAs or Developers if you would like to test the app’s behavior with various responses. Some of the testing scenarios:

* Define a Response and use it as a Response for matched Requests
* Quickly try new parameters in responses.
* Test the app’s behaviors with different parameters in the responses.
* Test the UI layout with unusual content.
* Quickly reproduce the bug with specific parameters in responses.
* Mock Fake API with a local File: It's useful for developers would try out the testing APIs which are not in production.

## Prerequisites

* Already downloaded the latest version of Proxyman on AppStore: <https://apps.apple.com/us/app/proxyman/id1551292695>
* Already installed and trusted Proxyman Certificate on iOS device (If you’re new to Proxyman, please follow [this tutorial](https://proxyman.io/posts/2021-10-17-Getting-Started-With-Proxyman-For-iOS) on how to start intercepting HTTP traffic on your iPhone).

## Create Map Local Rules

There are 2 ways that we can define a Breakpoint rule:

1. From Setting screen

* Go to Setting → map Local → Tap on + button.
* From here we will need to manually fill in all required fields for the Rule, including Title, Method, Matching URL, and include Subpaths or not.

<figure><img src="/files/YADCUIkCnsdpypwqwmms" alt=""><figcaption></figcaption></figure>

2. From the Menu context

* Long tap on the Request → Add to Map Local List.
* It will automatically fill in all fields to define the Rule based on the selected Request.

<figure><img src="/files/yXBMmForkI9H4gYhjxuR" alt=""><figcaption></figcaption></figure>

#### Modify Header, Status Code and Body

From the Map Local Editor screen, we can freely manipulate the Headers, Status Code and Body data. If we alternate the Body with the new data type, Proxyman will auto-detect the Content-Type and update Headers for us.

<figure><img src="/files/FUtoHC7nPOQD6S6xz1z1" alt=""><figcaption></figcaption></figure>

## Manipulate Response with Map Local Tool

<figure><img src="/files/SyqyJ3uQhxexRtAyJEpb" alt=""><figcaption></figcaption></figure>

And you’re all set, it’s time to make another request to see how it works.

If the URL of incoming requests are matching with the **pre-defined matching Rule**, and the Local file is valid => The body response of those matching requests is automatically replaced with the content of the local file.

If the requests are not matching any rules, the entire Response's content remains on the server.

<figure><img src="/files/968kpDom8RWbMA9zq1LB" alt=""><figcaption></figcaption></figure>

Nicely done! If you look into the flow list, you will find a small blue icon to indicate that this flow has been modified. As you can see, both the Response content has been updated with the local file.

## What’s next

Map Local tool allows you to try various types of responses to test the layout or content from your devices, thus boosting your debugging productivity, but limited by the capability of modifying Response content only. If you'd like to modify the Request content, you might want to check out our [Breakpoint tutorial](https://docs.proxyman.io/proxyman-ios/tutorial-for-ios/breakpoint-for-ios-tutorial) that enables us to manipulate both the Request and Response on the fly without changing any logic from your client.


# Breakpoint for iOS Tutorial

## M**odify HTTP(s) Request & Response on your iPhone with Proxyman Breakpoint Tool**

Since version 2.0.0, Proxyman has introduced a new feature that enables developers to manipulate the Request & Response data on the fly without changing any logic from your client.

<figure><img src="/files/dj8bW1Q7xU8xefhm4Ks4" alt=""><figcaption></figcaption></figure>

This mini tutorial demonstrates how we can modify HTTP(s) Requests/Responses on iOS devices with Proxyman Breakpoint Tool, for example:

* Modify the Request URL (including the Scheme, Host, Path, Port) and HTTP Method
* Modify HTTP Headers of Request/Response
* Modify Query from Requests
* Modify HTTP Body of Request/Response
* Modify Response HTTP Status Code

## Prerequisites

* Already downloaded the latest version of Proxyman on AppStore: <https://apps.apple.com/us/app/proxyman/id1551292695>
* Already installed and trusted Proxyman Certificate on iOS device (If you’re new to Proxyman, please follow [this tutorial](https://proxyman.io/posts/2021-10-17-Getting-Started-With-Proxyman-For-iOS) on how to start intercepting HTTP traffic on your iPhone).

## Create Breakpoint Rules

There are 3 ways that we can define a Breakpoint rule:

1. From Setting screen

* Go to Setting → Breakpoint → Tap on the + button.
* From here we will need to manually fill in all required fields for the Rule, including Title, Method, Matching URL, and include Subpaths or not.
* We are also able to select if this rule is applied for upcoming Requests, Responses or both.

<figure><img src="/files/dsmrhI3Deg7zpT7nDNYv" alt=""><figcaption></figcaption></figure>

2. From "Waiting Breakpoint" screen

* Tap on Waiting Breakpoint icon → Create Breakpoint Rule.
* Then we will need to manually create the Rule (similar to the previous option).

<figure><img src="/files/cAB1bqNderA6fnPyFk9M" alt=""><figcaption></figcaption></figure>

3. From the Menu context

* Long tap on the Request → Add to Breakpoint List.
* It will automatically fill in all fields to define the Rule based on the selected Request.

<figure><img src="/files/kbZbYrPOlz9CaIJEeoEB" alt=""><figcaption></figcaption></figure>

In this example, the Breakpoint Rule will apply to both upcoming Requests/ Responses. Let’s make a Request to see how it works.

<figure><img src="/files/WY2Dvzn5gLKecKImTKyR" alt=""><figcaption></figcaption></figure>

## Modify HTTP(s) Requests

Once we make a Request with the matching URL, Proxyman will stop it and notify us that there are waiting breakpoints. From the Home screen, we can tap the small icon to see the waiting Breakpoint list and select a Breakpoint to start modifying the Request Content.

<figure><img src="/files/RCvT51QpuxCrNHY3GZMe" alt=""><figcaption></figcaption></figure>

#### Modify URL + Method

We can freely manipulate the HTTP Method, URL, and Query,. The URL will be auto-updated as the queries change and vice versa.

<figure><img src="/files/ZJLwd3wflhgwLs8hkLSA" alt=""><figcaption></figcaption></figure>

#### Modify Body

If we alternate the Body with a new data type, Proxyman will auto-detect the Content-Type and update Headers for us.

<figure><img src="/files/hC0FsnrHKKLvR52pQo60" alt=""><figcaption></figcaption></figure>

## Execute, abort, continue Breakpoint

When you're happy with the change, you can execute the Request/ Response by selecting the option from the top right menu. To keep the original Request, you can use the Continue button or cancel it with the Abort option.

<figure><img src="/files/dAasGCRD9csOaOyG15OA" alt=""><figcaption></figcaption></figure>

Since our Breakpoint rule is applied for both Request and Response, you will find the Response added to waiting breakpoints list once you hit the “Execute” button.

<figure><img src="/files/JHvd2doAjpNAobZGOWz0" alt=""><figcaption></figcaption></figure>

Now you can change the HTTP Status Code, update Headers or alternate the Body with new content for Response (similar to modifying Request Breakpoint)

<figure><img src="/files/vJj7RXE7jNFnsmyUTIOX" alt=""><figcaption></figcaption></figure>

Nicely done! If you look into the flow list, you will find a small blue icon to indicate that this flow has been modified.

<figure><img src="/files/DUgnZvX7gmKasaPx4v4F" alt=""><figcaption></figcaption></figure>

As you can see, both the Request and Response content has been updated as expected.

<figure><img src="/files/nAmsRBq1W3u5nju6rZC0" alt=""><figcaption></figcaption></figure>

**NOTES**:

* When you create a new rule, both Breakpoint Tool and Rule will be enabled by default (you can switch it ON/OFF as needed).
* Make sure to check the VPN status (1), the Breakpoint Tool status (2), and the Breakpoint Rule status (3) are all ENABLED so that the Breakpoint Tool can work.
* If the first rule matches the Requests/ Responses, other rules will not be applied.
* As you’re editing the Request, the Response tab will be disabled. As you’re editing the Response, the Request tab will be displayed in read-only mode.

## What’s next

Breakpoint allows you to modify the Request/Response on the fly, but it requires a lot of manual works. If you'd like to make it automated, you might check out our [Map Local tool](https://docs.proxyman.io/proxyman-ios/tutorial-for-ios/map-local-for-ios-tutorial) tutorial to automatically map a local file as a Response.


# macOS

How to install Certificate and decrypt HTTPS Request/response in macOS device. Support Automatic and Manual steps

## Install & Trust Proxyman Certificates on your Mac

In order to intercept encrypted HTTPS messages (Request or Response), you have to install **Proxyman CA Certificate** on your current machine. This step is mandatory for iOS, Android devices, iOS simulators, Java VMs, and Firefox too.

{% hint style="info" %}
The Proxyman Certificate is a self-signed certificate that is generated on your machine. Proxyman never stores or transmits any personal data to Proxyman's server or 3rd-party.

Please check out the [Privacy Statement](https://proxyman.io/privacy) to understand what Proxyman obtains or not.

If you'd like to manually generate a Certificate on your machine, then add it to Proxyman. Please check out the [Custom Certificate Doc](/advanced-features/custom-certificates#6-how-to-generate-self-signed-certificates-for-custom-root-certificate-that-comply-with-new-apples-security-requirements)
{% endhint %}

{% hint style="info" %}
Proxyman's certificate is stored locally at **\~/Library/Application\ Support/com.proxyman.NSProxy/app-data/**
{% endhint %}

## 1. Automatic mode (recommended)

Proxyman could **automatically** install & trust the Certificate in Keychain by following the below steps:

1. Open the **Certificate** menu
2. Install a Certificate on this Mac...
3. On the Automatic Mode -> Enter your Mac's password (Root Privileges)
4. Verify the status: ✅ `Installed & Trusted` in the button (If not, try to use the Manual Tab, or contact us for further support)
5. Done :white\_check\_mark:

![Install & trust Proxyman Certificacte](/files/BVbg3Ts3XAioAlJeJyNW)

{% hint style="info" %}
**Automation mode** requires **Root Privileges** to perform the installation script. If you're not sure, please consider using Manual mode.
{% endhint %}

### How does it work?

In automatic mode, Proxyman will automatically perform two steps:

1. Generate a local Proxyman Certificate at `~/Library/Application\ Support/com.proxyman.NSProxy/app-data/proxyman-ca.pem`
2. Install & Trust the certificate to System Keychain Access. It requires Root Privileges to execute the following CLI:

{% code overflow="wrap" %}

```bash
sudo security add-trusted-cert -d -r trustRoot -k /Library/Keychains/System.keychain ~/Library/Application\ Support/com.proxyman.NSProxy/app-data/proxyman-ca.pem
```

{% endcode %}

## 2. Manual Mode (Advance)

Proxyman also offers more freedom for super-users who need to install the certificate on their behalf.

1. Open the **Certificate** menu
2. Install a Certificate on this Mac... -> Select the Manual Tab
3. Click on the **Generate & Add** button (Proxyman will locally generate the certificate and add it to Keychain, but not Trust it automatically, no Password required)
4. In some cases, System Keychains will ask to select what keychain should be installed -> Select **System Keychain**
5. Open the Keychain Access app on your Mac -> Search "Proxyman CA" -> Open -> Select "Always Trust" -> Quit Keychain and Save

{% hint style="info" %}
If you've done it correctly, Proxyman will display " ✅ Installed and Trusted" status.
{% endhint %}

![Manually install Proxyman Certifiacte](/files/i1jFy1mUU43DWlo7Wpcb)

{% hint style="info" %}
If you'd like to use your own custom Root Certificate, please check out the [Custom Certificate Doc](/advanced-features/custom-certificates#6-how-to-generate-self-signed-certificates-for-custom-root-certificate-that-comply-with-new-apples-security-requirements)
{% endhint %}

Suppose you are not sure how to trust the certificate on the Keychain Access app. You can open the Terminal app and execute the command:

{% code overflow="wrap" %}

```bash
sudo security add-trusted-cert -d -r trustRoot -k /Library/Keychains/System.keychain ~/Library/Application\ Support/com.proxyman.NSProxy/app-data/proxyman-ca.pem
```

{% endcode %}

{% hint style="info" %}
Make sure that you **Delete the Proxyman Certificate in Keychain app** if you're not using Proxyman anymore. If not, anyone who has the Proxyman Certificate can intercept your HTTP/HTTPS requests from your macOS machine.
{% endhint %}

## 3. Uninstall Proxyman Certificate

1. Open Certificate Menu
2. Reset all Certificates
3. Enter your Mac password and done


# iOS Device

How to set up iOS/iPad Devices with Proxyman, to capture and decrypt HTTPS request/response

To capture HTTP/HTTPS messages in iOS devices (iPhone, iPad), please navigate to:

* **Certificate** **Menu** -> **Install Certificate on iOS -> Physical Devices...**

{% hint style="success" %}
This setup guide works with all real physical devices, including iPhone, iPad, Apple Watch, Apple TV, and Vision PRO.
{% endhint %}

## iOS Setup Guide

<figure><img src="/files/ymBNJYghiC7QD3rx3gnK" alt="Install certificate to iPhone Setup Guide"><figcaption></figcaption></figure>

Let's follow the guidelines:

1. Install **Root Proxyman Certificate** on your machine: You can follow the [macOS Guide](/debug-devices/macos).
2. Get your iOS Device -> Open Settings app -> Wifi -> Select the current Wifi -> Configure the HTTP Proxy by following the next tables.

| Name           | Value                                             |
| -------------- | ------------------------------------------------- |
| Server IP      | Your current IP Network                           |
| Port           | The current port of Proxyman: 9090 is the default |
| Authentication | No                                                |

{% hint style="info" %}
If you're using any **VPN apps** on macOS or iOS devices, please ensure that you close all VPN apps, as they conflict with the HTTPS Proxy configuration.
{% endhint %}

3\. Open <http://proxy.man/ssl> or [http://cert.proxyman.io](http://cert.proxyman.io/) in **Safari Web Browser with Private Tab** from your iOS device to install the Proxyman Certificate.

{% hint style="info" %}
**<http://proxy.man/ssl>** or **<http://cert.proxyman.io>** is a local website, which is served from the local Proxyman's HTTP server. If you can't open it, please forget the wifi, reconnect, and make sure the Proxyman app is opening.

If you can't access it. Please open the support ticket at [Github's repo](https://github.com/ProxymanApp/Proxyman).
{% endhint %}

4\. From iOS 10.3, we have to explicitly install & trust the Proxyman CA in the Settings app

#### **Install Proxyman CA**

* **iOS ≥ 12.2**: On your iPhone -> Open Settings app > Profiles Downloaded > Select Proxyman CA > Install

#### Trust Proxyman CA

* Setting app > General > About > Certificate Trust Settings > Switch ON on Proxyman CA.

![Install and Trust Proxyman Certificate](/files/-LmSeU4alrXa9cAA3od-)

{% hint style="info" %}
Please make sure we **install** and **trust** the Proxyman CA on your iOS Device. If you have any problem, shoot us an email at **<support@proxyman.io>** or bump it to [**Github**](https://github.com/ProxymanApp/Proxyman)
{% endhint %}

{% hint style="info" %}
If you cannot see any traffic from your iOS Devices, please check out this [troubleshooting](/troubleshooting/my-ios-devices-couldnt-connect-to-proxyman-via-proxy)
{% endhint %}

{% hint style="info" %}
Make sure that you **delete the certificate on your iPhone** when you're not debugging by Proxyman. If not, your HTTP/HTTPS requests can be intercepted and leak your sensitive data.
{% endhint %}

## Tutorial

See detailed steps on how to [debug an application on iOS device](https://proxyman.io/blog/2019/06/How-I-use-Proxyman-to-see-HTTP-requests-responses-on-my-iPhone.html) with Proxyman.

### Tired of manual config?

We understand that manually overriding the HTTP Proxy and installing and trusting Proxyman Certificates is painful. Let's check out Atlantis, which is a native iOS framework that helps you do it automatically.

{% content-ref url="/pages/-MKbtRGUKK\_BNXyKwceR" %}
[Atlantis for iOS](/atlantis/atlantis-for-ios)
{% endcontent-ref %}

## Flutter app?

You might not be able to see the Network Traffic on Proxyman if your app is a Flutter app.

Flutter does not use a system-level proxy, so requests to Proxyman will not be displayed. To do this, you must manually configure your HTTP client used in the code to work with a proxy.

Please follow the solution "Getting Charles to work with Flutter" in <https://flutterigniter.com/debugging-network-requests/>

To find out your local IP, please go to Certificate Menu -> Install Certificate on iOS -> Physical device and get the Server IP and Port


# iOS Simulator

How to set up iOS / iPad Simulator with Proxyman to capture HTTP/HTTPS Requests/Response

In order to capture the HTTP/HTTPS message from your iOS Simulator devices, please navigate to:

* **Certificate** **Menu** -> **Install Certificate on iOS -> Simulators**

## 1. iOS Simulator Setup Guide

![Automatically install the Certificate to iOS Simulators](/files/0cxK92fxJIqYV6yI9o1B)

{% hint style="info" %}
It works for iOS, iPadOS, tvOS and watchOS.
{% endhint %}

The following photo describes three steps:

1. Install **Root Proxyman Certificate** on your machine: You can follow the [macOS Guide](/debug-devices/macos).
2. Install Proxyman Certificate to all available simulators, which you have opened at least one time.
3. **Reset the Simulator**: Proxyman tries to reset all simulators, so it will load the new Certificate.

{% hint style="info" %}
From Proxyman 2.19.0+, Proxyman uses the [simctl](https://nshipster.com/simctl/) command line to perform tasks.

**simctl** is built-in on your installed Xcode, which is more modern and reliable than the legacy approach (Use Python custom scripts).
{% endhint %}

{% hint style="info" %}
This step only installs on Simulators, which you have open at least one time

For instance, if you would like to debug on iPhone X Simulator, please make sure to **open** the iPhone X Simulator first, then **install** the Certificate in Step 2
{% endhint %}

### Xcode Preview (SwiftUI)

If you're using Xcode Preview for SwiftUI, you can install the certificate into the Xcode Preview Simulator by following:

1. Open Xcode with Previewer Mode (SwiftUI).
2. Open Proxyman -> Certificate Menu -> Install for iOS -> Simulator
3. Click on the Advanced button -> Install for Xcode Preview

You can read more at: <https://github.com/ProxymanApp/Proxyman/issues/1568#issue-1610877870>

### Manually Install

In Proxyman v4.16.0 or later, you can manually install the certificate to your iOS Simulator in case the Automatic Solution doesn't work.

1. Certificate Menu -> Install Certificates for iOS -> Simulators
2. In Step 2, click on the ↓ button (Next to the Prepare Simulators button) -> Install Manually…

<figure><img src="/files/UaEtYO8TMviIDh55WdrB" alt=""><figcaption><p>Install certificate manually</p></figcaption></figure>

3. Drag and drop the certificate to your iOS Simulator

<figure><img src="/files/D5vGZq2Pj5eor2pB41sH" alt="" width="563"><figcaption><p>Manually Install the certificate</p></figcaption></figure>

4. Open your iOS Simulator -> Setting app -> General -> About -> Certificate Trust Setting -> Find Proxyman CA Certificate and switch it ON
5. Done

## 2. Troubleshooting

### 1. Unable to install the Certificate

If you get errors when clicking on Step 2, please open Xcode -> Preferences -> Location tabs -> Select your Xcode in the Command Line Tools.

![Make sure you have the Xcode Command Line](/files/8hcWvebE2KDHq0vHGgwh)

### 2. Get SSL Error from HTTPS Response

* Opening the Setting app -> General -> About -> Certificate Trust Settings and verifying that Proxyman Certificate is installed and trusted.

![Proxyman Certificate is installed and trusted properly](/files/-MV04a_0MtTevA03M6fq)

If it's not installed:

* Open the iOS Simulator Setup (Certificate Menu -> Install Certificate on iOS -> Simulator) and click on the 2nd button.
* Or Try the following step to manually install the Certificate.

### 3. Some HTTP/HTTPS Requests are missing from Proxyman

Alamofire or URLSession might use the cached response for your request. As a result, the actual request doesn't hit the server. Thus, Proxyman could not capture and display it on the app.

Solution:

* Disable the cache mechanism on URLSession or Alamofire.
* Use the [No Caching Tool](/advanced-features/no-caching) (⌥⌘N)

## Manually Install the Certificate by exporting the certificate

If you cannot install the certificate, you can **manually** do it:

1. Open Proxyman -> Certificate Menu -> Export -> Root Certificate as DER -> Save to Desktop Folder
2. Open the Simulator **drag the certificate and drop it** on the Simulator screen
3. Open Setting app (on the Simulator) -> General -> Device Management -> Select the Certificate -> Install
4. Setting app -> General -> About -> Certificate Trust Settings and verifying that Proxyman Certificate is installed and trusted.
5. Done ✅

### Tutorial

See detailed steps to [debug an application on iOS Simulator ](https://proxyman.io/blog/2019/07/Debugging-on-iOS-Simulator-with-Proxyman.html)with Proxyman


# tvOS & watchOS

How to set up tvOS and watchOS Simulator or real devices with Proxyman to capture HTTP/HTTPS Requests/Response

Proxyman can capture and intercept HTTP/HTTPS traffic from tvOS and watchOS.

## 1. watchOS

### Simulator

It's straightforward by following the [Proxyman iOS Simulator Guideline.](/debug-devices/ios-simulator#ios-simulator-setup-guide)

### watchOS Physical Device

Follow the [iOS devices guideline](/debug-devices/ios-device) to set HTTP Proxy and install the certificate to your host device.

#### Tutorial:

{% embed url="<https://proxyman.io/posts/2021-09-02-intercept-https-traffic-from-watch-os-simulator>" %}

## 2. tvOS

### Simulator

Fortunately, it's easy to capture traffic from the tvOS simulator. All you have to do is follow the [iOS Simulator Guideline](/debug-devices/ios-simulator).

### tvOS Devices

It's quite tricky to use Proxyman on a real device.

✅ New Setup Guide (2024)

* Follow this Medium article (from Raxit Majithiya): **Setup Proxyman in a physical AppleTV** <https://medium.com/@rax/setup-proxyman-in-a-physical-appletv-bf6df86d3a28>

⚠️ Old Setup Guide

1. Follow this tutorial: <https://www.willowtreeapps.com/craft/a-how-to-guide-for-apple-tv-setup-with-charles-proxy>
2. Instead of using Charles Proxy, you can use Proxyman.

* Please note that Proxyman port is 9090 (default)
* Export Proxyman Certificate in the Certificate Menu -> Export
* Make sure you install & trust the Proxyman Certificate before intercepting HTTPS Traffic.

{% hint style="info" %}
If you can't set up Proxyman with watchOS or tvOS, please contact us at <support@proxyman.io>
{% endhint %}


# Android Device & Emulator

How to set up Android Device or Emulator with Proxyman to capture HTTP/HTTPS Requests/Response

In order to capture and decrypt HTTP/HTTPS request/response from your physical Android Devices or Android Emulators, please navigate to:

* **Certificate** **Menu** -> **Install Certificate on Android -> Device**
* **Certificate Menu -> Install Certificate on Android -> Emulator**

{% hint style="info" %}
Check out the [Mini Tutorial on how to set up Android devices & emulators](/debug-devices/android-device/sample-android-project)
{% endhint %}

{% hint style="info" %}
For the **Android Emulator**, let's check out the [Automatic Script for Android Emulator](/debug-devices/android-device/automatic-script-for-android-emulator#1-whats-it)
{% endhint %}

## 1. Android Setup Guide

If you want to capture & decrypt HTTP/HTTPS Traffic from your Physical or Emulator Android Device, please follow all steps in the setup guide:

<figure><img src="/files/R5mjsMS8W4jeLwiqMJ88" alt="" width="563"><figcaption><p>Setup Guide for Android Devices</p></figcaption></figure>

1. Certificate Menu -> Install Certificate on Android -> **Device**
2. Install **Root Proxyman Certificate** on your machine: You can follow the [macOS Guide](/debug-devices/macos).
3. Get your Android Device or Emulator -> Open Setting app -> Wifi -> Select the current Wifi -> Config the HTTP Proxy by following the next tables.

| Name           | Value                                             |
| -------------- | ------------------------------------------------- |
| Server IP      | Your current IP Network                           |
| Port           | The current port of Proxyman: 9090 is the default |
| Authentication | No                                                |

{% hint style="info" %}
Some Samsung devices couldn't access the Internet after setting the HTTP Proxy. Please try to forget your current network and connect again.

If **you're using any VPN app**, please make sure to close it, since some VPN apps conflict with HTTP/HTTPS Proxy configs.
{% endhint %}

3\. Open <http://proxy.man/ssl> or <http://cert.proxyman.io> from the native web browser on your Android Devices in order to install the Proxyman Certificate.

### **Android 11, Android 12 or later:**

* Visit <http://proxy.man/ssl> from the Google Chrome app to download the certificate.
* From Android 11 or later, you have to manually install the certificate in the Setting app.
* Settings app -> Security -> Encryption & Credentials -> Install a Certificate -> Selec "CA Certificate" -> Select Proxyman CA Certificate in your storage.

### **Android 10 and below:**

* As soon as you visit <http://proxy.man/ssl>, your Android devices will download and install it automatically. Make sure you select the **VPN and App Section**.

{% hint style="info" %}
**On Android 12+**, If you encounter this warning "Can't install the Certificate: This file can't be used as a VPN & app user certificate", please try to select "CA Certificate" instead.

Ref: <https://stackoverflow.com/a/70261393/3127477>
{% endhint %}

{% hint style="info" %}
**<http://proxy.man/ssl>** is a local website, which serves from the local Proxyman's HTTP server. If you can't open it, please forget the wifi, re-connect, and make sure the Proxyman app is opening.
{% endhint %}

4\. On Android 11 and Android 12. Let's verify by opening the Trusted Credentials -> User Tab.

Make sure you can see the **Proxyman CA** Certificate like the below screenshot.

![Verify that Proxyman CA Certificate is installed properly](/files/-MjXnM9qmJjcjN218uLz)

5\. Open your app Source Code: Adding the two following `xml` files.

* Add **res/xml/network\_security\_config.xml**

{% code title="network\_security\_config.xml" %}

```markup
<network-security-config>
  <debug-overrides>
    <trust-anchors>
      <!-- Trust user added CAs while debuggable only -->
      <certificates src="user" />
      <certificates src="system" />
    </trust-anchors>
  </debug-overrides>

  <base-config cleartextTrafficPermitted="true">
    <trust-anchors>
      <certificates src="system" />
      <certificates src="user" />
    </trust-anchors>
  </base-config>
</network-security-config>
```

{% endcode %}

* Add to **AndroidManifest.xml**

{% code title="manifest.xml" %}

```markup
<?xml version="1.0" encoding="utf-8"?>
<manifest ... >
    <application android:networkSecurityConfig="@xml/network_security_config" ... >
    ...
    </application>
</manifest>
```

{% endcode %}

{% hint style="info" %}
Find more information at [Network Security Configuration](https://developer.android.com/training/articles/security-config.html)
{% endhint %}

{% hint style="info" %}
Make sure that you **remove those configs in the Release build**. If not, your HTTP/HTTPS requests can be intercepted and leak your sensitive data in the Production build.
{% endhint %}

6\. If it's Android Emulator, please restart the emulator

7\. Done ✅

## **2. Troubleshooting**

Please check out this [troubleshooting section.](/debug-devices/android-device/sample-android-project#4-troubleshooting)

## 3. Sample Android Project

If you've struggled to config XML settings, let's check out this simple project that we've configured:

Github Link: <https://github.com/ProxymanApp/OKHTTP-Android-Sample>

{% content-ref url="/pages/-MHZAQR12xFwFLfxLs7y" %}
[Sample Android Project](/debug-devices/android-device/sample-android-project)
{% endcontent-ref %}

## 4. React Native Android app

If you're using React Native for the Android app, please check out the [React Native Page](/debug-devices/react-native).

## 5. Intercept Traffic from embedding WebView

Some Android apps have embedded WebView that requires extra steps in order to intercept HTTPS traffic.

1. Make sure you're able to see other HTTPS traffic from your Android app. It means that you've set up the certificate properly
2. Inject the following code to your WebView

```java
if (Build.VERSION.SDK_INT >= Build.VERSION_CODES.KITKAT) {
    WebView.setWebContentsDebuggingEnabled(true);
}

// The following two lines help with disabling asset caching
webView.getSettings().setAppCacheEnabled(false);
webView.getSettings().setCacheMode(WebSettings.LOAD_NO_CACHE);
```

3\. Open a new Chrome tab on your computer and navigate to `chrome://inspect`

4\. When you open the WebView, the view will appear in your Chrome tab, then you can simply click `inspect` to start using the remote debugger.

## 6. SSL Proxying using Root Device

> Credit for [Shirshak](https://github.com/shirshak55)

If your Android version is below 7 you don't need to do this step. Google added extra security that doesn't allow man-in-middle-app to attack after Android 6. i.e unable to do MITM attack on android apps.

We don't bear any responsibility for problems caused by rooting phones. So please follow the guide at your own risk.

1. Root your phone with `magisk` framework.
2. Install the Root file browser so you can copy and paste files in a restricted system folder.
3. Type the following script in the command line

   ```bash
   $ cd ~/.proxyman
   // We copy certificate to another file name just so we may need it later
   $ cp proxyman-ca.pem temp.pem
   $ hash=$(openssl x509 -inform PEM -subject_hash_old -in temp.pem | head -1)
   $ mv temp.pem "$hash.0"
   ```
4. If you go to `~/.proxyman` folder you must notice a file name starting with numbers with extension
5. Copy that file to your Android.
6. Using root file browser transfer that file to /system/etc/security/cacerts/
7. Enjoy proxying.

{% hint style="info" %}

1. When using Android phones, set the gateway to any wrong IP just so you can be sure all your traffic goes from proxy man proxy only.
2. We can use the macOS sharing feature to create a mobile hotspot. And from an Android phone, you can use Proxyman proxy easily. It is much better because sometimes the router can block requests between mobile and macOS.
   {% endhint %}

## Additional Resources

* Mitmproxy has a useful tutorial on how to install Proxyman Certificate on your Android Emulator: <https://docs.mitmproxy.org/stable/howto-install-system-trusted-ca-android/>


# Automatic Script for Android Emulator

How to set up capture all HTTPS Request Response from Proxyman with Automatic Script

## 1. What's it?

It's too complicated and error-prone if we manually override the HTTP Proxy, Install, and Trust Proxyman Certificate from your Android Emulator.

Thus, Proxyman provides a built-in script to automatically perform it in a second. You can access it from **Certificate Menu -> Install Certificate on Android -> Emulator.**

{% hint style="success" %}
From Proxyman 5.15.0 or later, Proxyman can now install Proxyman certificate into the system-level Store. Make it possible to decrypt all HTTPS from Android Emulators.
{% endhint %}

{% hint style="info" %}
Proxyman nows can works with Google-Play and non Google-Play Emulators. 1 click to override. Refer at [Google-Play Android Emulator with Magisk](/debug-devices/android-device/google-play-android-emulator-with-magisk)
{% endhint %}

<figure><img src="/files/EdIbgbhqXiqU1JfLWxNj" alt="capture traffic from Android Emulator - including Flutter app" width="563"><figcaption></figcaption></figure>

## 2. Benefit?

**1 Click to:**

* **✅ Auto** Override / Revert HTTP Proxy
* **✅ Automatically** download, install, and trust the Proxyman Certificate at the system-level store. Can decrypt all HTTPS from your Emulators. (Available on Proxyman 5.16.0 or later)
* No need **network\_security\_config.xml**
* **✅** Less error-prone and finishes in a few clicks

{% hint style="success" %}
Work with Android Emulator and Android Physical Devices via \`adb\` (Only for Proxyman v5.19.0+)
{% endhint %}

<div data-full-width="true"><figure><img src="/files/BzWIn5XgvbNl9rGx8KmP" alt=""><figcaption><p>Capture and decrypt HTTPS from Android Emulators with Proxyman</p></figcaption></figure></div>

* Install Proxyman Certificate to the system-level Store.

<figure><img src="/files/Fas5taoeL8jRBXnYMXe7" alt=""><figcaption><p>Install Proxyman Certificate to the system-level Store.</p></figcaption></figure>

### ✅ Flutter / React Native app

From Proxyman macOS 6.4.0 or later, Proxyman can capture HTTPS traffic from the Flutter app without a code change required.

Refer [Flutter](/debug-devices/flutter) documentation to know more.

## 3. How to use it?

1. Make sure the adb command is installed. If not, please install it

```bash
brew install android-platform-tools
```

2. Open your Android app with Android Studio
3. Create a new Emulator in Android Virtual Device Manager. **Make sure it's not the Play Store. Must be a Google Play API**

![Create new Google APIs Android Emulators](/files/-MJzcil8BjBKKzfatnn9)

* ✅ NEW: Proxyman now can root Google-Play Store Emulators, please read at [Google-Play Android Emulator with Magisk](/debug-devices/android-device/google-play-android-emulator-with-magisk)

![Create a new Emulator (Google APIs)](/files/-MJzcnRTL09sMj7o_p8d)

<figure><img src="/files/YZDmjQTF7yqtLU5fCU0J" alt=""><figcaption></figcaption></figure>

3. Open Proxyman -> Certificate Menu -> Install Certificate on Android -> Emulators -> Click on the Override All Emulators button

<figure><img src="/files/UhphHnuK6tXvKg8Mcfq2" alt=""><figcaption><p>capture all HTTPS from Emulators with 1 click</p></figcaption></figure>

4. Wait until the Terminal completes

<figure><img src="/files/NYZpcBekVEjNljRNUgkF" alt=""><figcaption></figcaption></figure>

5. Relaunch your Android app on Android Studio
6. Proxyman will capture all HTTPS data ✅

{% hint style="info" %}
If you close Proxyman, make sure to click on the Revert All Changes button. Otherwise, your Android Emulator could not access the Internet.
{% endhint %}

## 4. ⚠️ Proxyman 5.15.0 or earlier

* Proxyman 5.15.0 or earlier is only able to install Proxyman Certificate to the User level.
* It means: We have to complete the next step:
* In your source code:
  * Add res/xml/network\_security\_config.xml

```xml
<network-security-config>
    <debug-overrides>
        <trust-anchors>
            <!-- Trust user added CAs while debuggable only -->
            <certificates src="user" />
            <certificates src="system" />
        </trust-anchors>
    </debug-overrides>

    <base-config cleartextTrafficPermitted="true">
        <trust-anchors>
            <certificates src="system" />
            <certificates src="user" />
        </trust-anchors>
    </base-config>
</network-security-config>
```

* Add to AndroidManifest.xml

<pre class="language-xml"><code class="lang-xml">&#x3C;?xml version="1.0" encoding="utf-8"?>
&#x3C;manifest xmlns:android="http://schemas.android.com/apk/res/android"
    xmlns:tools="http://schemas.android.com/tools">

    &#x3C;uses-permission android:name="android.permission.INTERNET" />

    &#x3C;application
        <a data-footnote-ref href="#user-content-fn-1">android:networkSecurityConfig="@xml/network_security_config"></a>
        &#x3C;activity
            ...
        &#x3C;/activity>
    &#x3C;/application>

&#x3C;/manifest>
</code></pre>

## 5. Advance: Run the script manually

It's possible to execute the script manually in your Terminal app without granting the Automation Permission in Security & Privacy.

### **Script path**:

{% code overflow="wrap" %}

```bash
/Applications/Proxyman.app/Contents/Frameworks/ProxymanCore.framework/Resources/install_certificate_android_emulator.sh
```

{% endcode %}

* For Proxyman 51.9.0 or later

{% code overflow="wrap" %}

```bash
Usage: /Applications/Proxyman.app/Contents/Frameworks/ProxymanCore.framework/Resources/install_certificate_android_emulator.sh -m <mode> [options]

Modes:
  all             Set proxy and install certificate
  proxy           Set proxy only
  revertProxy     Revert proxy settings only
  certificate     Install certificate only

Required Options based on Mode:
  -m, --mode <mode>              : Operation mode (all, proxy, revertProxy, certificate)
  -i, --ip <ip_address>          : IP address (required for all, proxy, certificate)
  -p, --port <port_number>       : Port number (required for all, proxy, certificate)
  -c, --cert <path_to_cert.pem>  : Path to Proxyman certificate (required for all, certificate)

Optional Options:
  --include-physical            : Include physical devices (default: only emulators)
  -h, --help                    : Show this help message
```

{% endcode %}

### Prepare the certificate

1. Open the Proxyman app
2. Find the current IP in the Main Toolbar
3. Certificate menu -> Export -> Root Certificate as PEM -> Save to Desktop folder

### 4.1 Override HTTP Proxy and Install the Certificate to system-level Store

* Proxyman v5.19.0 or later (NEW)

{% code overflow="wrap" %}

```bash
bash /Applications/Proxyman.app/Contents/Frameworks/ProxymanCore.framework/Resources/install_certificate_android_emulator.sh --mode all --ip <current_ip> --port <port> --cert <certificate_path>
```

{% endcode %}

* Proxyman v5.18.0 or earlier

{% code overflow="wrap" %}

```bash
bash /Applications/Proxyman.app/Contents/Frameworks/ProxymanCore.framework/Resources/install_certificate_android_emulator.sh all <current_ip> <port> <certificate_path>
```

{% endcode %}

### 4.2 Only Override HTTP Proxy

* Proxyman v5.19.0 or later (NEW)

{% code overflow="wrap" %}

```bash
bash /Applications/Proxyman.app/Contents/Frameworks/ProxymanCore.framework/Resources/install_certificate_android_emulator.sh --mode proxy --ip <current_ip> --port <port>
```

{% endcode %}

* Proxyman v5.18.0 or earlier

{% code overflow="wrap" %}

```bash
bash /Applications/Proxyman.app/Contents/Frameworks/ProxymanCore.framework/Resources/install_certificate_android_emulator.sh proxy <current_ip> <port> 
```

{% endcode %}

### 4.3 Revert HTTP Proxy

* Proxyman v5.19.0 or later (NEW)

{% code overflow="wrap" %}

```bash
bash /Applications/Proxyman.app/Contents/Frameworks/ProxymanCore.framework/Resources/install_certificate_android_emulator.sh --mode revertProxy
```

{% endcode %}

* Proxyman v5.18.0 or earlier

{% code overflow="wrap" %}

```bash
bash /Applications/Proxyman.app/Contents/Frameworks/ProxymanCore.framework/Resources/install_certificate_android_emulator.sh revertProxy
```

{% endcode %}

[^1]: This line


# Google-Play Android Emulator with Magisk

How to use Proxyman to root your Google-Play Android Emulators, so Proxyman can capture HTTPS from your Android app

## 1. What's it?

From Proxyman macOS 6.14.0 or later, Proxyman can do

* Override HTTPS proxy
* Install Proxyman Certificate to system store

to Google Play Android Emulator version ✅ (API 30+)

## 2. How to use it

1. Open Proxyman macOS 6.14.0 or later
2. Start your Android Emulators: Works with non Google Play Version and Google-Play version
3. Certificate Menu -> Install certificates for Androids -> Emulators
4. Check "Root Google Play Emulators with Magisk" checkbox
5. Override your Emulators
6. Done ✅

<figure><img src="/files/jFviHmxgkXRiDhg96NMa" alt="Override and Root Google Play Store with magisk"><figcaption></figcaption></figure>

## 3. How does it work?

* Proxyman bundles the Magisk.apk in the app and use it to root your Emulators with 1 click.
* You can audit at /Applications/Proxyman.app/Contents/Frameworks/ProxymanCore.framework/Versions/A/Resources/Magisk


# Sample Android Project

A Sample Android Project to demonstrate on how to use Proxyman with Android

## 1. What's it?

Sample Kotlin Android Project to demonstrate how Proxyman can capture & decrypt HTTPS data from OKHTTP library

<figure><img src="/files/BzWIn5XgvbNl9rGx8KmP" alt=""><figcaption><p>Capture and decrypt HTTPS traffic from Android</p></figcaption></figure>

## 2. Download

Download at <https://github.com/ProxymanApp/OKHTTP-Android-Sample>


# Firefox

How to capture HTTPS Reqyests/Responses from Firefox Browser with Proxyman

## ✅ New Solution (Proxyman v5.19.0 or later - recommended)

With Proxyman v5.19.0+, Proxyman can capture HTTPS Requests/Responses from Firefox with 1-click setup.

1. Go to Setup Menu -> Automatic Setup
2. On the Web Browser Section -> Click the ⬇️ Arrow Button -> Select Firefox

<figure><img src="/files/nHjBAsQMPZo7e437qWlr" alt=""><figcaption><p>How to capture HTTPS Reqyests/Responses from Firefox Browser with Proxyman</p></figcaption></figure>

3. New Firefox instance will open
4. ✅ Done. All traffic from Firefox will be captured by Proxyman

This setup will make Firefox or Google Chrome:

* Auto set Proxyman to Proxyman
* Auto install & trust Proxyman Certificate

{% hint style="success" %}
Works with Google Chrome and Firefox
{% endhint %}

## ❌ Old Solution (Proxyman v5.18.0 or ealier)

In order to intercept HTTPS traffic from Firefox, it requires extra steps to install Proxyman CA into Firefox's Trust Store.

### 1. Install Proxyman CA on macOS machine

Before installing Proxyman CA on Java VMs, we have to install it properly on your current machine.

Check out macOS Guidelines:

{% content-ref url="/pages/-LlQ11LV9KVIfRygaCPn" %}
[macOS](/debug-devices/macos)
{% endcontent-ref %}

If you've done this step, you can skip to the next step.

### 2. Set Proxy on Firefox

* Open Firefox's Preferences panel (CMD+,)
* Search Proxy and open the Proxy Settings
* Select Auto Use System Proxy or manually hardcode the Proxy IP and Port

![](/files/-MH_Hi8ciXNj2TC6323L)

### 3. Install Proxyman CA to Firefox

1. Open `http://proxy.man/ssl` on Firefox and download the certificate to your Download folder

{% hint style="info" %}
<http://proxy.man/ssl> is a local HTTP Server for strengthening the security. Please make sure the Proxyman app is open when accessing this domain.
{% endhint %}

2\. Open Firefox's Preferences (CMD+,) and openthe View Certificate window

![](/files/-MAUH9ID3Ks0R5MuU0L6)

3\. Open the Authorities Tab and select the Import button

![](/files/-MAUHITJp-gj9-hSheNW)

4\. Select Proxyman CA, which you've downloaded and Trust all.

![](/files/-MAUHTWo97fQnsijXTbu)

5\. Reload the page that you need to intercept. Enjoy!


# Java VMs

How to install Root CA Certificate to all Java store on macOS

In order to intercept HTTPS traffic from Java apps, extra steps are required to install the Proxyman CA Certificate into the Java Key Store.

* Intercept Traffic from Unit Test (written by Java or Kotlin)
* Intercept Traffic from Java app or CLI

## 1. Benefit

* Proxyman provides a script to help developers automatically install Root Certificate to Java KeyStore with 1 click ✅
* Support `$JAVA_HOME`
* Support `SDKMAN`
* Support `/usr/libexec/java_home`

## 2. How to use?

### 1. Install Proxyman CA on your Mac

Before installing Proxyman CA on Java VMs, we have to install it properly on your current Mac machine.

Check out the macOS Guideline:

{% content-ref url="/pages/-LlQ11LV9KVIfRygaCPn" %}
[macOS](/debug-devices/macos)
{% endcontent-ref %}

You can skip and start the next step if you've done this step.

## 2. Install Proxyman CA to all Java Key Stores

* Certificate Menu -> Install Certificate on Java VMs -> Run Scripts

![Run Java script](/files/7pmGiHRc7yk79H3cIOW3)

* The script will attempt to find the Key Store location from **JAVA\_HOME, SDKHOME,** or from **$(/usr/libexec/java\_home)** environment and install the CA Certificate if possible

<figure><img src="/files/6GTBM66wL2m4BOOu3nzM" alt=""><figcaption><p>Proxyman install the certificate to all Java Trust Store if possible</p></figcaption></figure>

{% hint style="info" %}
You can find the script at /Applications/Proxyman.app/Contents/Frameworks/ProxymanCore.framework/Versions/A/Resources/install-certificates-java.sh
{% endhint %}

{% hint style="info" %}
The script might require permission for EventKit because Proxyman triggers the script by [Apple Script](https://developer.apple.com/library/archive/documentation/AppleScript/Conceptual/AppleScriptLangGuide/introduction/ASLR_intro.html) in order to install it under admin permission.
{% endhint %}

### Alternative solution

* Check out @[**yauheniprakapenka**](https://github.com/yauheniprakapenka) solution: <https://github.com/ProxymanApp/Proxyman/issues/569#issuecomment-723588490> if you get the following error

`sun.security.validator.ValidatorException: PKIX path building failed: sun.security.provider.certpath.SunCertPathBuilderException: unable to find valid certification path to requested target javax.net.ssl.SSLHandshakeException: sun.security.validator.ValidatorException: PKIX path building failed: sun.security.provider.certpath.SunCertPathBuilderException: unable to find valid certification path to requested target`


# Python

Capture HTTP/HTTPS traffic from Python with Proxyman

## 1. New Automatic Solution (v4.7.0 or later) ✅

Proxyman v4.7.0 or later can capture HTTP/HTTPS traffic from Python with 1-click.

* 1-click solution: No need to manually set HTTP Proxy config or trust the self-signed certificate.
* Support many Python libraries: request, http.client, urllib3, httpx and aiohttp

### How to use:

1. Open Proxyman -> Setup Menu -> Automatic Setup
2. Click on "Open New Terminal"
3. Accept the Apple Script permission prompt if needed
4. The New Terminal app is launched -> You can start your Python Backend Server, or Run scripts => Proxyman automatically captures all traffic.
5. Done ✅

<figure><img src="/files/dr4sOSxh55sWCPkGY65C" alt=""><figcaption><p>Capture NodeJS Traffic with Proxyman</p></figcaption></figure>

Please check out the Automatic Setup page:

{% content-ref url="/pages/8HduLQAFcllaS3GbigwH" %}
[Automatic Setup](/automatic-setup/automatic-setup)
{% endcontent-ref %}

##

## 2. Old Solution (Not recommended) ❌

### 1. Script Approach

1. Use [the following script ](https://github.com/ProxymanApp/Proxyman/issues/1220#issuecomment-1249090359)to automatically install/remove the certificate to Python.
2. Save the script to \~/desktop file with the name is `script.py`

* Add Certificate:

```bash
$ python3 script.py add
```

* Remove Certificate

```
$ python3 script.py remove
```

{% hint style="info" %}
For macOS 12.2 or later, make sure you use `python3`

Credit to [@novitae](https://github.com/novitae)
{% endhint %}

### 2. Manual Approach

### - Install Proxyman on the Python environment

By default, Python on macOS doesn't trust Proxyman self-signed certificates. As a result, you might encounter SSL Error if you try to intercept HTTPS traffic.

If you would like to intercept HTTPS Traffic from your Python script, you have to explicitly **tell Python to use the Proxyman Root Certificate** at `~/.proxyman/proxyman-ca.pem`

Please follow the guideline:

1. Install Proxyman Certificate on Mac (If you've done it, please skip it. If not, please check out [MacOS Guideline](/debug-devices/macos#install-certificates-on-macos)).
2. Run the following CLI on your Terminal app

```bash
$ export SSL_CERT_FILE=~/.proxyman/proxyman-ca.pem
$ export REQUESTS_CA_BUNDLE=~/.proxyman/proxyman-ca.pem
$ echo "export REQUESTS_CA_BUNDLE=~/.proxyman/proxyman-ca.pem" >> ~/.bash_profile ; source ~/.bash_profile
```

3\. Done.

### - Revert the change

If you don't use Proxyman, please revert the change by commenting out:

```bash
# export REQUESTS_CA_BUNDLE=~/.proxyman/proxyman-ca.pem
```

in \~/.bash\_profile

## 3. Troubleshooting

#### 3.1 Proxyman could not capture HTTP traffic from my Python code.

**Solution**: Please use the [Automatic Setup](/automatic-setup/automatic-setup).

### Reference

* <https://github.com/ProxymanApp/Proxyman/issues/948#issuecomment-890520435>
* <https://github.com/ProxymanApp/Proxyman/issues/1220>


# Ruby

Capture HTTP/HTTPS Traffic from Ruby with Proxyman

## 1. New Automatic Solution (v4.7.0 or later) ✅

Proxyman v4.7.0 or later can capture HTTP/HTTPS traffic from Ruby with 1-click.

* 1-click solution: No need to manually set HTTP Proxy config or trust the self-signed certificate.
* Support many Ruby libraries: http, net/http, net/https, httparty, and faraday.

### How to use:

1. Open Proxyman -> Setup Menu -> Automatic Setup
2. Click on "Open New Terminal"
3. Accept the Apple Script permission prompt if needed
4. The New Terminal app is launched -> You can start your Ruby Backend Server, or Run scripts => Proxyman automatically captures all traffic.
5. Done ✅

<figure><img src="/files/dr4sOSxh55sWCPkGY65C" alt=""><figcaption><p>Capture Traffic from Ruby</p></figcaption></figure>

## 2. Old Solution (Not Recommended)

### 1. Set HTTP Proxy to Ruby

Net::HTTP will automatically create a proxy from the `http_proxy` environment variable if it is present.

So you can use:

```bash
ENV['http_proxy'] = 'http://127.0.0.1:9090' # your http://address:port here
```

and Net::HTTP will use it for all requests by default.

Ref: <https://stackoverflow.com/questions/15792999/how-to-set-a-proxy-in-rubys-net-http>

### 2. Install Proxyman Certificate on Ruby

By default, **Ruby** on macOS might not trust Proxyman's self-signed certificate. As a result, you might encounter SSL Error if you try to intercept HTTPS traffic.

You can explicitly tell Ruby to use Proxyman Certificate by using `SSL_CERT_FILE` env.

```bash
$ env SSL_CERT_FILE=~/.proxyman/proxyman-ca.pem ruby my_script.rb
```


# NodeJS

Capture HTTP/HTTPS traffic from NodeJS with Proxyman

## 1. New Automatic Solution (v4.7.0 or later) ✅

Proxyman v4.7.0 or later can capture HTTP/HTTPS traffic from NodeJS with 1-click.

* 1-click solution: No need to manually set HTTP Proxy config or trust the self-signed certificate.
* Support many NodeJS libraries: axios, got, superagent, fetch, and node-fetch

### How to use:

1. Open Proxyman -> Setup Menu -> Automatic Setup
2. Click on "Open New Terminal"
3. Accept the Apple Script permission prompt if needed
4. The New Terminal app is launched -> You can start your NodeJS Backend Server, or Run scripts => Proxyman automatically captures all traffic.
5. For example:

```
$ npm start
```

Done ✅

<figure><img src="/files/dr4sOSxh55sWCPkGY65C" alt=""><figcaption><p>Capture NodeJS Traffic</p></figcaption></figure>

Please check out the Automatic Setup page:

{% content-ref url="/pages/8HduLQAFcllaS3GbigwH" %}
[Automatic Setup](/automatic-setup/automatic-setup)
{% endcontent-ref %}

## 2. Old Solution (Not recommended) ❌

There are common problems when using NodeJS + Proxyman:

### 1. Proxyman could not capture <http://localhost:3000> requests to my NodeJS Server

If you're using NodeJS to serve a localhost website (e.g <http://localhost:3000>), Proxyman might not work. For example: Use ExpressJS to serve an API Server at <http://localhost:3000>

### Solution:

Please check out this solution.

### 2. Proxyman could not capture HTTP requests, which are called from my NodeJS local server.

* I use [fetch](https://www.npmjs.com/package/node-fetch) or [axios](https://github.com/axios/axios) doesn't show on the Proxyman app
* Get SSL Error from HTTPS Requests

### Solution

By default, all HTTP/HTTPS requests which are called from your NodeJS library don't go through HTTP Proxy Server. Thus, Proxyman could not capture the traffic.

### 1. node-fetch

1. Install [global-agent](https://github.com/gajus/global-agent) package

```bash
npm install global-agent
```

2\. At the top of your NodeJS code, add the following code:

```javascript
import { bootstrap } from 'global-agent';
bootstrap();
process.env['NODE_TLS_REJECT_UNAUTHORIZED'] = '0';
```

3\. Add this env to your current bash. Make sure Proxyman is listening at port 9090

```
export GLOBAL_AGENT_HTTP_PROXY=http://127.0.0.1:9090
```

4\. Done ✅

Run your NodeJS Script again and the HTTP/HTTPS request would appear on the Proxyman app.

#### Sample code

```javascript
import fetch from 'node-fetch';

// Setup global-agent
import { bootstrap } from 'global-agent';
bootstrap();
process.env['NODE_TLS_REJECT_UNAUTHORIZED'] = '0';

// fetch the data
const response = await fetch('https://httpbin.org/get?id=123');
const data = await response.json();

// Done
console.log(data);
```

### 2. Axios

According to Axios Documentation, we can simply provide the HTTP\_PROXY and HTTPS\_PROXY environment.

1. Click on the Proxyman Status Menu
2. Copy Shell Command

<figure><img src="/files/OJMQSXgLTkYQt7aDyVTq" alt=""><figcaption></figcaption></figure>

3. Open the Terminal and run the paste content: For example export https\_proxy=<http://192.168.1.103:9090> http\_proxy=<http://192.168.1.103:9090>
4. On the same Terminal -> Start your NodeJS Server with axios.
5. Axios will proxy the traffic to Proxyman.
6. Done ✅

### 3. I use different NodeJS Library

If you're not using fetch or axios, the configuration might be different. Please check out your lib Document to see how to set the proxy and trust the Proxyman certificate.

* Discussion at <https://github.com/ProxymanApp/Proxyman/issues/236>


# Rust

## 1. Problem

Proxyman can't automatically capture HTTP/HTTPS traffic which is called from `reqwest` in Rust because of:

* `reqwest` doesn't respect the system HTTP Proxy -> No traffic goes through Proxyman
* `reqwest` doesn't trust any self-signed Proxyman Certificate -> Get SSL Error

## 2. Solution

* Manually set the Proxy to Proxyman at `http://localhost:9090`
* Disable SSL Verification

```rust
use anyhow::Result;
use reqwest::Url;

#[tokio::main]
async fn main() -> Result<()> {
    let proxy_url = Url::parse("http://localhost:9090")?;
    let client = reqwest::Client::builder()
        .danger_accept_invalid_certs(true) // trust self-signed certificate
        .proxy(reqwest::Proxy::https(proxy_url)?) // Proxy to Proxyman
        .build()?;
    let response = client.get("https://httpbin.org/get").send().await?;

    if response.status().is_success() {
        let body = response.text().await?;
        println!("Response Text: {}", body);
    } else {
        println!("Request failed with status: {}", response.status());
    }

    Ok(())
}
```


# Golang

Capture HTTP/HTTPS from Golang application (net/http, fasthttp, resty, gorequest, req, grequests) with Proxyman

## 1. New Automatic Solution (macOS v5.17.0 or later) ✅

Proxyman macOS v5.17.0 or later can capture HTTP/HTTPS traffic from Golang with 1-click.

* 1-click solution: No need to manually set HTTP Proxy config or trust the self-signed certificate.
* ✅ Support many Go Network Libraries: net/http, fasthttp, resty, gorequest, req, grequests

### How to use:

1. Open Proxyman -> Setup Menu -> Automatic Setup
2. Select your favorite Terminal -> Click on the "Open New Terminal" button
3. Accept the Apple Script permission prompt if needed

<figure><img src="/files/TYsuFTzSfqWzPsVm8WRe" alt=""><figcaption><p>Open Pre-configured Terminal to intercept GO network https</p></figcaption></figure>

4. The New Terminal app is launched -> You can start your Golang Backend Server, or Run scripts => Proxyman automatically captures all traffic.
5. For example:

```
$ go run main.go
```

6. Proxyman captures all internal HTTP/HTTPS from go, including net/http

<figure><img src="/files/N0PshaKQxgLWdCvRdJmu" alt=""><figcaption><p>capture and intercept HTTPS traffic from net/http go</p></figcaption></figure>

* Go Example Code: <https://github.com/ProxymanApp/golang-example>

## 2. Old Solution (Not recommended ❌)

* Proxyman can't capture any HTTP/HTTPS traffic from the Golang Server.
* The reason is that some network libraries (such as net/http) won't respect the System HTTP Proxy, so no traffic goes through the Proxyman app.

### 2.1 Solution

#### net/http

1. Config Proxy to Proxyman, by default, it's at IP = localhost, port 9090
2. Tell the Transport to trust Proxyman self-signed certificate. Otherwise, you will get an SSL Error because net/http rejects.

```go
package main

import (
	"crypto/tls"
	"fmt"
	"io/ioutil"
	"log"
	"net/http"
	"net/url"
)

func main() {
	// Create a new HTTP client
	client := &http.Client{}

	// Configure the proxy
	proxyURL, err := url.Parse("http://localhost:9090")
	if err != nil {
		log.Fatal("Error parsing proxy URL:", err)
	}

	// Configure transport with proxy and TLS settings
	transport := &http.Transport{
		Proxy: http.ProxyURL(proxyURL),
		TLSClientConfig: &tls.Config{
			InsecureSkipVerify: true, // This allows self-signed certificates
		},
	}

	// Set the transport for the client
	client.Transport = transport

	// Make a request
	resp, err := client.Get("https://example.com")
	if err != nil {
		log.Fatal("Error making request:", err)
	}
	defer resp.Body.Close()

	// Read the response body
	body, err := ioutil.ReadAll(resp.Body)
	if err != nil {
		log.Fatal("Error reading response:", err)
	}

	// Print the response
	fmt.Printf("Status: %s\n", resp.Status)
	fmt.Printf("Body: %s\n", string(body))
}

```


# React Native

Capture HTTPS Traffic from React Native app with Proxyman. Worked with iOS and Android devices/simulators

## 1. React Native - iOS

* If you're using React Native for the iOS app, you can simply follow the iOS Guidelines. There is no difference from the iOS native app.
* Works with Expo or Metro bundler

{% content-ref url="/pages/-LlQ19ku2tYS3NsRLWXo" %}
[iOS Device](/debug-devices/ios-device)
{% endcontent-ref %}

{% content-ref url="/pages/-LlQ1Bhv9TgSkeXN8TYp" %}
[iOS Simulator](/debug-devices/ios-simulator)
{% endcontent-ref %}

## 2. React Native - Android

Basically, To capture HTTP/HTTPS traffic from React Native for Android apps, it's similar to the native Android app. Please follow the Android Setup Guide:

* [Android Physical Device](/debug-devices/android-device)
* [Android Emulator](#android-emulator)

{% hint style="warning" %}
Make sure you've followed all steps in the Guideline, especially the **5th step**, where you add the **res/xml/network\_security\_config.xml** and **AndroidManifest.xml**

Otherwise, Proxyman could not decrypt the SSL connection.
{% endhint %}

## 3. Troubleshooting - Android

### 3.1 Metro bundle errors

After setting the HTTP Proxy from your Android to Proxyman, you might encounter the following error because Metro Bundle could not connect to its local server.

<figure><img src="/files/UQMpgAYqQlWVWmWEYxXs" alt=""><figcaption><p>Metro bundle errors</p></figcaption></figure>

To fix it:

#### Android Emulator

1. Open Proxyman -> Certificate menu -> Install for Android -> Emulator -> Click on the "Revert the Proxy"
2. Open Android Emulator -> Setting App -> Network -> Wifi -> Find a way to change the proxy
3. Change the HTTP Proxy manually by using the **Proxyman IP & Port**. If you don't know what the IP & Port is, open the Certificate menu -> Install for Android -> Physical Device -> In the 2nd section. Find the Server IP & Port.
4. Before saving, enter the `localhost` in the bypass Proxy List ✅

![CleanShot 2023-04-05 at 22 28 12 2@2x](https://user-images.githubusercontent.com/5878421/230129476-4bd5d1a0-c3c5-4c73-bb79-81f14a071e63.jpg)

5. Done
6. `The Bridge Was shutdown` warning and the metro bundle errors are gone ✅

#### Android Physical Device

1. Open Android Physical Device -> Setting App -> Network -> Wifi -> Find a way to change the proxy
2. Change the HTTP Proxy manually by using the Proxyman IP & Port. If you don't know what the IP & Port is, open the Certificate menu -> Install for Android -> Physical Device -> In the 2nd section. Find the Server IP & Port.
3. Before saving, enter them `your IP` in the bypass Proxy List ✅
4. Done

Read more at: <https://github.com/ProxymanApp/Proxyman/issues/1407#issuecomment-1497235102>


# Flutter

How to use Proxyman to capture HTTPS traffic. Works with iOS and Android Devices and Simulators

## ✅ 1. New Solution

{% hint style="success" %}
From Proxyman 6.4.0 or later, or Windows/Linux 3.7.0 or later
{% endhint %}

### Android Emulators

Proxyman can capture HTTPS from your Flutter app on the Android Emulator in 1 click. No need to modify your Flutter code, like the old solution.

1. Start Proxyman -> Certificate Menu -> Install Certificate for Android -> Emulators
2. Make sure set up your Android Emulator first, and the Android must is Google APIs.

Refer [Automatic Script for Android Emulator](/debug-devices/android-device/automatic-script-for-android-emulator)to understand how to set up your Android Emulators

3. Check "Install Proxyman VAN to Android Emulators"
4. Click "Override All Emulators"

<figure><img src="/files/EdIbgbhqXiqU1JfLWxNj" alt="capture https from Flutter app Android Emulator with Proxyman"><figcaption><p>Capture https from Flutter app Android Emulator with Proxyman</p></figcaption></figure>

5. New Terminal will open and execute our bash script to override your Emulators.
6. When it's done, a New VPN App is installed to your Emulators
7. Click to the VPN button to start it -> Done ✅
8. Try to open your Flutter app, and make HTTPS Requests, Proxyman will capture it ✅

<figure><img src="/files/PVE7smmWam5HTv8aOI6a" alt="Local VPN, routes all traffic to Proxyman app. Works with Flutter, React Native apps" width="563"><figcaption></figcaption></figure>

## ⚠️ 2. Old Solution

{% hint style="warning" %}
Old solution works with Proxyman macOS 6.3.0 and earlier, Windows/Linux 3.6.0 and earlier
{% endhint %}

### 2.1 Problem

[Flutter does not use the system-level proxy](https://github.com/flutter/flutter/issues/20376), so if you use Proxyman, you might not see any traffic from your Flutter Project.

The good news is that you can work around this issue by manually configuring Flutter’s HTTP client to use Proxyman as its proxy.

In general, we have to manually configure the HTTP Client to proxy all traffic to Proxyman Proxy Server, which is listening at IP = localhost, port = 9090.

#### 1. Set up Flutter (Required for all platforms - iOS & Android)

Depending on which HTTP client you’re using, the steps will be slightly different. We will cover some popular HTTP Clients:

* Dart’s [HttpClient](https://api.dartlang.org/stable/2.4.1/dart-io/HttpClient-class.html) class
* The [http](https://pub.dev/packages/http) package
* [Dio](https://pub.dev/packages/dio)

If you're using an Android Emulator or an iOS Simulator, you can use `String proxy = 'localhost:9090'`. Otherwise, please use `String proxy = '<YOUR_LOCAL_IP>:9090'` on Android Physical Devices.

You can find the \<YOUR\_LOCAL\_IP> from the Proxyman -> Certificate menu -> Install for iOS -> Physical Device

<figure><img src="/files/OSF3ioPQGdJvTkKrcvK6" alt=""><figcaption><p>Use current IP</p></figcaption></figure>

Depending on the network library that your Flutter is using, please follow the settings below:

#### Dart HTTPClient Class

```dart
// Make sure to replace <YOUR_LOCAL_IP> with 
// the external IP of your computer if you're using Android. 
// You can get the IP in the Android Setup Guide window
String proxy = Platform.isAndroid ? '<YOUR_LOCAL_IP>:9090' : 'localhost:9090';

// Create a new HttpClient instance.
HttpClient httpClient = HttpClient();

// Hook into the findProxy callback to set
// the client's proxy.
httpClient.findProxy = (uri) {
  return "PROXY $proxy;";
};

// This is a workaround to allow Proxyman to receive
// SSL payloads when your app is running on Android
httpClient.badCertificateCallback = (cert, host, port) => true;
```

#### HTTP Package

```dart
// Make sure to replace <YOUR_LOCAL_IP> with 
// the external IP of your computer if you're using Android. 
// You can get the IP in the Android Setup Guide window
String proxy = Platform.isAndroid ? '<YOUR_LOCAL_IP>:9090' : 'localhost:9090';

// Create a new HttpClient instance.
HttpClient httpClient = HttpClient();

// Hook into the findProxy callback to set
// the client's proxy.
httpClient.findProxy = (uri) {
  return "PROXY $proxy;";
};

// This is a workaround to allow Proxyman to receive
// SSL payloads when your app is running on Android.
httpClient.badCertificateCallback = (cert, host, port) => true;

// Pass your newly instantiated HttpClient to http.IOClient.
IOClient myClient = IOClient(httpClient);

// Make your request as normal.
final response = myClient.get('/my-url');
```

### Dio ≥ v5.0.0 (Recommended)

```dart
// Make sure to replace <YOUR_LOCAL_IP> with 
// the external IP of your computer if you're using Android. 
// You can get the IP in the Android Setup Guide window
String proxy = Platform.isAndroid ? '<YOUR_LOCAL_IP>:9090' : 'localhost:9090';

// Create a new Dio instance.
Dio dio = Dio();

dio.httpClientAdapter = IOHttpClientAdapter(
  createHttpClient: () {
    final client = HttpClient();
    client.findProxy = (uri) {
      return 'PROXY $proxy';
    }
    client.badCertificateCallback = (cert, host, port) => true;
    return client;
  },
  validateCertificate: (cert, host, port) {
    return true;
  },
); 
```

#### Dio ＜ v5.0.0 (Deprecated APIs)

```dart
// Make sure to replace <YOUR_LOCAL_IP> with 
// the external IP of your computer if you're using Android. 
// You can get the IP in the Android Setup Guide window
String proxy = Platform.isAndroid ? '<YOUR_LOCAL_IP>:9090' : 'localhost:9090';

// Create a new Dio instance.
Dio dio = Dio();

// Tap into the onHttpClientCreate callback
// to configure the proxy just as we did earlier.
(dio.httpClientAdapter as DefaultHttpClientAdapter).onHttpClientCreate = (client) { 
  // Hook into the findProxy callback to set the client's proxy.
  client.findProxy = (url) {
    return 'PROXY $proxy'?;
  };
  
  // This is a workaround to allow Proxyman to receive
  // SSL payloads when your app is running on Android.
  client.badCertificateCallback = (X509Certificate cert, String host, int port) => true;
}
```

### 2. Flutter with iOS Simulators

1. Start your iOS Simulator from Flutter
2. On Proxyman -> Certificate menu -> Install Certificate for iOS -> Simulators
3. Follow all steps below

<figure><img src="/files/BPwQoJhgnDk0Y7t4SNKm" alt=""><figcaption><p>Install &#x26; trust Proxyman certificate to your iOS Simulators</p></figcaption></figure>

4. ✅ Done. Proxyman can capture your HTTPS.

### 3. Flutter with iOS Devices

* Follow this [Setup Guide](/debug-devices/ios-device)

### 4. Flutter with Android Emulator

* Follow this [Setup Guide](/debug-devices/android-device/automatic-script-for-android-emulator)

### 5. Flutter with Android Devices

* Follow this [Setup Guide](/debug-devices/android-device)

#### Credit & Reference

Credit to James Dixon from <https://flutterigniter.com/debugging-network-requests/>


# HTTP Clients

### 1. Problems

Proxyman might not capture or get SSL Error from HTTP/HTTPS Requests, which makes from some HTTP Clients, such as [Postman](https://www.postman.com/), [Insomnia Rest](https://insomnia.rest/), and [Paw](https://paw.cloud/) app.

This documentation would provide a solution to make Proxyman works.

### 2. Postman

1. Open Postman Preference
2. In General Tab -> Uncheck the "SSL certificate validation" checkbox
3. In Proxy Tab -> Check the "Use the System Proxy" and "Respect `HTTP_PROXY` *and `HTTPS_PROXY`* variables".

![Config to make Postman works with Proxyman](/files/Tv78SVpasfEkVQwAzhGo)

### 3. Insomnia Rest

1. Open Insomnia Preference -> General Tab
2. Uncheck the "Validate Certificates" checkbox
3. Check "Enable Proxy" and enter `localhost:9090` in HTTP Proxy and HTTPS Proxy Textbox.

![Config to make Insomnia Rest works with Proxyman](/files/tReP8MzMyYh0ELhfsLxw)

### 4. Paw

By default, Paw app uses the System Proxy Configuration. Thus, Proxyman can work out of the box.

If you don't see any Paw traffic from Proxyman, please double-check:

1. Open Paw Preference.
2. Make sure you're using System Proxy Configuration in the Proxy Setting.

![Paw and Proxyman](/files/9x5d2siCUQvfIH5ER9iW)


# Docker

### 1. Capture traffic from your Docker Container

By default, Proxyman can capture all traffic that you access from your Docker Container if you access it from your Mac Devices.

To elaborate, here is the sample Docker Container:

1. Set up a simple HTTP Server by NodeJS + Express. Then Dockerizing it. You can find it at <https://nodejs.org/en/docs/guides/nodejs-docker-webapp/>
2. Makes sure we expose your server via port 8080.
3. You can verify it by opening <http://localhost:8080> on Safari.

### 2. Capture traffic inside Docker Containers

Read more at <https://github.com/ProxymanApp/Proxyman/issues/419#issuecomment-1059096490>

### 3. Alternative Solution:

1. Add docker-compose.proxyman.yml. Replace \<php8.1-fpm-xdebug> with your service

```yaml
version: '2'
services:
  php8.1-fpm-xdebug:
    environment:
      HTTP_PROXY: host.docker.internal:9090
      HTTPS_PROXY: host.docker.internal:9090
      http_proxy: host.docker.internal:9090
      https_proxy: host.docker.internal:9090
```

2. Start the Docker:

`docker-compose -f docker-compose.yml -f docker-compose.proxyman.yml up -d`

Ref: <https://github.com/ProxymanApp/Proxyman/issues/1712#issuecomment-1642279537>


# ElectronJS

Explain how to set up your Electron JS App, so Proxyman can capture HTTP/HTTPS

## 1. Problem

Many ElectronJS apps are unaware of System Proxy; it doesn't respect the System HTTP Proxy, so Proxyman can't capture HTTP/HTTPS from this app :x:

## 2. Solution

From Proxyman macOS 6.7.0 or later

* Capture HTTP/HTTPS from ElectronJS app
* 1-click to set up
* No modify the source code, it just works :white\_check\_mark:

## 3. How to use

1. Start Proxyman app: Make sure you've already installed & trusted Proxyman Certificate to your Mac. If not, you can follow the guide from the Certificate Menu -> Install Certificate on this Mac -> Automatic Tab
2. Open the Setup Menu -> Automatic Setup
3. Click on the "Select Electron App" button and select the app you'd like to capture (Make sure to kill your Electron App first)
4. Done :white\_check\_mark:

<figure><img src="/files/zb3Q8qjnh2jpq50Yoyx8" alt="Captuer HTTP from Electron App with Proxyman"><figcaption></figcaption></figure>


# NextJS (fetch)

how to capture HTTPS Request Response from NextJS with Server Side Rendering (fetch)

## 1. Problem

* Proxyman can't capture any traffic from the \`use server\` from NextJS
* It's because the \`fetch\` from NextJS doesn't respect the System HTTP Proxy. Therefore, no traffic goes through the Proxyman app.

## 2. Solution

1. Start the Pre-configure Terminal on Tools -> Setup -> Automatic Setup -> Click on "Open New Terminal"
2. New Terminal is opened -> Start your NextJS server on this Terminal. For example: \`npm run dev\`
3. Use `no-cache` on `fetch`

```js
export default async function MyPage() {
  const res = await fetch('https://httpbin.org/anything', { cache: 'no-cache' }) // no cache, or no request is sent to Proxyman
  return <div>My Page{res.text()}</div>
}
```

3. Reload your website
4. Done ✅ Your HTTP Traffic is captured by the Proxyman app

<figure><img src="/files/bDN7LTVdm88KvxxChB0A" alt=""><figcaption><p>Capture NextJS fetch on Proxyman</p></figcaption></figure>

## 3. Reference:

* <https://github.com/ProxymanApp/Proxyman/issues/2038>


# Demo iOS & Android

Demonstrate how to capture HTTPS from iOS Simulators and Android Emulators

## 1. 📱 iOS Simulators

### 1.1 Native iOS app - iOS 26 Simulators + Xcode 26

* YouTube: <https://www.youtube.com/watch?v=THzb2e9hoGo>

### 1.2 React Native with Expo with iOS 18 Simulator

* Tutorial: <https://proxyman.com/posts/how-to-capture-https-from-React-native-app-2025-update>
* Demo project: <https://github.com/ProxymanApp/Proxyman-React-Native-Sample-App>
* Youtube: <https://www.youtube.com/watch?v=4LkKXyIPulM>

## 2. 🤖 Android Emulators

### 2.1 Native Android app (Java or Kotlin) with Pixel 6 Pro (Google APIs version) + API 36

* Demo Project: <https://github.com/ProxymanApp/OKHTTP-Android-Sample>
* YouTube: <https://www.youtube.com/watch?v=CWInB7gZj6g>

### 2.2 React Native with Expo | Pixel 9 Pro Google APIs with API 36

* Tutorial: <https://proxyman.com/posts/how-to-capture-https-from-React-native-app-2025-update>
* Demo project: <https://github.com/ProxymanApp/Proxyman-React-Native-Sample-App>
* Youtube: <https://www.youtube.com/watch?v=4LkKXyIPulM>


# Automatic Setup

1-click to capture HTTP/HTPS traffic from NodeJS, Ruby and Python

## 1. Problems

Proxyman **could not capture** HTTP/HTTPS traffic from the following setup:

* **NodeJS**: Axios, got, superagent, fetch, and node-fetch
* **Python**: http, https, aiohttp, requests
* **Ruby**: http, net/http, net/htps, faraday, and httparty, fastlane
* Golang: net/http, fasthttp, resty, gorequest, req, grequests
* ElectronJS
* cURL

It's a known issue since NodeJS, Python, Ruby, and cURL which are executed from the Terminal app, don't respect the system HTTP Proxy. Thus, there is no traffic on Proxyman.

You have to read through the Technical Documentation of each library and manually config:

* The HTTP Proxy
* Trust a self-signed certificate

\=> Time-consuming and error-prone ❌

## 2. Solution: Automatic Setup

### Benefit:

* ✅ **1-click to automatically set up HTTP Proxy & Certificate** on a variety of dev environments
* Capture HTTP(s) traffic from NodeJS, Python, Ruby, Terminal or Web Browser, etc
* Safe. Work on your current session, not affect your OS

### How to use:

1. Open Proxyman -> Setup Menu -> Automatic Setup
2. Click on "Open New Terminal"
3. Accept the Apple Script permission prompt if needed
4. The New Terminal app is launched -> You can start your Backend Server, or Run scripts => Proxyman automatically captures all traffic.
5. Done ✅

<figure><img src="/files/dr4sOSxh55sWCPkGY65C" alt=""><figcaption><p>Start the pre-configured Terminal app</p></figcaption></figure>

<figure><img src="/files/zJB4tqlCkWBfDwRpZwt6" alt=""><figcaption><p>New Terminal app is launched</p></figcaption></figure>

### Notes:

* Only the pre-configured Terminal app is able to capture HTTP traffic out of the box. If you would like to use your own Terminal app (e.g. iTerm2, Hyper, etc), please use the Manual Setup.
* It's totally safe because it runs on your current session. It doesn't alter your System Config.

#### ElectronJS

1. Open the Automatic Terminal
2. Use this command line:

```
open ~/Applications/your_electron_app.app
```

### Support Libraries:

Proxyman (with Automatic Setup) can work out of the box with the following network libraries.

* NodeJS: [axios](https://www.npmjs.com/package/axios), [fetch](https://nodejs.org/dist/latest-v18.x/docs/api/globals.html#fetch) (v18+), [node-fetch](https://www.npmjs.com/package/node-fetch), [got](https://www.npmjs.com/package/got), [https](https://nodejs.org/api/https.html), and [superagent](https://www.npmjs.com/package/superagent)
* Ruby: [http](https://ruby-doc.org/stdlib-3.0.2/libdoc/net/http/rdoc/Net/HTTP.html), [net/http](https://ruby-doc.org/stdlib-2.7.0/libdoc/net/http/rdoc/Net/HTTP.html), [net/https](https://ruby-doc.org/stdlib-2.7.0/libdoc/net/http/rdoc/Net/HTTP.html), [httparty](https://github.com/jnunemaker/httparty), and [faraday](https://github.com/lostisland/faraday), fastlane
* Python: [request](https://pypi.org/project/requests/), [aiohttp](https://docs.aiohttp.org/en/stable/), http.client, urllib3 and httpx
* Golang: net/http, fasthttp, resty, gorequest, req, grequests
* ElectronJS app
* cURL without --proxy flag

{% hint style="success" %}
It's completely **SAFE** since the change only affects your current Terminal Session. It doesn't alter your **bash\_profile** or **zshrc** file.
{% endhint %}

## 3. Advanced: How does it work?

As soon as you click on the "Open New Terminal" button, Proxyman would perform a series of automatic actions:

1. Use AppleScript to start the Terminal app.
2. With the new Terminal app, it starts running this command line:

```bash
set -a && source "$HOME/.proxyman/proxyman_env_automatic_setup.sh" && set +a
```

3. proxyman\_env\_automatic\_setup.sh is a bash script that defines new Variable Environments that helps Proxyman.

For example:

* HTTP\_PROXY & HTTPS\_PROXY env
* PATH
* RUBYLIB
* PYTHONPATH
* NODE\_OPTIONS
* GLOBAL\_AGENT\_HTTP\_PROXY

**NodeJS**:

1. Proxyman prepends a new Node directory into the $PATH env.
2. Monkey-patching the node with a [global-agent ](https://www.npmjs.com/package/global-agent)package, which supports HTTP Proxy for axios, and fetch out of the box

**Ruby**:

1. Override the $RUBYLIB to Proxyman app
2. Patching all common libraries, such as http, net/http and net/https, etc -> Set HTTP Proxy and trust Proxyman self-signed certificate.

**Python**:

1. Override $PYTHONPATH to Proxyman app
2. Patching all common library, such as aiohttp, httplib, http.client -> Set HTTP Proxy and trust Proxyman self-signed certificate.

**Go**:

1. Override HTTP\_PROXY & HTTPS\_PROXY env
2. Override some Go env to trust self-signed certificate

## 4. Troubleshooting

See the [Troubleshooting](/automatic-setup/troubleshooting) page


# Manual Setup

Capture HTTPS Traffic from Ruby, Python or NodeJS with Proxyman

## 1. Problems

Proxyman **could not capture** HTTP/HTTPS traffic from the following setup:

* **NodeJS**: Axios, got, superagent, fetch, and node-fetch
* Python: http, https, aiohttp, requests
* Ruby: http, net/http, net/htps, faraday, httparty and fastlane
* cURL

It's a known issue since NodeJS, Python, Ruby, and cURL which are executed from the Terminal app, don't respect the system HTTP Proxy. Thus, there is no traffic on Proxyman.

You have to read through the Technical Documentation of each library and manually config:

* The HTTP Proxy
* Trust a self-signed certificate

\=> Time-consuming and error-prone ❌

## 2. Solution: Manual Setup

### Benefit:

* ✅ Run on your favorite Terminal app: iTerm2 with Bash, Zsh, and Fish Shell
* Capture HTTP(s) traffic from NodeJS, Python, Ruby, Terminal or Web Browser, etc
* Safe. Work on your current session, not affect your OS

### How to use:

1. Open Proxyman -> Setup Menu -> Manual Setup
2. Open your favorite Terminal app, such as iTerm2
3. Copy & Paste the script to your Terminal -> Run it
4. Done ✅
5. You can start your Backend Server or run a script => Proxyman automatically captures all HTTP/HTTPS traffic out of the box

<figure><img src="/files/BSkt1alz5v66muI9L1uH" alt=""><figcaption><p>Manual Setup</p></figcaption></figure>

### Support Libraries:

Proxyman (with Manual Setup) can work out of the box with the following network libraries.

* NodeJS: [axios](https://www.npmjs.com/package/axios), [fetch](https://nodejs.org/dist/latest-v18.x/docs/api/globals.html#fetch) (v18+), [node-fetch](https://www.npmjs.com/package/node-fetch), [got](https://www.npmjs.com/package/got), [https](https://nodejs.org/api/https.html), and [superagent](https://www.npmjs.com/package/superagent)
* Ruby: [http](https://ruby-doc.org/stdlib-3.0.2/libdoc/net/http/rdoc/Net/HTTP.html), [net/http](https://ruby-doc.org/stdlib-2.7.0/libdoc/net/http/rdoc/Net/HTTP.html), [net/https](https://ruby-doc.org/stdlib-2.7.0/libdoc/net/http/rdoc/Net/HTTP.html), [httparty](https://github.com/jnunemaker/httparty), [faraday](https://github.com/lostisland/faraday), and fastlane
* Python: [request](https://pypi.org/project/requests/), [aiohttp](https://docs.aiohttp.org/en/stable/), http.client, urllib3 and httpx
* cURL without --proxy flag

## 3. Advanced: How does it work?

See the [Automatic Setup: How does it work?](https://docs.proxyman.com/automatic-setup/pages/8HduLQAFcllaS3GbigwH#3.-advanced-how-does-it-work)

## 4. Troubleshooting

See the [Troubleshooting](/automatic-setup/troubleshooting) page


# Troubleshooting

All problems and solutions when you Automatic/Manual Setup

### 1. Automatic Setup does not capture any HTTP Traffic from my new networking library

Proxyman supports the following libraries:

* **NodeJS**: Axios, got, superagent, fetch, and node-fetch
* **Python**: http, https, aiohttp, requests
* **Ruby**: http, net/http, net/htps, faraday, and httparty

-> If you're using a new library and Proxyman Automatic Setup doesn't capture your HTTP/HTTPS traffic, please [create a new ticket](https://github.com/ProxymanApp/Proxyman/issues) to request your library.

### 2. I get SSL Errors from my NodeJS, Ruby, Python script

-> Make sure you've installed & trusted the certificate on macOS. You can easily do it by opening the Certificate Menu -> Install a certificate for Mac.

-> If the bug still happens, it seems there is a bug in the Automatic Setup feature, please [create a new ticket](https://github.com/ProxymanApp/Proxyman/issues) and let us know.

### 3. Proxyman could not record any traffic from my local server, e.g <http://localhost:3000>

By default, Traffic from <http://localhost:3000> doesn't go through the system proxy. Therefore, Proxyman could not capture your traffic.

Please follow this [solution](https://docs.proxyman.io/troubleshooting/couldnt-see-any-request-from-localhost-server) to fix it.


# Atlantis for iOS

## 1. What's it?

A lightweight and powerful iOS framework for intercepting HTTP/HTTPS and WS/WSS traffic from your iOS app. No more messing around with proxy, certificate config.

![iOS Framework for intercepting HTTP/HTTPS traffic](/files/-MKnMEuFoWVFC_kNu_GD)

* **Github**: <https://github.com/ProxymanApp/atlantis>

## 2. Benefit?

* Automatically intercept all **HTTP/HTTPS** Traffic with ease.
* Automatically intercept **WebSocket** from iOS devices.
* Support iOS Physical Devices and Simulators
* **No need** to config HTTP Proxy, Install or Trust any Certificate
* Review traffic logs from [Proxyman](https://proxyman.io/) for the macOS app.
* Categorize the log by app and devices.

{% hint style="info" %}
**Atlantis** is only for **Network Inspectors**. If you would use Debugging Tools like Map Local, Breakpoint, Map Remote, Scripting, Network Throttling, and Reverse Proxy ... please consider using a normal Proxy.
{% endhint %}

![Inspect iOS Traffic from MacOS app](/files/-MKnqa36NL-YcP3YyczB)

## 3. How to install

Please checkout the latest update on Github page: <https://github.com/ProxymanApp/atlantis>


# Proxyman Proxy Helper Tool

Explain what Proxyman Proxy Helper Tool is. Useful to override / revert System HTTP Proxy at launch time. Faster than using networkutils

## Proxyman Proxy Helper Tool

By default, Proxyman will try overriding your HTTP/HTTPS Proxy Config by using the [networksetup](https://www.unix.com/man-page/osx/8/networksetup/) Command-Line. However, the **networksetup** is a bottleneck during starting or quitting the app.

Proxyman offers a better solution: **Proxyman Proxy Helper Tool**, which is a [Privileged Helper Tool macOS](https://developer.apple.com/library/archive/documentation/Security/Conceptual/SecureCodingGuide/Articles/AccessControl.html#//apple_ref/doc/uid/TP40002589-SW2) in order to override Network Proxy in **high performance**.

{% hint style="info" %}
You can notice the performance difference by starting the app with or without the Proxy Setting Tool.
{% endhint %}

At the first launch, Proxyman will present the Popup to install the Proxyman Proxy Helper Tool. You can skip it and install it later in **Preference** -> **Advanced** Tab.

<figure><img src="/files/8c3VbB42AAx111Em6Hga" alt=""><figcaption></figcaption></figure>

{% hint style="info" %}
After the installation, you can find the Helper tool at `/Library/PrivilegedHelperTools/com.proxyman.NSProxy.HelperTool`

If Proxyman releases a new update for Proxy Setting Helper Tool, it requires installation again.
{% endhint %}

### Require user Permission for macOS 13 Ventura or later

MacOS Ventura or later requires permission to work properly.

To grant the permission, please follow the steps:

1. Open System Setting -> General -> Login Items
2. Find Proxyman and Switch ON ✅

<figure><img src="/files/wImu2ggrSRN3OboA6hOD" alt=""><figcaption><p>Grant permission to Proxyman Helper Tool</p></figcaption></figure>

### Guest or non-admin users

If you're a guest or non-admin user, the `networksetup` CLI would fail and could not change the HTTP/HTTPS Proxy config until you install the Proxyman Proxy Helper Tool.

Proxyman Proxy Helper Tool has privileged permission to override the proxy config for all kinds of users.

We highly recommend installing the Proxyman Helper Tool if you're a guest or non-admin user to make the UX smoother.

### Uninstall the Proxy Helper Tool

You can uninstall the Proxy Helper Tool in **Preference** -> **Advanced** Tab -> **Uninstall** Proxy Setting Tool or delete it directly at `/Library/PrivilegedHelperTools/com.proxyman.NSProxy.HelperTool`

## Install the Proxy Helper Tool by command line

From macOS 4.12.0 or later, you can install the Helper Tool without GUI.

```
sudo /Applications/Proxyman.app/Contents/MacOS/proxyman --install-privileged-components
```

## Changelog

## Version 1.6.0 (Proxyman 5.11.0 or later)

* Fixed: Proxyman can't restore the PAC URL when the app is closed

### **Version 1.5.0**

* Fix the Security Vulnerability that Proxyman v1.5.0 or older (2019) can connect to the Helper Tool (v1.4.0) and override the system proxy without user consent. This fix will add some constraints to verify the incoming Connection. (The caller must be notarized by Apple, signed by Proxyman LLC Certificate, enabled Library Validation, and enabled Force Hard flag). (CVE-2023-45732)

📣 Credit to **Scott Leitch** from NCC Group.

### **Version 1.4.0**

* Comply with new macOS 13 Ventura Requirements for Helper Tool
* Show App Icon & App Name on the Login-Items

<figure><img src="/files/GpOjUdWh81UXNqfCz8D9" alt=""><figcaption><p>Display correct Proxyman icon and App Name</p></figcaption></figure>

{% hint style="info" %}
On macOS Ventura, Helper Tools, Launch Daemon, and Launch Agent will be added to the Allow in the Background, even though Proxyman only runs on the Foreground.

There is an ongoing discussion on [Twitter](https://twitter.com/siracusa/status/1583914093437935616?s=46\&t=C1XB91IkDFkG697Ab8T9Dg) that macOS should fix it.
{% endhint %}

After installing the 1.4.0, the Login Item might not be updated due to the cache layer of the Preference.

<figure><img src="/files/Nc71wkArw76jm3mrc8qv" alt=""><figcaption><p>Invalid Cache</p></figcaption></figure>

To fix it:

1. Open Terminal app -> Run: `sfltool resetbtm`
2. Restart the macOS
3. Done

### **Version 1.3.0**

* Remember and restore to your previous Proxy Setting.

### Version 1.2.0:

* Gracefully revert the HTTP Proxy Config if Proxyman is crashed.

### Troubleshooting

If you've encountered this error when installing the helper Tool:

The operation couldn’t be completed. (CFErrorDomainLaunchd error 9.)

Please follow this solution: <https://cloud.tencent.com/developer/article/1816504>

Ref: <https://github.com/ProxymanApp/Proxyman/issues/1113>


# Request / Response Previewer

Display the Request/Response body with multiple formats, such as JSON, Tree View, Raw, ...

After installing the [Certificate](/debug-devices/macos) and enable [HTTP Response](/basic-features/ssl-proxying) on domains or clients, your network traffic would show up immediately inside the Proxyman window, separated into three main areas:

* The Source List on the left panel
* The Flow List on the middle panel
* The Flow Content on the right panel

![](/files/-M5kcU0AOTr014EyiUPT)

### Body Content Previewer

Depend on what the content of the Request or Response is: Proxyman will automatically show in separate tabs:

* **Header**: All headers (key-value table)
* **Cookies**: **Cookie** key in the header
* **Set-Cookie** for the Set-Cookie Header in the Response
* **Auth**: **Authentication** key in the header
* **Body**: The body of the message: Proxyman automatically formats and beautifies the body content depends on the **Content-Type,** such as JSON, PNG, GIF, Raw Data, ...
* **Query**: If the request has a query, all queries are presented.
* **Raw**: The RAW HTTP message.
* Protobuf Message
* MessagePack
* Multipart/form-data

### Custom Previewer Tab

It's possible to customize which Previewer Tab you would like to see

* Custom tabs will persistent on the Request/Response Panel
* Attempt to decode and beautify the content

{% content-ref url="/pages/-MBw3pBhnWE-Wwq3Vs7-" %}
[Custom Previewer Tab](/basic-features/custom-previewer-tab)
{% endcontent-ref %}

![Custom Previewer Tab](/files/-Md01URMXqWeaY7AsRN1)

### Layout mode

There are two way to order the Request / Response Panel: Vertical or Horizontal layout

![Request/ Response Panel](/files/-LmSVFKeUuNPwG6HpV-Y)

![Previewer in Horizontal Layout](/files/-M5kdG7Ych9_JbU82Mm7)

![Previewer in Vertical layout](/files/-M5kdOeUJerSyTDQLo45)

### Customize Workspace

You can use custom layout buttons on the top right corner of the app to display content as your preference

1. Collapse/Expand Source List Panel
2. Open Request/ Response Panel in new window
3. Display Request/Response Panel in Horizontal layout
4. Display Request/Response Panel in Vertical layout

![](/files/-M5khQdFnInkcHQX-Ci_)

### Shortcuts

All sections are support **Copy (⌘C)** and multiple selections

![](/files/-LmSXLCTr7qnOJvQv4rH)

Read more at our [Proxyman Keyboard Shortcuts](https://proxyman.io/blog/2019/08/Proxyman-keyboard-shortcuts.html) blog

### **Body Previewer**

Body previewer automatically beautifies the content as well as offering handy minor features:

* **Tree View**: Represent the JSON in Tree View mode
* **Hex**: Show the body in Hex format
* **Export only body**: Able to export your body content to file. Suitable for Raw Data or binary data
* **Open With**: You can open the Body content with your favorite Editor. **Sublime Text** is mime 😍

![](/files/-LmSXeS1vqgVfomWgdCG)

### JSON Tree View mode

Proxyman supports native JSON Tree View mode, which displays a JSON Body. It allows the developer to:

* Search JSON by [JSON Path](/basic-features/jsonpaths)
* Copy JSON Node like Google Developer Tool does.

![](/files/0ssVu2P5Z1QY9hb03MQ1)


# SSL Proxying

How to set up SSL Proxying to tell Proxyman to capture/decrypt HTTPS data from a certain websites by Host name, Regex, ...

## 1. SSL Proxying List

A list of domains or applications that Proxyman should decrypt its SSL Connection. It enables the user to inspect the HTTPS Request/Response in plain text.

### Include List and Exclude List

You can define rules for:

* **Include List**: Intercept the traffic from apps/domains if it's in the include list
* **Exclude List**: Ignore all traffic from apps/domains in Exclude List

![SSL Proxying List](/files/-MNNVBHLJJ_R4d-5rijF)

{% hint style="info" %}
⌘⌥P to quickly open the SSL Proxying List.
{% endhint %}

### Apps / Domains / Wildcards

Proxyman supports several formats to define a rule:

* **By app**: Intercept all traffic that goes from this app
* **By Domain**: Intercept all traffic from this domain
* **Wildcard**: If it's matched the wildcard regex

For examplee:

| Wildcard                    | Description                                                |
| --------------------------- | ---------------------------------------------------------- |
| \*                          | Decrypt ALL HTTPS traffic                                  |
| \*.domain.com, \*.apple.com | e.g. v1.domain.com, data.domain.com, health.apple.com, ... |
| v?.domain.com               | e.g. v1.domain.com, v2.domain.com, ...                     |

{% hint style="info" %}
It's essential to set up the Proxyman Certificate before intercepting any HTTPS requests. You can follow the [macOS setup Guide](/debug-devices/macos) to properly install and trust the certificate..
{% endhint %}

### How to enable SSL Proxying on a particular domain or app

* Right-Click on the app or domain on the Left Panel -> Enable SSL Proxying

<figure><img src="/files/3pGIB5b90oMwBWh3zpRg" alt=""><figcaption><p>Add a domain to the SSL Proxying List</p></figcaption></figure>

* Right-Click on the Request on the main table -> Enable SSL Proxying
* Select the request and enable SSL Proxying on the Response Panel.

<figure><img src="/files/5hElcPpKLRosWzbLyjnT" alt=""><figcaption><p>Enable entire app or a single domain</p></figcaption></figure>


# Bypass Proxy List

## 1. Bypass Proxy List

Bypass Proxy Lis helps developers to:

* ✅ Define a list of domains that **never** go to the Proxyman Proxy Server
* Ignore some noised traffic
* Avoid SSL Error due to SSL Pinning when proxying to the Proxyman app.

## 2. How to use it?

2. Open the Bypass Proxy List in Tools Menu -> SSL Proxying List -> Bypass Proxy List
3. Enter your list of domains (separated by Comma, support simple wildcard)

<figure><img src="/files/gBqiSeqo3po4oIObvBGB" alt=""><figcaption><p>Define a list of bypass proxy list</p></figcaption></figure>

## 3. How does it work?

1. As soon as the Proxyman app is launched, Proxyman will override your system Bypass Proxy List with Proxyman List. You can find the system setting in System Setting -> Wi-Fi -> Your Wifi hotspot -> Details… -> Proxy -> Bypass Proxy List
2. When the app is closed -> Proxyman will revert to your original setting.


# Import / Export

How to export and Import data from Proxyman. Support Proxyman Log, HAR, CSV, Charles File, PostmanCollection2

### 1. Import

Proxyman supports multiples traffic log files from Proxyman and Charles Proxy.

* **Proxyman Log**: Built-in Proxyman Log that contains all Requests and Responses information.
* Proxyman Session: Entire working session files that are exported from the Proxyman app.
* **HAR 1.2** ([HTTP Archive](https://en.wikipedia.org/wiki/HAR_\(file_format\))): Suitable for transferring the HTTP Request and Response to other apps for the later inspector. Charles, Google Chrome, Safari, Firefox, and other Network Analyzer apps are fully supported.
* **Charles Proxy Log**: Charles Log that exports from Charles Proxy app. The file extension is **chls**.
* **CSV File**: Export selected requests as a CSV file (Proxyman 2.29.0+)
* **Charles Proxy Log for iOS** (Proxyman 2.30.0+): File extension is **chlsj**.
* Export as Postman Collection 2.

If you would like to save an entire working Session, please read the Save Session Page.

{% content-ref url="/pages/-M5kd2REoknFlvN7cDMU" %}
[Save Session](/advanced-features/save-session)
{% endcontent-ref %}

{% content-ref url="/pages/-M6E14-gv4VNn5nK5B5y" %}
[Charles Proxy Converter](/advanced-features/charles-proxy-converter)
{% endcontent-ref %}

### 2. Export

You can export:

* List of selected Requests or Responses.
* All traffic from specific Client or Domain Node or Remote Devices.
* An entire working session.
* Export as Proxyman LOG or ProxymanSession, Body or Raw tab.

It's useful to export a bug request that you can investigate later or send to your QA team.

### 3. Import & Export by Command Line

Proxyman offers a useful command line that helps you perform that import/export operation by a bash script.

{% content-ref url="/pages/KYRfSGxmdBYN1AKPHtcD" %}
[Command-line](/command-line)
{% endcontent-ref %}

### 4. How to use

#### 4.1 Import files to Proxyman

* **Drag and drop** files to Proxyman Window
* File -> Open -> Select a file

The imported file will be added to the Pin Section where you can inspect all traffic.

#### 4.2 Export to files

There are many ways to export a selected request to files:

* Select Request & Response on the main table view -> Right Click -> Export
* Right Click on the App or Domain -> Export

![](/files/-Mi5O_YRLVNO3-RUnK_0)


# Content Filter

Quick filter the URLs with many criteria, such as URL, Header, Body, Status Code by contains, not contains, prefix, suffix, and regex.

Proxyman offers the Primary and Secondary Filters to quickly filter out the Requests or Responses you're looking for.

{% hint style="info" %}
**⌘F: Open** Filter Bar quickly

**ESC** to close the Filter Bar
{% endhint %}

![Multiple Filters Selection (Hold CMD key and Click)](/files/-MWPX5yS4YA7CuixaXhZ)

![](/files/-MWPYdeG67U8YQg8xfyU)

![](/files/-MMIpKKAFLhXu7K35zgZ)

![](/files/-MMIpSwCM9NRjZsf8y-r)

### Primary Filter:

| Filter    | Description                                       |
| --------- | ------------------------------------------------- |
| All       | All Requests and Responses                        |
| HTTP      | Only HTTP                                         |
| HTTPS     | Only HTTPS                                        |
| WebSocket | Only WebSocket and Secure WebSocket               |
| JSON      | Content-Type is application/json or JSON contents |
| XML       | Only XML                                          |
| Form      | Only Form Body in Request / Response              |
| JS        | Only JavaScript content                           |
| CSS       | Only CSS content                                  |
| Document  | Documents content: HTML, ...                      |
| Media     | Image contents: PNG, JPG, GIF, ...                |
| Other     | Other contents which no matching with the above.  |
| Font      | All font family                                   |
| GraphQL   | GraphQL Request (has suffix `/graphQL`)           |

### Status Filters:

| Filter | Description              |
| ------ | ------------------------ |
| 1xx    | Status Code from 100-200 |
| 2xx    | Status Code from 200-300 |
| 3xx    | Status Code from 300-400 |
| 4xx    | Status Code from 400-500 |
| 5xx    | Status Code from 500     |

{% hint style="info" %}
Hold CMD key and Click to select multiple Types
{% endhint %}

### Secondary Filter:

#### Content:

* URL
* Query String
* Request Header
* Response Header
* Method
* Status Code
* Comment
* Color

#### Matching:

* Contains
* Not Contains
* Start With
* End With
* Equal
* Not Equal
* Regex

### Header, Query, Auth, Form Filter

From Proxyman 2.34.0+, we can quickly filter the Header, Query, Auth, Form from the selected Request and Response.

1. Click on the view (e.g. Header of the Request)
2. Use Hotkey: CMD + F or Right-Click -> Show Filter to open the filter

![Filter Header, Query, Auth Form content](/files/G3SQAsIUYRLCaiBfqFaR)


# Multiple Tabs

Able to open many workspace in different tabs.

Proxyman supports multiple tabs to increase your productivity.

### Keyboard

All keyboard shortcuts are same with Safari's shortcut.

| Shortcut            | Action                                    |
| ------------------- | ----------------------------------------- |
| **⌘ + T**           | Open new tab                              |
| **⌘ + 1, 2, 3**     | Quick navigate to the 1st, 2nd, 3rd tabs. |
| **⌘ + ⇧ + \[ or ]** | Quick navigate the the left or right tab. |

{% hint style="info" %}
This feature only enabled in Premium version.
{% endhint %}

## Screenshots

![Multiple tabs](/files/-LsKN4LX1S3e8jeS_btt)

![Right-click on the app or domain to open the new tab.](/files/-LsKNx5ET-VaSl_gDIAA)

##


# Horizontal/Vertical/Window Layout

Able to custom your workspace

It's possible to change the UI layout of the Request and Response Panels to optimize your space to render the content.

* **Detachable Window**: Bring Request and Response to a seperated Windows
* **Vertical**: Request and Response Panel is in Vertical Mode
* **Horizontal**: Request and Response Panel is in Horizontal Mode

![](/files/-M5khQdFnInkcHQX-Ci_)

| Shortcut             | Description       |
| -------------------- | ----------------- |
| ⇧**⌘ + Up Arrow**    | Detachable Window |
| ⇧**⌘ + Left Arrow**  | Toggle Left Panel |
| ⇧**⌘ + Right Arrow** | Vertical Mode     |
| ⇧**⌘ + Down Arrow**  | Horizontal Mode   |


# Copy as

Copy content from Request / Response

Proxyman offers various Copy functions from Right-click menu Context:

* **Copy URL**: Copy URL of the selected flow.
* **Copy cURL**: Generate cURL command, which includes headers, cookies, query, and body.
* **Copy Cell Value**: Copy a string value of the right-clicked cell
* **Copy as**: Cookies, Header, Body from Request and Response.

![Copy selected requests](/files/-Mi5OpUlB_gDXH3xmEtf)

{% hint style="info" %}
You can opt-out the `--proxy` flag from cURL command from Preference -> Advanced -> Uncheck "Include HTTP Proxy config in cURL"
{% endhint %}

{% hint style="info" %}
**⌘C:** Copy the URL

⇧**⌘C:** Copy as **cURL**
{% endhint %}


# Custom Previewer Tab

## 1. What's it?

You can customize the Custom Previewer Tabs, which always render one format at once time.

This handy tool might help you to fix the following issues:

* Format the BODY as **JSON**, but the Content-Type isn't `application/json`
* Format the body as **Protobuf**, but the Content-Type isn't `application/x-protobuf`
* Render HTML Page on the Web View
* **Beautify** the minified files (HTML, CSS, JS)
* Multipart/form-data
* Try to format the body as the selected type regardless of the `Content-Type`
* Convert MessagePack (msgpack) to JSON
* [Code Generator](/advanced-features/code-generator) to Swift, Node, Javascript, cURL, ...
* GraphQL Query Prettier

<div data-full-width="false"><figure><img src="/files/ZRVTQXc6iLumtWxbAktk" alt="" width="563"><figcaption><p>Select Custom Tabs for Request / Response Panel</p></figcaption></figure></div>

{% hint style="info" %}
The selected custom tabs will be appended to the right side of the Request or Response view
{% endhint %}

<figure><img src="/files/DMyB7qiOSppxyVFw3XSH" alt=""><figcaption><p>Display Custom Tabs</p></figcaption></figure>

## 2. How to use it?

You can either access the Custom Previewer Window:

1. Click on the "+" button on the Request/Response bar or (from the Tools Menu -> Custom Previewer Tab...)
2. Click the checkbox to show/hide your custom Tab
3. The New Tab will appear on the Request or Response Panel ✅

### 2.1 Server-Sent Events and OpenAI Tabs

From Proxyman 5.22.0 or later, Proxyman supports

* Server-Sent Events from OpenAI endpoints: Auto prettify the inline JSON of the data event
* OpenAI Tab: Auto accumulate the content and show the final result, similar to the output of your chat view.

<figure><img src="/files/kGKKTVX1T6WA7tBpAxTz" alt=""><figcaption><p>Capture OpenAI Endpoints</p></figcaption></figure>

## 3. ⚡️ Advance: Create a custom Tab with the Scripting Tool

* ✅ Show your own data on your tab
* It is useful if you want to decode your Body or display a partial body to your custom tab

### How to use:

1. the Click on the "+" button on the Request/Response bar or (from the Tools Menu -> Custom Previewer Tab...)
2. Select the \`Add Custom Tab\` button
3. Select the Request / Response panel and set a name for your tab

<figure><img src="/files/ojATCxhZ3frstP7g3rG7" alt=""><figcaption></figcaption></figure>

4. Click on the "..." button to show the Javascript Code

<figure><img src="/files/uGXYaRo7NSKvCuHsG0hg" alt=""><figcaption><p>Show the Javascript Code</p></figcaption></figure>

5. Tools -> Scripting -> Add new Rule -> Use this code to display your own data

<figure><img src="/files/MsBajBB48XSR5fHzQeSY" alt=""><figcaption><p>Write your code to display data</p></figcaption></figure>

6. Done

<figure><img src="/files/EFbxeRqeDqBcNtlAkEh5" alt=""><figcaption><p>Display your data on a new tab</p></figcaption></figure>

## 4. Examples

#### Force render JSON TreeView

Proxyman supports JSON Tree View for better visualization

![](/files/-MNNUbxHWsWRMr_boEpI)

We can show/hide a certain column by Right-Click on the Column Header

![](/files/-MNNUzgYXIXmb4RYSGpL)

#### Force render HTML Page

![](/files/-MCAKf7af-qiy4s1Q-Eb)

#### Beautify the Javascript files

![Beautify JS Body](/files/-MCAKqYypND8C0vo8X5N)


# Custom Header Column

### 1. What's it?

Custom Header Column feature allows you to customize the column that displays on the main Table View. It's similar to Custom Header Column from [Google Chrome Dev Tools](https://developers.google.com/web/tools/chrome-devtools/network/reference#custom-columns)

### 2. Benefit

* Define a Header from Request/Response and show it on the table.
* **Easier to distinguish each request/response if they have the same URL, but different Headers**
* Support resize/sorting/reorder columns
* Remember the previous state and restore it for the future session.

### 3. How to use it?

You can open **Tool Menu** -> **Custom Header Column**

![Custom your header column](/files/-MVesDI6M8IiS5UtE1-9)

![It will display on the main Table View](/files/-MVerXncCd4zbCjZz_zd)

{% hint style="info" %}
If you need to manage the default columns, please right-click on the Column Header.
{% endhint %}

![](/files/-MVetSwMrJ3MJXUAjQKW)

### **GraphQL Query Column**

Custom Header Column would extract and display the query name for GraphQL Request.

![](/files/-MVetX1HGlYXY9NQS7A3)


# Regex (Regular Expression)

Regular Expression

## 1. What's it?

From the 2.3.0 version, Proxyman supports **Wildcard** and **Regex** (Match a whole word) when you define matching rules for all available tools:

* Map Local
* Map Remote
* Block & Allow List
* Breakpoints
* Protocol Buffers (Protobuf)
* Reverse Proxy
* Network Throttling
* ...

It's a handy tool to help you exactly define which requests should trigger the tool.

![Match a request by Wildcard or Regex](/files/-MC_DZnVSPfddI4tnDir)

## 2. Test your URL (New feature 🎉)

From Proxyman v4.8.0, you can quickly test your Rule (Wildcard / Regex).

* You can quickly test & play around with your Wildcard/Regex
* **Save time**: You don't need to go back and forth to check your URL.
* Less error-prone.

<figure><img src="/files/CGWA8zCN4O1duStCsyYa" alt=""><figcaption></figcaption></figure>

#### How to use it?

1. Open any debugging tools (Breakpoint, Map Local, ...) -> Create a new rule
2. Click on the "Test your Rule" underline button -> New Window is opened.
3. Add your Rule and URLs you'd like to check

* :white\_check\_mark: Matched: Your URL is matched with your rule.
* :warning: Not Matched: Your URL doesn't match your rule. You might rewrite your wildcard/Regex rule.

## 3. Wildcard

Proxyman supports simple Wildcard characters, which include `*` and `?`

| Wildcard | Purpose                                                              |
| -------- | -------------------------------------------------------------------- |
| `*`      | The asterisk in a wildcard matches any character zero or more times. |
| `?`      | A question mark matches a single character once.                     |

For instance:

* <http://proxyman.io/v1/\\>\*
* <https://myserver.com/v?/\\>\*

## 4. Regex

Proxyman also supports Regex.

* Make sure your regex is **matching a whole URL**.
* **Partial Matching** is considered as not matching.
* Make sure you **escape characters** properly: Splash (/), full-stop (.), etc.

For instance:

| Regex                                                                        | Matched URL Examples                                                                                                                              |
| ---------------------------------------------------------------------------- | ------------------------------------------------------------------------------------------------------------------------------------------------- |
| https:\\/\\/proxyman\\.io.\*                                                 | <p><https://proxyman.io><br><https://proxyman.io/v1/data?id=123><br><https://proxyman.io/pricing></p>                                             |
| ^(http\|https):\\/\\/www\\.google\\.com.\*                                   | <p><http://www.google.com><br><http://www.google.com/user?id=proxyman><br><https://www.google.com></p>                                            |
| ^(http\|https)?:\\/\\/www\\.google\\.com\\/v\[0-9]?\\/build\\?query=proxyman | <p><http://www.google.com/v1/build?query=proxyman><br>[www.google.com/v2/build?query=proxyman](http://www.google.com/v2/build?query=proxyman)</p> |

You can use <https://regex101.com/> to verify your Regex that matches the whole text.

![Make sure your Regex matches whole words](/files/3FqmpoejI6t5oWY3jGDA)

{% hint style="info" %}
Please check the [**Regex** **Metacharacters, Operator and Flag**](https://developer.apple.com/documentation/foundation/nsregularexpression#1965590) from Apple Developer Documents to know which one is supported.
{% endhint %}

{% hint style="info" %}
Check <https://regex101.com> and make sure your Regex is full-matching with the given URL
{% endhint %}

* Select Regex when creating rules

![](/files/-MC_GHgRHPy8AUEjilO4)

{% hint style="info" %}
With regular expressions the meaning of `?` and `*` is different from that of wildcards. The equivalent of wildcard `?` is the regex `.` and the equivalent of wildcard `*` is the regex `.*`
{% endhint %}


# Filter JSON Response

You can quickly filter the JSON Response with the following approach:

### 1. Filter on JSON Previewer

* **⌘F** to trigger the Filter
* Support Regex
* Support Jump Next

![](/files/-MIxxuqk-fVjjHSX9dcr)

### 2. JSONPath

Proxyman supports [JSONPath](https://github.com/json-path/JsonPath#path-examples) for quickly querying the data in JSON Document.

![](/files/-MfzvapgK9JWsYTJn6dt)

Please check out JSONPath documentation.

{% content-ref url="/pages/-MfzfoPRgCYnSYnY6JsG" %}
[JSONPath](/basic-features/jsonpaths)
{% endcontent-ref %}

### 3. KeyPaths

* Support Key Paths filter on JSON Tree View mode
* Search specifically the children keys

Syntax example:

* **posts\[1].maker\[2]**: Go from Root -> Get item at index 1 of the Posts array -> Get the index 3 items of Makers array and filter out
* **users.name**: Get the name value of the "users" dictionary

![](/files/-MIxy5sNhUXUbfvyiijX)

### 4. All Keys or All Values

* Show all nodes that the key or value contains the search text

![](/files/-MIxzB4KkDq13VJqL13z)


# Highlight by Color and Add Comment

## 1. What's it?

You can

* **Highlight** a single or group of Request with pre-defined **colors** (Red, Yellow, Green, Blue, Purple, Gray)
* Add ~~Strikethrough~~
* Add Comment
* Filter by Color or Comment (CMD+F)
* Export with Color and Comment (Only Support Proxyma Log format)

![](/files/-MLr0L3vQE6h4Y24t9Ut)

## 2. Benefit?

* Easily mark your failed, succeed request/response with eye-catching colors
* Add Comments during development.
* Share it with your colleague (Color and Comment)
* Easily filter out the request/response by Color or Commend

3\. Shortcuts?

Proxyman supports many shortcuts to help you highlight or add comments quickly.

| Shotcut | Purpose                          |
| ------- | -------------------------------- |
| ⌘1      | Highlight with Red Color         |
| ⌘2      | Highlight with Yellow Color      |
| ⌘3      | Highlight with Green Color       |
| ⌘4      | Highlight with Blue Color        |
| ⌘5      | Highlight with Purple Color      |
| ⌘6      | Highlight with Gray Color        |
| ⌘0      | Reset All                        |
| ⌘/      | Add Strikethrough style          |
| ⌘M      | Add Comment to selected requests |

![](/files/-MLr1rRQmtk5bQSaoSJ2)


# Import / Export Settings

## 1. Import Settings

From Proxyman 2.26.0, the developer can import the Tools Settings from other colleagues who are using **Proxyman** or **Charles Proxy**.

To import settings, please go to Tools -> Import Settings -> From Proxyman / Charles Proxy -> Select the tools you would like to import

![](/files/-M_s5AZDJrJ7HW4n81LP)

The following list will describe what tools that you can import:

### Proxyman

* SSL Proxying List
* Block List
* White List
* Map Local
* Map Remote
* Breakpoint
* Network Condition
* Scripting

### Charles Proxy

* SSL Proxying List
* Block List
* White List
* Map Local
* Map Remote
* Breakpoint

## 2. Export Settings

You can also export the Tools Settings then sharing to your colleagues.

1. Open the tool you would like to export
2. Select Rules
3. Right Click -> Export Setting

![](/files/-M_s6EMoJZUREXqeKusD)

## 3. Open Charles Proxy Log File (\*.chls)

Proxyman supports open Charles Proxy Log file, which is exported from Charles Proxy app. Please check out the Charles Proxy Converter.

{% content-ref url="/pages/-M6E14-gv4VNn5nK5B5y" %}
[Charles Proxy Converter](/advanced-features/charles-proxy-converter)
{% endcontent-ref %}


# Multipart Form-Data Previewer

## 1. What's it?

From Proxyman 2.27.0+, Proxyman displays a multipart/form-data in a nice table view.

![multipart/form-data](/files/-MackOx1UhMiBd_KrVXq)

### 2. Benefit

* Display each separate part of the multipart/form-data body
* Able to export the data


# JSONPath

## 1. What's it?

JSONPath is a tool for quickly filtering from JSON data.

![Filter JSON data](/files/-MfzurR3JU5X5vLm0O6T)

### Operator

| Operator                  | Description                                                         |
| ------------------------- | ------------------------------------------------------------------- |
| `$`                       | The root element to query. This starts all path expressions.        |
| `@`                       | The current node is being processed by a filter predicate.          |
| `*`                       | Wildcard. Available anywhere a name or numeric are required.        |
| `..`                      | Deep scan. Available anywhere a name is required.                   |
| `.<name>`                 | Dot-notated child                                                   |
| `['<name>' (, '<name>')]` | Bracket-notated child or children                                   |
| `[<number> (, <number>)]` | Array index or indexes                                              |
| `[start:end]`             | Array slice operator                                                |
| `[?(<expression>)]`       | Filter expression. The expression must evaluate to a boolean value. |

### Filter Operators

Filters are logical expressions used to filter arrays. A typical filter would be `[?(@.age > 18)]` where `@` represents the current item being processed.

| Operator | Description                                                          |
| -------- | -------------------------------------------------------------------- |
| ==       | left is equal to the right (note that 1 is not equal to '1')         |
| !=       | left is not equal to the right                                       |
| <        | left is less than right                                              |
| <=       | left is less or equal to the right                                   |
| >        | left is greater than right                                           |
| >=       | left is greater than or equal to the right                           |
| =\~      | left matches regular expression \[?(@.name =\~ /foo.\*?/i)]          |
| in       | left exists in right \[?(@.size in \['S', 'M'])]                     |
| nin      | left does not exists in right                                        |
| subsetof | left is a subset of right \[?(@.sizes subsetof \['S', 'M', 'L'])]    |
| anyof    | left has an intersection with right \[?(@.sizes anyof \['M', 'L'])]  |
| noneof   | left has no intersection with right \[?(@.sizes noneof \['M', 'L'])] |
| size     | size of left (array or string) should match right                    |
| empty    | left (array or string) should be empty                               |

### Path Examples

Given the JSON Data.

```javascript
{
    "store": {
        "book": [
            {
                "category": "reference",
                "author": "Nigel Rees",
                "title": "Sayings of the Century",
                "price": 8.95
            },
            {
                "category": "fiction",
                "author": "Evelyn Waugh",
                "title": "Sword of Honour",
                "price": 12.99
            },
            {
                "category": "fiction",
                "author": "Herman Melville",
                "title": "Moby Dick",
                "isbn": "0-553-21311-3",
                "price": 8.99
            },
            {
                "category": "fiction",
                "author": "J. R. R. Tolkien",
                "title": "The Lord of the Rings",
                "isbn": "0-395-19395-8",
                "price": 22.99
            }
        ],
        "bicycle": {
            "color": "red",
            "price": 19.95
        }
    },
    "expensive": 10
}
```

| JsonPath                                | Result                                                       |
| --------------------------------------- | ------------------------------------------------------------ |
| $.store.book\[\*].author                | The authors of all books                                     |
| $..author                               | All authors                                                  |
| $.store.\*                              | All things, both books and bicycles                          |
| $.store..price                          | The price of everything                                      |
| $..book\[2]                             | The third book                                               |
| $..book\[-2]                            | The second to last book                                      |
| $..book\[0,1]                           | The first two books                                          |
| $..book\[:2]                            | All books from index 0 (inclusive) until index 2 (exclusive) |
| $..book\[1:2]                           | All books from index 1 (inclusive) until index 2 (exclusive) |
| $..book\[-2:]                           | Last two books                                               |
| $..book\[2:]                            | Book number two from tail                                    |
| $..book\[?(@.isbn)]                     | All books with an ISBN number                                |
| $.store.book\[?(@.price < 10)]          | All books in store cheaper than 10                           |
| $..book\[?(@.price <= $\['expensive'])] | All books in store that are not "expensive"                  |
| $..book\[?(@.author =\~ /.\*REES/i)]    | All books matching regex (ignore case)                       |
| $..\*                                   | Give me everything                                           |
| $..book.length()                        | The number of books                                          |

### Reference

* <https://github.com/json-path/JsonPath>


# JQ

How to use the jq filter in the JSON Tab to quickly filter your JSON Data

## 1. What's it?

* jq is like sed for JSON data - you can use it to slice and filter and map and transform structured data with the same ease that sed, awk, grep and friends let you play with text.
* Available on Proxyman 5.24.0 or later

{% hint style="success" %}

* jq Filter is only available in the JSON Tab. On the Request/Response Tool bar -> Click on the + button -> Select JSON in the Request or Response. A new JSON Tab will be added.
  {% endhint %}

<div align="center" data-full-width="false"><figure><img src="/files/q0R2gSs9N8be7tiO7Zml" alt="use jq to filter JSON Body"><figcaption></figcaption></figure></div>

## 2. Syntax

* Please refer the [jq Manual Page](https://jqlang.org/manual/#basic-filters) to understand how to use the jq


# Customize Toolbar

## 1. What's it?

From Proxyman 2.32.0+, you can easily customize your toolbar to fit your need.

You can design your toolbar with various Tools buttons:

* Proxy Overriden
* Block List
* Allow List
* Breakpoint
* Map Local
* Map Remote
* Reverse Proxy
* Network Condition
* Scripting

These tool buttons will toggle ON/OFF on a particular feature.

![Customize your toolbar](/files/-MiF8_Ijju82twE4Y0P-)

## 2. How to use it?

You can simply open the Customize Toolbar Palette from:

* Right-click on the toolbar -> Customize Toolbar
* Tools menu -> Customize Toolbar

{% hint style="info" %}
Customize Toolbar is exclusively available for macOS 11+
{% endhint %}


# Localization

### 1. What's it?

Proxyman supports localization, which affect all UI of the app. The following list is a current langauges:

* English (Default)
* Chinese - Simplified

### 2. How to override the app language?

By default, Proxyman will respect the current System Language. To override it, please:

* System Preference -> Language & Region -> Select Apps Tab -> Add Proxyman app -> Click the + button -> Select Proxyman app and English.

### 3. Improve localization?

If you've encountered a poor translation in your languages, please help us a hand at <https://github.com/ProxymanApp/proxyman-localization>


# Quick Preview

## 1. What is it?

The quick view can help you to quick preview the selected in any place of the app.

* Beautify inline JSON
* Decode Base64 String
* Display key\&value as a table
* Decode JWT Token

<figure><img src="/files/TstSKdvs0uMDcIeaUPrM" alt=""><figcaption></figcaption></figure>

## 2. How to use it?

1. Select any text on the app, e.g Body Tab, Raw Tab, etc
2. Right Click to show the menu context
3. Select Text Selection View as Mode

<figure><img src="/files/ZVDFAhu6rEgAuQHOPVsH" alt=""><figcaption><p>Quick View on the Raw Tab</p></figcaption></figure>

<figure><img src="/files/6C4uFj9rnUj0qUXNf1dt" alt=""><figcaption><p>Quick View on Body Tab</p></figcaption></figure>


# Command Palette

Explain how to use Command Palette on Proxyman to quickly find and open any Tools, features with few clicks

## 1. What's it?

Introduce a global Command Palette that helps developers:

* Quickly search Debugging Tools
* Toggle Debugging Tools
* Open a new Guideline for iOS, Simulator, Android, and Emulators
* Pin your most used action

<figure><img src="/files/bviEuwPVnTNTwvPMnoIw" alt="Proxyman with Command Palette"><figcaption></figcaption></figure>

{% hint style="success" %}
Use ⌘⇧P to open the Command Palette Windows
{% endhint %}

{% hint style="warning" %}
Command Palette is available on Proxyman macOS 5.26.0 or later
{% endhint %}

## 2. Missing your shortcut?

If you could not find your shortcut in the Command Palette view, please request it in our GitHub Public Tracker at <https://github.com/ProxymanApp/Proxyman/issues>


# Repeat

Quick make a request with the same param and body

### 1. What's it?

Repeat tool is a useful tool for quickly making a new HTTP request with the same HTTP Header and Body for seeing the new response without changing from your browsers or clients.

### 2. What's it for?

* Quickly make an HTTP/HTTPS Request for testing the newest response from the server.
* It's useful for developers to test the change of the server without repeating the request manually.

{% hint style="info" %}
Repeat tool only supports HTTP/HTTPS Requests. Repeat on WS/WSS traffic might be failed.
{% endhint %}

{% hint style="info" %}
Repeated requests can be modified by the Breakpoint, Map Local, and Scripting tool if it matches any rules.
{% endhint %}

### 3. How to use

* Right-Click on a single or multiple Request(s) -> **Repeat**

![Quickly repeat the current requests](/files/j64mDpQZUP9Lx3HtD7mH)

{% hint style="info" %}
⌘ ⏎ : Repeat the current selected request.
{% endhint %}

### 4. Settings

* **Request Timeout**: In Setting -> Tools Tab -> Request Timeout: Define a second that the Request will timeout. Use 0 to disable it. Available on Proxyman 4.13.0 or later


# Edit & Repeat

### 1. What's it?

Edit & Repeat is a handy tool for developers who need to test the Endpoint directly on Proxyman app without making a new request from your browser or client app.

* Rapidly change a **Query**, **Header**, **Body** of the selected request and test the Response from the server
* Easily reproduce the bug from the server with a different set of params.
* Support Form and JSON format.
* Edit by Raw Message
* Review Response data on the Right Panel (Proxyman 3.6.0+).

![Edit and repeat the request](/files/I3PBAQr5UmHPXffpVSt0)

### 2. How to use it?

1. Simply select your request -> Right Click -> Edit & Repeat
2. The request data (Header, URL, Query, Body) is preserved and it's ready to edit

![Edit and repeat on the selected request](/files/hW0Zf6hF8vc5HKpSYfwy)


# Compose new Request

Make new HTTPS Requests to your server, and inspect the HTTPS Response. It's a simple version of Postman

## 1. What's it?

"Compose new Request" tool is a handy tool to help developers:

* Compose an HTTP/HTTPS Request and send it to your service. It's similar to Paw, Insomnia, and Postman.
* Quickly test your APIs without depending on your app client.
* Support Header, Query, URL, Form, JSON Body
* Support Raw Message
* Support multipart body
* Preset template: Empty Request, GET Request, Post Request with JSON or Form.

{% hint style="info" %}
You can reuse your request data for new requests. Please check out the [Edit & Repeat](/advanced-features/edit-and-repeat) page.
{% endhint %}

<figure><img src="/files/ahDTgyWeaUVciQNq4Tg6" alt=""><figcaption><p>Make a HTTPS Requests with Proxyman</p></figcaption></figure>

## 2. How to use

You can open the tool by either:

* Click on the Compose button on the main navigation bar
* Tools -> Compose

![Open the Compose Tool](/files/NQT7vXmosYFHBI7Jb3Ka)

1. Enter the URL
2. Select HTTP Method
3. Modify the Header, Param, Body, Raw Message
4. Click the Send button.

![Compose JSON Body](/files/m77SiOFQiClZB7mZ3Tjl) ![Using Raw Message](/files/ZIQPRl3o6Jugk5Fd8ZOI)

## 3. Template

Proxyman also supports a few request templates.

* GET with Query
* Post with JSON
* Post with Form
* Post with multiparts
* Import from cURL

![Use preset template](/files/77ifxniP5T1wdonmXVro)

## 4. Import from cURL

You can import your cURL, which you can copy from a Network Tab in Google Chrome and make a request with the Compose Tool.

<figure><img src="/files/KIJfu28uoarfskULZZov" alt=""><figcaption><p>import cURL</p></figcaption></figure>

{% hint style="success" %}
You can simply paste your cURL to the URL Text View, Proxyman will tries to parse your cURL
{% endhint %}

## 5. History Request

From Proxyman macOS 5.24.0, Proxyman will store your requests/responses in the History List.

* ✅ Useful to preview your previous Request/Response

<figure><img src="/files/JTaJ0mwjjgb4TYmeWXTj" alt=""><figcaption><p>Request History in the Compose View</p></figcaption></figure>

## 6. Settings

* **SettingsRequest Timeout**: In Setting -> Tools Tab -> Request Timeout: Define a second that the Request will timeout. Use 0 to disable it. Available on Proxyman 4.13.0 or later


# No Caching

Prevent caching HTTP Content and tell Proxyman to fetch your up-to-date content from servers.

### 1. What's it?

Prevent the server or client from caching your Request or Response, and you always get the latest change from the server.

No Caching tools will affect all HTTP Request and Response, which enabled SSL Proxying.

### 2. What's for?

* If you would like to **see the latest HTTP Response changes** from the Server or Client and ignore all caching layers

### 3. How it works

No Caching tool will manipulate all requests by adding or removing caching HTTP Headers, which are described in the following table.

| HTTP Message | Remove                                       | Add                                                  |
| ------------ | -------------------------------------------- | ---------------------------------------------------- |
| Request      | **If-Modified-Since** and **If-None-Match**  | **Pragma: no-cache** and **Cache-control: no-cache** |
| Response     | **Expires**, **Last-Modified,** and **ETag** | **Expires: 0** and **Cache-Control: no-cache**       |

### 4. How to use

* Enable in **Tool Menu -> No Caching**

![](/files/-M5kVwl9fEys53qNNwEW)

![No Caching Status on the bottom right of Proxyman app](/files/-M5kWUcDLjQdfVToZaRN)

{% hint style="info" %}
**⌥⌘N:** Toggl the No Caching Tool.
{% endhint %}


# Breakpoint

How to use the Breakpoint Tool to modify the Request/Response on the fly, including the Headers, URL, Status Code, and the body

## 1. What's it?

Breakpoint is a handy tool to help developers to edit the content of the Request and Response **on the fly**.

It's possible to set a breakpoint on both **Request** or **Response.**

<figure><img src="/files/IwMqt7ucK8JWeUGV887I" alt=""><figcaption></figcaption></figure>

{% hint style="info" %}
If you're using [Atlantis Framework](/atlantis/atlantis-for-ios), you could not use Breakpoint. Please consider using a normal proxy.
{% endhint %}

## 2. Main features

Breakpoint tool allows the developer to stop an ongoing Request or incoming Response to modify its data.

* Modify the Request URL, including the Scheme, Host, Path, Port, HTTP Method
* Modify HTTP Headers of Request/Response
* Modify Query or Form entry from Requests.
* Modify Authorization/Cookie/Set-Cookie Headers.
* Modify HTTP Body of Request/Response
* Change Response HTTP Status Code.

<figure><img src="/files/crJhdVt7NqFtUfX9oRi7" alt="Modify Request and Response with Proxyman Breakpoint Tool"><figcaption></figcaption></figure>

Raw HTTP Message

From Proxyman macOS 6.12.0 or later, you can switch to the Raw Tab to modify the Request/Response HTTP Message. It allows you to edit the data in 1 place.

<figure><img src="/files/dz8L1WZFEc4jkymabHDs" alt="Modify Request and Response with Raw HTTP Message"><figcaption></figcaption></figure>

### Breakpoint Actions

| Action  | Meaning                                               |
| ------- | ----------------------------------------------------- |
| Cancel  | Cancel a breakpoint and continue the Request/Response |
| Abort   | Abort the connection and return 503 status code       |
| Execute | Make a request/response with a new change             |

{% hint style="info" %}
Check out Breakpoint Tutorial: [Breakpoint to intercept and edit the requests/response on iOS app](https://proxyman.io/blog/2019/09/Use-Breakpoint-to-intercept-and-edit-request-response-on-iOS-app.html)
{% endhint %}

## 3. Breakpoint by the Scripting Tool ✅

If you would like to do Breakpoint in an Automatic way, you should use the [Scripting](/scripting/script#1-whats-it) tools, which you can achieve the same result that Breakpoint can do, but in a flexible way by writing Javascript Code.

Please check out this [Snippet Code](/scripting/snippet-code#2-common-on-request-and-response) to understand how to use Scripting for Breakpoint.

## 4. Breakpoint with GraphQL Requests

From Proxyman 2.27.0+, Breakpoint can work with GraphQL Request by a specific QueryName. Please check out the following GraphQL Document.

{% content-ref url="/pages/-MQ\_uhE\_Ncnoi5qbw2KX" %}
[GraphQL](/advanced-features/graphql)
{% endcontent-ref %}

## 5. How to use

You can simply create a Breakpoint rule by:

1. Make sure Proxyman can capture your HTTPS Request first
2. Right-Click on the Request to show the menu context -> Tools -> Breakpoint
3. Proxyman will open a Breakpoint Window and fill the Matching Rule.
4. Select Breakpoint on Request or Response or both.
5. Click Add to create a rule.
6. Try sending a Request again -> Proxyman will open a Breakpoint and you can modify the data.
7. Click on the Execute Button to send a request/response.

<figure><img src="/files/IwMqt7ucK8JWeUGV887I" alt=""><figcaption></figcaption></figure>


# HTTP Message Templates

How to use HTTP Message Template to quickly reuse it in the Breakpoint Tool

## 1. What's it?

You can create a HTTP Message Template for the Breakpoint that you can reuse it later

* Create new HTTP Message Template for Request: HTTP Method, URL, Headers
* Template for Response: Status Code, Headers
* Boots productivity when using the [Breakpoint tool](https://docs.proxyman.com/advanced-features/pages/-MEVxZPXyAZ4rxm6JLkd#1.-whats-it).

![Breakpoint Template for Request/Response](/files/3j4UGRYGOgKTZBYRG9Ht)

## 2. How to create a new template?

### Create a new one

1. Tools Menu -> Breakpoint -> Breakpoint Template
2. CMD+N or SHIFT+CMD+N to create a template for Request/Response
3. Defind your Request/Response template

### Use the existing one

1. Create a Breakpoint Rule -> Make sure your request/response -> Make sure it hits the Breakpoint
2. Click Raw Tab -> Template button -> Request/Response -> Create new request/response
3. Done

## 3. How to use it?

1. When a request/response hit a Breakpoint -> Click Raw Tab
2. Template -> Request/Response -> Select your template
3. It will replace the current data with the template one.

![Use Breakpoint Template](/files/S3SXBtizThcMmCkcC8mq)


# Map Local (File)

Map a file as a response of requests

## 1. What's it?

The Map Local Tool enables you to use the content of local files as an HTTP Response to your requests.

{% hint style="info" %}
You can do Map Local for **GraphQL** with the Scripting Tool ([Snippet Code](/scripting/snippet-code#map-local-with-graphql))

You can combine **Map Local with Breakpoint** to modify the content on the fly (2.16.0+)
{% endhint %}

## 2. Benefits

* Define a Response with Status Code, Headers, and Body -> Mock to a given Request -> Easily to test some edge cases without waiting for the server's update.
* **Mock Fake API with a local File**: It's useful for developers to try out the testing APIs that are not in production.

![Define Status Code, Headers and Body](/files/-MgdAvRMcpn98kCytuZk)

### With an HTTP Message

1. Right Click on your request on the main table -> Tools -> Map Local -> Proxyman will automatically create a new rules with a current Response
2. Feel free to change the Status Code, Headers and the JSON Body
3. Done
4. Re-sent your request -> New Response is mapped.

### With a Local File

* Click on the `Select Local File` button and select any files. Supports: Text, JSON, Binary, Image

### With \<FILE\_URL> flag

* It's useful to map to a given file and able to provide the Status Code and Response Headers.
* Work with JSON, Text, Binary, Image etc
* Make sure to provide `Content-Type` header, so your client can work properly

```json
HTTP/1.1 200 OK
Content-Type: application/json

<FILE_URL="~/Desktop/myjson.json">
```

## 2. How to use

1. Right-click on the Request (which already has a Response) -> Tools -> Map Local. Proxyman will create a rule with the current Response Body (The file is stored in your Desktop folder)
2. We can directly change the Response body.
3. Make a request and observe the new Response Body.

<figure><img src="/files/e8enHwgcx0eicMyeIOxw" alt=""><figcaption><p>Create a Map Local with curernt Response</p></figcaption></figure>

## 3. Map Local with GraphQL Requests

From Proxyman 2.27.0+, Map Local can work with GraphQL Request by a specific QueryName. Please check out the following GraphQL Document.

{% content-ref url="/pages/-MQ\_uhE\_Ncnoi5qbw2KX" %}
[GraphQL](/advanced-features/graphql)
{% endcontent-ref %}

## 4. Map Local with Scripting Tool ✅

If you would like to do Map Local with **complicated rules,** you might check out [Scripting](/scripting/script#1-whats-it) since it's easier to achieve the same result.

Please check out these [Snippet Code](/scripting/snippet-code#2-common-on-request-and-response) to understand how to map a local file with Javascript Code.


# Map Local (Directory)

## 1. What's it?

It's a handy tool to map a matched requests to local files on a selected Directory. If the local files doesn't exist, it will serve from the real server.

If you would like to map a Local File, let check out the Map Local (File) page

{% content-ref url="/pages/-LlQ26G\_ZMrufbuOXtFP" %}
[Map Local (File)](/advanced-features/map-local)
{% endcontent-ref %}

## 2. How to use

### 2.1 Map a path and its subdirectories

`api.proxyman.io/build/v1/*` => All sub-paths after `/v1/` will map to a selected directory.

For instance, we select `~/desktop/my_folder` as the local directory

| Real URL                                     | Resolved Local Path              |
| -------------------------------------------- | -------------------------------- |
| <http://api.proxyman.io/build/v1/index.html> | \~/desktop/my\_folder/index.html |
| <http://api.proxyman.io/build/v1/js/main.js> | \~/desktop/my\_folder/js/main.js |

#### How to config

| Rule     | How to use                                                                                      | Examples                                                                                                                      |
| -------- | ----------------------------------------------------------------------------------------------- | ----------------------------------------------------------------------------------------------------------------------------- |
| Wildcard | <ul><li>Check ON "Include subpaths" checkbox</li><li>Or use /\* at the end of the URL</li></ul> | <ul><li>api.proxyman.io/build/v1/ (Check ON)</li><li>api.proxyman.io/build/v1/\*</li></ul>                                    |
| Regex    | <ul><li>Use (.\*) at the end</li></ul>                                                          | <ul><li><https://api.proxyman.io/build/v1/(>.<em>)</em></li><li><em><https://api.proxyman.io/build/v1/(>.</em>.css)</li></ul> |

{% hint style="info" %}
Make sure you use `()` group Regex operator to tell Proxyman where to map
{% endhint %}

### 2.2 Map Entire Host

`api.proxyman.io/*` => All sub-paths will map to a selected directory.

For instance, we select `~/desktop/my_folder` as the local directory

| Real URL                                     | Resolved Local Path                       |
| -------------------------------------------- | ----------------------------------------- |
| <http://api.proxyman.io/build/v1/index.html> | \~/desktop/my\_folder/build/v1/index.html |
| <http://api.proxyman.io/build/v1/js/main.js> | \~/desktop/my\_folder/build/v1/js/main.js |

#### How to config

| Rule     | How to use                                                       | Examples                                                                                                    |
| -------- | ---------------------------------------------------------------- | ----------------------------------------------------------------------------------------------------------- |
| Wildcard | <ul><li>Leave the path blank</li></ul>                           | <ul><li>api.proxyman.io</li></ul>                                                                           |
| Regex    | <ul><li>Use single path that contains (.\*) at the end</li></ul> | <ul><li><https://api.proxyman.io/(>.<em>)</em></li><li><em><https://api.proxyman.io/(></em>.html)</li></ul> |

## 3. Map Local Directoy with Scripting Tool ✅

If you would like to do Map Local Directory with **complicated rules,** you might check out [Scripting](/scripting/script#1-whats-it) since it's easier to achieve the same result.

Please check out our [Snippet Code](/scripting/snippet-code#2-common-on-request-and-response) to understand how to map a local file with Javascript Code.


# Map Remote

## 1. What's it?

Map Remote (**⌘⌥R**) would help the developer to change the HTTP Request's location to a new destination server, per the configured rules, so the HTTP Response is transparently served from your client.

Map Remote also supports mapping from HTTP to HTTPS and vice-versa

![Map Remote Rules](/files/-MC_DZnVSPfddI4tnDir)

{% hint style="info" %}
Check out common [Map Remote Config](#7.-common-usages) when mapping from HTTP <-> HTTPS.
{% endhint %}

{% hint style="info" %}
From Proxyman 4.3.0: Map Remote supports Websocket and Secure Websocket.
{% endhint %}

## 2. Benefits

* Use Production Endpoints on your Development website on certain endpoints without changing the source code
* Use Development Endpoints on your Production website
* Change certain request's URLs to different destinations
* Able to replace requests components, such as Protocol, Host, Port, Path, or Query on the fly

{% hint style="info" %}
To boost your productivity, you can use the [Scripting feature](/scripting/script#1-whats-it) that allows you to achieve the same result as Map Remote by writing simple Javascript Code

For instance, [Snippet code to change Production to Localhost server](/scripting/snippet-code#change-request-destination-schema-host-port-path)
{% endhint %}

## 3. Map Remote with GraphQL Requests

From Proxyman 2.27.0+, Map Remote can work with GraphQL Request by a specific QueryName. Please check out the following GraphQL Document.

{% content-ref url="/pages/-MQ\_uhE\_Ncnoi5qbw2KX" %}
[GraphQL](/advanced-features/graphql)
{% endcontent-ref %}

## 4. Using Scripting as Map Remote ✅

If you get difficult to set up a complicated Map Remote Rule, you might easily do it by using the [Scripting Tool](/scripting/script#1-whats-it).

Please check out [Map Remote Snippet Code](/scripting/snippet-code#8-map-remote-with-scripting) to learn how to use Scripting to achieve the same result as Map Remote.

For instance, it's straightforward to do the following by Scripting:

* Map v1 to v2 endpoints
* Map Production to Localhost
* Map Localhost to Production
* ...

## 5. Matching Rule

{% hint style="info" %}
Proxyman supports [Regular Expression](https://developer.apple.com/documentation/foundation/nsregularexpression#1965590) and Wildcard from the 2.3.0 version. [Check out here](/basic-features/regex)
{% endhint %}

We can define matching rules by using [Wildcard or Regular Expression](/basic-features/regex).

For matched requests, Proxyman attempts to:

* Replace Protocol, Host, Port, Path, and Query if it available
* If the component is empty, it won't change the matched request's component

![](/files/-MC_GHgRHPy8AUEjilO4)

{% hint style="info" %}

* Leave the Text Field blank to keep it unchanged from the matched request
* The wildcard is not allow
  {% endhint %}

### Debugging

To determine what Map Remote matches your URL, you can open The Request -> Summary Tab:

1. Select your request
2. Summary Tab -> Debugging Tools
3. Check the Map URL

<figure><img src="/files/95FVh8ckGdRzeQ9OSj1L" alt=""><figcaption><p>How to debug the Map Remote</p></figcaption></figure>

### Preserve Host Header

By default, Proxyman attempts to override the Host Header to match with the new Host in Remote Map. It's crucial to successfully make a request.

If you would like to preserve the original Host Header, please check ON in the "Preserve Host Header" checkbox when creating a new entry. Proxyman will preserve the Host value.

## 6. How to use

* Right Click on selected Request -> Tools -> Map Remote: Proxyman will fill in the necessary data from the selected request

![Create a Map Remote](/files/-M5kcjUlp-pVHTWFPxse)

## 7. Common Usages

### 7.1 Map Localhost (HTTP) to Production (HTTPS)

<figure><img src="/files/SXNyV3j5gxqBMkuoc3rg" alt=""><figcaption><p>Map Remote Config</p></figcaption></figure>

**Result:**

| Original URL                                           | To URL                                               |
| ------------------------------------------------------ | ---------------------------------------------------- |
| <http://localhost:3000>                                | <https://proxyman.io>                                |
| <http://localhost:3000/pricing>                        | <https://proxyman.io/pricing>                        |
| <http://localhost:3000/v1/user?id=123\\&name=proxyman> | <https://proxyman.io/v1/user?id=123\\&name=proxyman> |
| **POST** <http://localhost:3000/login>                 | **POST** <https://proxyman.io/login>                 |

### 7.2 Map Production (HTTPS) to localhost (HTTP)

<figure><img src="/files/tTkotFk81D2CT2QDItHl" alt=""><figcaption><p>Map Remote Config</p></figcaption></figure>

| Original URL                                         | To URL                                                 |
| ---------------------------------------------------- | ------------------------------------------------------ |
| <https://proxyman.io>                                | <http://localhost:3000>                                |
| <https://proxyman.io/v1/user?id=123\\&name=proxyman> | <http://localhost:3000/v1/user?id=123\\&name=proxyman> |
| **POST** <https://proxyman.io/login>                 | **POST** <http://localhost:3000/login>                 |

### 7.3 Map certain URL to another host

* Rule: **<https://proxyman.io/v1/user>** (for instance)
* Select **Any** and **Wildcard**
* **Un-Check Include all subpaths of this URL:** Un-check means it doesn't map other subpaths

**Map To:**

* Protocol: **https**
* Host: New Host (e.g staging.proxyman.io)
* Port: **443** (your local port)
* Leave Path and Query Empty

**Result:**

| Original URL                                         | To URL                                                       |
| ---------------------------------------------------- | ------------------------------------------------------------ |
| <https://proxyman.io>                                | <https://proxyman.io> (does not map the rule)                |
| <https://proxyman.io/v2/setting>                     | <https://proxyman.io/v2/setting> (does not map the rule)     |
| <https://proxyman.io/v1/user?id=123\\&name=proxyman> | <https://staging.proxyman.io/v1/user?id=123\\&name=proxyman> |

### 7.4 Map Websocket from localhost to Production

<figure><img src="/files/Be2KxibEI2saaYPXaiBn" alt=""><figcaption><p>Map Remote Config</p></figcaption></figure>

| Original URL                   | To URL                               |
| ------------------------------ | ------------------------------------ |
| ws\://localhost:4000           | wss\://ws.postman-echo.com           |
| ws\://localhost:4000/websocket | wss\://ws.postman-echo.com/websocket |

### 7.5 Map Websocket from Production to Localhost

<figure><img src="/files/EfVwZmjstcxdLwsljgBi" alt=""><figcaption><p>Map Remote Config</p></figcaption></figure>

| Original URL                         | to URL                         |
| ------------------------------------ | ------------------------------ |
| wss\://ws.postman-echo.com           | ws\://localhost:3000           |
| wss\://ws.postman-echo.com/websocket | ws\://localhost:3000/websocket |


# External Proxy

Proxy HTTP/HTTPS message to external Proxy server

### 1. What's it?

Some companies have a central Proxy server, and all outgoing requests must go through to the Proxy Server in order to access the Internet.

In this case, you might have to config Proxyman to proxy all connections to the External Proxy.

### 2. Benefits

* Navigate all traffic to your cooperated Proxy Server.
* Able to define Hosts, or Domains which bypass the External Proxy.
* Support HTTP/HTTPS/SOCKS Proxy.
* Support PAC Proxy (Automatic Proxy Configuration) (Proxyman 3.2.0+)

### 3. How to use

* **Tool** menu -> **Proxy Setting** -> **External Proxy Setting...**
* You can config **HTTP, HTTPS, or SOCKS Proxy**, which point to your external Proxy server.
* If you have a **PAC URL**, you can use it in Automatic Proxy Configuration.
* Proxyman also supports **Basic Authentication**.

![HTTP, HTTPS, SOCKS, PAC Proxy](/files/PdvrOgSVKFfGBoggUKC9)

{% hint style="info" %}
External SOCKS Proxy with authentication is not supported.
{% endhint %}

### 4. Bypass Proxy

* You can define hosts/domains that will be bypass the external proxy. Each host must be separated by a Comma. Wildcard (\* or ?) is supported.
* By default, Proxyam automatically bypasses all localhost traffic from the external proxy. To enable it, please check the **"Always bypass external proxies for localhost" checkbox.**

{% hint style="info" %}
Localhost traffic is traffic from your localhost, 127.0.0.1, or 0.0.0.0 with all ports.
{% endhint %}


# Save Session

### 1. What's it?

It's a handy tool to save entire your working Session, so you can open it later without losing any debugging information, which includes:

* All Request and Response flows
* All App and Domains
* All Remote Devices

### 2. What's for?

* Save entire Session and open it later
* Share your Debugging Session to your QA or Teammates

### 2. How to use?

#### 2.1 Save current Session

* File menu -> Save Session As then selecting the save location

![](/files/-M5kdtfRFbbJQlNVUV5M)

#### 2.2 Restore previous Session

* File Menu -> Open or Open Recent


# Protobuf

How to decode your HTTP/HTTPS Request/Response Protobuf with Proxyman

## 1. Protobuf

* Proxyman macOS can decode your HTTP/HTTPS Request/Response Protobuf Body with a given Protobuf Desc file
* Decode Protobuf binary and show as plain text
* Support Single or Multiple Delimited Messages in a single Protobuf Binary
* Import a desc file and read all Message Type -> Useful to decode protobuf binary
* Decode [Protobuf from Websocket](/advanced-features/websocket#websocket-with-protobuf-payload)

![Parse protobuf request with File Descriptor](/files/-M5lkc_hSq_6DhDF6Az5)

## 2. Protobuf File Descriptor (\*.desc)

Proxyman requires a File Descriptor (\*.desc) to properly parse the Protobuf Data.

There are various ways to get the File Descriptor:

#### 1. Ask your colleagues.

If your company is using Protobuf, it's a high chance that your colleagues have already had this file, especially the Backend and Frontend teams.

It might be one or multiple descriptor files.

#### 2. Generate from \*.proto file

If you have a bunch of \*.proto files, you can simply generate 1 single \*.desc file by using the following command line.

{% code overflow="wrap" %}

```bash
# Install protobuf cli if need
brew install protobuf

# Create `input` folder on the Desktop
# Copy all proto files to the `input` folder

# Generate 1 descriptor file with multiple proto files
protoc --descriptor_set_out=output.desc --include_imports -I=/Users/<your_name>/Desktop/input /Users/<your_name>/Desktop/input/*.proto

# Done
# output.desc
```

{% endcode %}

Once you have the Descriptor File, you can import them to Proxyman:

* Proxyman -> Tools Menu -> Protobuf Schema
* Click on the + button and select the **output.desc** file

{% hint style="info" %}
Proxyman 3.6.0+ only accepts **File Descriptor (\*.desc)** for better Protobuf parsing.

If you have **\*.proto** files, you can convert them to **\*.desc**. Please check out the next section.
{% endhint %}

{% hint style="info" %}
Proxyman automatically imports all common types from **Google Protobuf**, such as Timestamp, Struct, Value, Enum, Method, etc.

Proxyman supports both **proto2** and **proto3** syntax. [Read more](https://developers.google.com/protocol-buffers/docs/proto3)
{% endhint %}

#### 3. Protobuf Config

Before using Protobuf, you have to configure which Message Type should be used to parse the Protobuf data.

The following table describes which configurations are:

| Name                                | Description                                                                                                                                                         |
| ----------------------------------- | ------------------------------------------------------------------------------------------------------------------------------------------------------------------- |
| Schema                              | Add `.desc` file if need                                                                                                                                            |
| Message Type                        | The Class name of the root object in Protobuf binary. **Must include Package name**                                                                                 |
| Payload Type: **Auto**              | Auto detect if the Protobuf Binary is encoding as a Single Message or [Delimited Message](https://developers.google.com/protocol-buffers/docs/techniques#streaming) |
| Payload Type: **Single Message**    | Single Mesage in a Protobuf Binary                                                                                                                                  |
| Payload Type: **Delimited Message** | Multiple Messages in a Protobuf Binary (Length-Prefix)                                                                                                              |

<figure><img src="/files/ftxTSraYKYut1EFdPvxI" alt="Decode Protobuf HTTPS Resposne with Proxyman"><figcaption><p>Decode Protobuf HTTPS Resposne with Proxyman</p></figcaption></figure>

## 4. How to use?

There are **two** ways to parse Protobuf properly with qualified name fields:

* Define Protobuf Rules
* Read from Content-Type Header

### 4.1 Define Protobuf Rule

1. Your Protobuf Request should have a Content-Type header, which is `Content-Type: application/x-protobuf` or `Content-Type: application/protobuf`
2. Proxyman detects that it's a Protobuf Payload -> A Warning that Proxyman couldn't parse properly due to the absence of the message type. Click Add to open Protobuf Settings.

Alternatively, you can right-click on your Request -> Tools -> Protobuf

![Missing Message Type](/files/-M5lq38TdKPlCYQk1JvO)

3\. In the Protobuf Rule Window -> Select which Message Type for this request (Add Desc file if needed) for this Request/Response

{% hint style="info" %}
If you have a different Protobuf Message Type for the Request and Response. Select the \`Use different Message Type for Request/Response\` checkbox
{% endhint %}

![](/files/ftxTSraYKYut1EFdPvxI)

4\. Click Add and see the JSON Format

![](/files/-M5lsSsNQf3WDg0JIvmX)

#### 4.2 Read from Content-Type Header

You can **dynamically** provide the Protobuf Config from `Content-Type`

For example: Your `Content-Type` in the Request or Response might look like:

`Content-Type: application/x-protobuf; messageType="tutorial.Address"; delimited=true`

`Content-Type: application/x-protobuf; messageType="com.proxyman.User"; delimited=false`

To specify that the Protobuf Body this MessageType and the payload encoding.

### 5. ✅ Protobuf With Websocket (from macOS 6.5.0 or later)

* Decode a single binary web socket frame: Read at [WebSocket](/advanced-features/websocket)
* You can create a Protobuf Rule for websocket. Use Request Message Type for the client message, and Response Message Type for the server message

### 6. Troubleshooting

#### 5.1 Some name fields are missing

There is a situation where some field names are absent because the field name definition is not included in your Protobuf File Descriptor. It might be that your descriptor is out of date.

**Solution**:

* Remove the old Protobuf Schema and add the latest descriptor file from your server.
* If you're using Proxyman 3.5.2 or older, please update to Proxyman 3.6.0 or later. Then, use File Descriptor (\*.desc) for better results.


# WebSocket

How to capture and decrypt Websocket (WS/WSS) from iOS devices / simulators with Proxyman. Works with Google Chrome Web Browser or websocket from NodeJS, Python, Golang Backend Server

## 1. What's it?

Proxyman could capture WebSocket (WS) and Secure WebSocket (WSS) traffic and easily preview it.

* Capture WS/WSS from iOS Physical devices and iOS Simulator (Required [Atlantis framework](https://github.com/ProxymanApp/atlantis))
* Capture WS/WSS from Web Browser and Mac applications.
* Capture WS/WSS from Android Physical devices or Android Emulators.
* Prettier WebSocket Message.
* Filter All / Sent / Received messages.
* See the content in JSON / Tree Preview / HEX format.
* Customize Columns: Frame, Length, Data, Time, ...
* Auto-decode Binary Message to JSON if possible
* Open WebSocket messages by external Editors, such as Sublime, VSCode

## 2. Capture WS/WSS from Web Browsers

### Localhost websocket

Proxyman can capture localhost websocket, such as ws\://localhost:3000, from Google Chrome by using the [Automatic Setup](/automatic-setup/automatic-setup)

1. Go to Setup Menu -> Automatic Setup
2. Select Google Chrome (New Profile or Current Profile) -> New Google Chrome opens
3. Try to access your localhost websocket here. Proxyman will capture it

### Production websocket

Proxyman automatically captures your WS/WSS on Google Chrome, without configuring anything

1. Open Proxyman, and your Google Chrome
2. Make some WS/WSS traffic, such as <https://echo.websocket.org/.ws>
3. Inspect WS/WSS data in Proxyman

<figure><img src="/files/vuZh4gFJr6AS7RkLxh70" alt="Proxyman captures websocket traffic"><figcaption></figcaption></figure>

### Websocket with Protobuf Payload

From Proxyman macOS 6.5.0 or later, Proxyman can decode your websocket protobuf.

1. Make sure Proxyman can capture your websocket traffic first
2. Right-click on a websocket protobuf message -> Protobuf -> Decode

* **Raw mode**: Useful if you don't have a Protobuf Desc file.
* **Message Type**: Use Message Type from your protobuf desc file.

<figure><img src="/files/z2j4LXKtYPgS8DEvlx9v" alt="Decode websocket payload with Protobuf"><figcaption><p>Decode websocket payload with Protobuf</p></figcaption></figure>

## 3. Capture WS/WSS from iOS

If your iOS app is using **URLSessionWebSocketTask** or iOS WebSocket libraries, e.g. Starscream, SocketRocket, etc. Proxyman might not be able to capture WS/WSS traffic.

* **Reason**: Apple's intention. **URLSessionWebSocketTask** doesn't respect the System HTTP Proxy. All WS/WSS traffic goes directly to the Internet. Thus, Proxyman or Charles Proxy can't capture it.
* Example Ap: <https://github.com/ProxymanApp/websocket-example-ios-app>

### ✅ Solution 1 (Recommended for iOS 17 or later)

1. Follow the Setup guide for your [iOS Devices](/debug-devices/ios-device) or [iOS Simulators](/debug-devices/ios-simulator) (Make sure we installed and trusted the certificate on your device)
2. Proxyman Setup: Tools > Proxy Settings > SOCKS Proxy settings -> Enable it (Take note of the port)
3. On the main Proxyman app -> Take note of a current IP in the Proxyman Tools bar

<figure><img src="/files/Uf9fBvhkXO8XPMFprM5W" alt=""><figcaption><p>Get Proxyman current IP</p></figcaption></figure>

4. On your app: Configure a SOCK Proxy in your App, make sure this is only available for debug builds by implementing a switch or something, you might not want your release build with this configuration.

* For NWConnection

{% code overflow="wrap" fullWidth="false" %}

```swift
let parameters = webSocketURL.scheme == "wss" ? NWParameters.tls : NWParameters.tcp

let options = NWProtocolWebSocket.Options()
options.autoReplyPing = true

parameters.defaultProtocolStack.applicationProtocols.insert(options, at: 0)

if #available(iOS 17.0, *) {
    let socksv5Proxy = NWEndpoint.hostPort(host: "x.x.x.x", port: 8889) //  Please x.x.x.x with a real Proxyman IP
    let config = ProxyConfiguration.init(socksv5Proxy: socksv5Proxy)
    let context = NWParameters.PrivacyContext(description: "my socksv5Proxy")
    context.proxyConfigurations = [config]

    parameters.setPrivacyContext(context)
}

let connection = NWConnection(to: .url(webSocketURL), using: parameters)
connection.start(queue: .main)
```

{% endcode %}

* For URLSession and URLSessionWebSocketTask

{% code overflow="wrap" fullWidth="false" %}

```swift
private lazy var urlSession: URLSession = {
    let config = URLSessionConfiguration.default
    if #available(iOS 17.0, *) {
        let socksv5Proxy = NWEndpoint.hostPort(host: "x.x.x.x", port: 8889) //  Please x.x.x.x with a real Proxyman IP
        let proxyConfig = ProxyConfiguration.init(socksv5Proxy: socksv5Proxy)
        config.proxyConfigurations = [proxyConfig]
    }

    return URLSession(configuration: config, delegate: nil, delegateQueue: nil)
}()
```

{% endcode %}

5. Done ✅

<figure><img src="/files/OyRypsew3ytIDjuXPbuY" alt=""><figcaption><p>Capture Websocket from iOS with Proxyman</p></figcaption></figure>

* Credit to [**FranklinSamboni**](https://github.com/FranklinSamboni) **->** <https://github.com/ProxymanApp/Proxyman/issues/586#issuecomment-2125082129>
* Tutorial: <https://proxyman.io/posts/2019-10-18-WebSocket-Debugging>

### ✅ Solution 2

Use [Atlantis Framework](https://github.com/ProxymanApp/atlantis#features) (developed by Proxyman) to capture WS/WSS **URLSessionWebSocketTask** traffic from iOS.

Read more at [https://github.com/ProxymanApp/atlantis](https://github.com/ProxymanApp/atlantis#wswss-traffic)

## 3. Capture WebSockets from your Web Browser (Chrome, Safari, etc)

* Proxyman can capture WS/WSS from a Web Browser out of the box. No need to configure anything.
* How to use: Open Google Chrome -> Visit your website that makes a WS/WSS connection -> Open Proxyman -> Find your websocket domains -> On the Response Panel -> Click Enable SSL Proxying on these domains. Open your Browser, and reload your website -> Proxyman will capture and decrypt WS/WSS ✅

## 4. Capture Websocket from NodeJS, Golang, Python Server

* Proxyman can capture WS/WSS from your NodeJS, Golang, Python, and Ruby server.
* How to use: Read [Automatic Setup](/automatic-setup/automatic-setup) to start your server on this Terminal -> Make a WS/WSS connection -> Proxyman automatically captures and decrypts it ✅

## 5. Map Websocket from Localhost <-> Production

It's possible to map the WebSocket Traffic from localhost <-> Production. Please check out the [Map Remote Tool.](https://docs.proxyman.com/advanced-features/pages/-M5kYD509H9yll6_m0g4#7.4-map-websocket-from-localhost-to-production)


# Clear Session

Clean the current working sessions, includes: All Requests, Domains and Clients

### What's for?

* Refresh New Session without quitting the app
* Release Unnecessary Memory

![](/files/-M5lXf4cJgfNjv-6Rj6T)


# Block List

The Block Tool allows users to block or hide certain requests by domains or wildcard or from a client

## 1. What's it?

The Block List Tool is useful when you would like to **block or hide** certain domains during a debugging session.

For instance, you can use Block List in the following situations:

* Block all ads requests from particular domains
* Block all analytic requests that flood the working space
* Block all annoying ping requests from your app to reduce the number of requests that appear on Proxyman
* Hide analytic traffic from your website without blocking it.

All blocked domains in the Block List will **drop the connection.**

<figure><img src="/files/U2PnA3JBdA6LNOMGSOhj" alt=""><figcaption><p>Block certain Requests by Domains or Client</p></figcaption></figure>

## 2. Block Actions

Block List supports some block actions that can suit your needs:

<table><thead><tr><th width="238.87890625">Block Action</th><th>Description</th></tr></thead><tbody><tr><td>Block &#x26; Hide Request</td><td>Matched requests are blocked and don't display on the app.</td></tr><tr><td>Block &#x26; Display</td><td>Matched requests are blocked, but display the blocked requests on the app.</td></tr><tr><td>Hide, but not Block</td><td>Just hiding the matched requests without blocking them. It's useful if you'd hide your annoying requests but don't block them.</td></tr></tbody></table>

![Create a Block / Hide Rule](/files/LCPchEiQy2fh14fqkJzn)

## 3. How to use it?

* **Tools** Menu -> **Block List**
* Right-click on the requests or domains -> **Tools** -> **Block List...**

{% hint style="success" %}
**⌥⌘\[** to quick open Block List Window
{% endhint %}

## 4. Block all traffic from a given App

* On Proxyman macOS 5.24.0 or later, you can select an app and block all traffic

<figure><img src="/files/6ERgms0jDMIdgIEPn7HY" alt=""><figcaption></figcaption></figure>


# Allow List

Define a set of requests that appears on Proxyman app

## 1. What's it?

The Allow List Tool is a handy tool to help you define which domains you **allow to appear** on the Proxyman app.

The unmatched requests won't go through Proxyman (by-pass)

It's useful in the following situations:

* Ignore all domains except your debugging domains (e.g. producthunt.com)
* Reduce the number of unnecessary requests, and focus on the domains you need to track

If you would like to block certain domains, please visit [Block Tool](/advanced-features/blacklist)

## 2. How to use?

* **Tools** menu -> **Allow List**
* Right-click on the selected request -> **Tools** -> **Allow List**

![](/files/-M9vMwKLNrpxZ9PLmi7O)

{% hint style="success" %}
**⌥⌘]** to quickly open the Allow List Window
{% endhint %}


# Charles Proxy Converter

Read Charles Proxy Log file and import to Proxyman app

## 1. What's it?

Proxyman is capable of converting and reading the `chls` files from Charles Proxy app to `har` format that Proxyman can understand.

{% hint style="success" %}
It requires that Charles Proxy beis already installed in order to convert `chls` files
{% endhint %}

You can manually convert the files from the File menu -> Convert -> `chls` to `har`

![](/files/-M6PIce9rkDFwLNTFfBY)

## 2. How does it work?

In general, Proxyman uses [Convert CLI from Charles Proxy](https://www.charlesproxy.com/documentation/tools/command-line-tools/) to convert .chls to .har, which Proxyman can understand.

1. As soon as you open `chls` file, Proxyman tries to find the Charles Proxy app, which has a bundle ID is

   `com.xk72.Charles`
2. Convert by using the convert command

```
$ ./Applications/Charles.app/Contents/MacOS/Charles convert ~/Desktop/input.chls ~/Desktop/output.har

```

3\. The output is `har` formatted in your Desktop directory

## 3. How to use?

There are several ways to open `chls` files:

* Open the `chls` file directly (Double-Click on the file, or Open With from Finder app)
* Drag and drop the file to the Proxyman app
* File -> Open and select `chls` files


# Custom Certificates

### 1. What's it?

Proxyman supports Custom **Root Certificate**, **Server Certificates, and** **Client Certificates** that allow you to add your certificate that Proxyman uses to establish the SSL-Connection between your clients, servers, and Proxyman app.

| Custom Certificate Type | Purpose                                                                                           | How Proxyman uses                                         |
| ----------------------- | ------------------------------------------------------------------------------------------------- | --------------------------------------------------------- |
| **Server Certificate**  | For intercepting HTTPS Traffic from clients that use SSL-Pinning                                 | Use this certificate for SSL-Handshake to your Clients    |
| **Client Certificate**  | For intercepting HTTPS Traffic from clients that use Mutual Authentication                        | Use this certificate for SSL-Handshake to specific Server |
| **Root Certificate**    | For intercepting HTTPS Traffic from clients and servers without using local Proxyman certificates | SSL Handshake for both clients & servers                  |

![](/files/-MGm7W8T4J_4PaDO-xUS)

{% hint style="info" %}
Even though the Proxyman Root Certificate is locally generated in your machine, you can manually generate and add to Proxyman. [Read more](#6-how-to-generate-self-signed-certificates-that-meet-apples-requirements)
{% endhint %}

### 2. Certificate Formats

Proxyman accepts the following formats:

| Custom Certificate | PEM or DER    | PKCS #12 (p12) |
| ------------------ | ------------- | -------------- |
| Root Certificate   | Not Supported | Supported      |
| Client Certificate | Supported     | Supported      |
| Server Certificate | Supported     | Supported      |

* PKCS #12 (p12).
* PEM or DER Private Key and Certificate file.

{% hint style="info" %}

* Proxyman automatically determines the format of the Private Key and Certificate file (Support PEM or DER).
* Proxyman will prompt to enter the password if import an encrypted Private Key or PKCS #12 file.
* All passphrases are securely stored in Proxyman Keychain.
  {% endhint %}

{% hint style="info" %}
If your certificates are in different formats that Proxyman supports, please convert them to p12 or PEM/DER format before importing.
{% endhint %}

### 3. Certificate Requirement on macOS 10.15+ and iOS 13+

If you're using a custom Root Certificate or Server Certificate on macOS 10.15 or iOS 13, you might encounter the failed handshake on Safari or iOS devices if the following requirements don't meet:

* RSA Key must have a key size is greater than 2048 bits
* The hash algorithm is SHA-2 family
* DNS Name of the server must be present on Subject Alternative Name. Common Name is no longer trusted
* Valid certificate (Current day is in Not Before and Not After)
* TLS server certificates must contain an ExtendedKeyUsage (EKU) extension containing the **id-kp-serverAuth** OID.

Read more <https://support.apple.com/en-us/HT210176>

{% hint style="info" %}
If it's too complicated for you, we recommend letting Proxyman performs it automatically. Please visit Certificate Menu -> Install Certificate on this Mac -> Select **Automatic** Tab.
{% endhint %}

### 4. Common issues

| Problem                                                | Solution                                                                                                                                                                                                                                                                           |
| ------------------------------------------------------ | ---------------------------------------------------------------------------------------------------------------------------------------------------------------------------------------------------------------------------------------------------------------------------------- |
| Private Key and Certificate are not matched            | Try different certificates and private keys and make sure they are matched                                                                                                                                                                                                         |
| Get SSL Handshake Error for custom certificates        | <ul><li>Try to add the custom Certificate to System Keychain and Trust it</li><li>Certificate doesn't match the requirement from macOS => Read <a href="#3-certificate-requirement-on-macos-10-15-and-ios-13">section 3</a></li><li>Check expires day of the Certificate</li></ul> |
| Could not import certificate due to invalid passphrase | Ask your leader to give the correct passphrase to open the encrypted Private Key or P12 file                                                                                                                                                                                       |

### 5. How to use

* Access from **Certificate Menu** -> **Add Custom Certificate**

![](/files/-MfwibXWpHoYDNlEzUpL)

### **6. How to generate self-signed certificates for Custom Root Certificate that comply with new Apple's Security Requirements**

Due to [Apple's requirements from iOS 13 and Catalina (10.15)](#3-certificate-requirement-on-macos-10-15-and-ios-13), It requires extra configuration to generate the self-signed certificate properly.

The following steps will guide you on how to do it properly:

1. Prepare a `cert.config` file on the **Desktop folder**

```
[ ca ]
default_ca    = CA_default
[ CA_default ]
default_md    = sha256
[ v3_ca ]
subjectKeyIdentifier=hash
authorityKeyIdentifier=keyid:always,issuer
basicConstraints = critical,CA:true
keyUsage=critical,keyCertSign
extendedKeyUsage = serverAuth,clientAuth
[ req ]
prompt = no
distinguished_name    = req_distinguished_name
[ req_distinguished_name ]
C=US
L=US
O=Proxyman LLC
CN=proxyman.dev
OU=Proxyman
```

* Please update values for C, L, O, CN, and OU parameters.

2\. Generate RSA Key in the Terminal app. (Replace **your\_password** with any password, e.g. 123456)

```bash
cd ~/Desktop
openssl genrsa -aes256 -passout pass:your_password -out key.pem 2048
```

3\. Generate the self-signed certificate and private key. (Replace **your\_password** with the password in step 2)

```
openssl req -x509 -new -nodes -passin pass:your_password -config cert.config -key key.pem -sha256 -extensions v3_ca -days 825 -out root-ca.pem
```

4\. Convert to p12 format. (Replace **your\_password** with the password in step 2)

```
openssl pkcs12 -export -legacy -out root-ca.p12 -in root-ca.pem -inkey key.pem -passin pass:your_password -passout pass:your_password
```

5\. Finally, you would have **root-ca.p12** file and move to the next step

{% hint style="info" %}
If you can't import your custom certificate on macOS 14 (OpenSSL v3) or later, you should use the \`-legacy\` flag in step 4.

Ref: <https://stackoverflow.com/questions/70431528/mac-verification-failed-during-pkcs12-import-wrong-password-azure-devops>
{% endhint %}

### 7. Import as a Custom Root Certificate

1. Go to Certificate Menu -> Custom Certificate -> Select Root Certificate Tab
2. Click **Import** button -> P12
3. Select **root-ca.p12** file and enter the password.
4. Trust your custom certificate in Keychain Access App:

* Open Keychain Access App
* Search for the certificate you've added. The name might be the common name (CN) of the certificate
* Double Click to open and select Always Trust
* Click "X" and save the change

![](/files/-MGm7bagKptMg27z3I-B)

5\. Please verify that you can see the Green Tick that shows the certificate is installed and trusted properly.

![Custom Root Certificate is installed and trusted properly. Ready to go!](/files/-MGnB4vOeNn-LubpeLLD)

### 8. Import as a Server/Client Certificate

For custom Server/Client certificates, you should not generate a self-signed certificate. Please ask your workmate or team lead about the certificate that the company is using. It could be in DER/PEM or P12 format.

Then import the certificate as a Server / Client Certificate in Custom Certificate Window.

![Import PEM/DER key and private key to Custom Client/Server Certificate](/files/-MAioZF7Q4lXuoCI6mKA)

{% hint style="info" %}
You don't need to trust the certificate on System Keychain since it's not a Root Certificate.
{% endhint %}


# GraphQL

Capture GraphQL HTTP Request with Proxyman

## 1. Use Debugging Tools with GraphQL Requests

From Proxyman 2.27.0, we can use debugging tools with GraphQL Requests by specifying the GraphQL Query Name.

Matching by GraphQL QueryName works with Breakpoint, Map Local, Map Remote, Block List, Allow List, and the Scripting Tool.

#### How to use

1. Open the debugging tool (e.g. Breakpoint)
2. Create new Rule
3. Click on Use "Wildcard Dropdown" -> Advanced -> Check GraphQL QueryName.
4. Enter the GraphQL QueryName

By doing this way, the debugging tool will match the original matching rule firstly, then match the GraphQL QueryName.

![Enable GraphQL QueryName](/files/-MacgUeszvheTmIlUrlG)

![Specify the GraphQL QueryName](/files/-MachGDOOk0ERFBap4p-)

{% hint style="info" %}
From build 3.0.0, Proxyman automatically fills the GraphQL Query Name when we create a debugging tool rule.
{% endhint %}

## 2. GraphQL Prettier

From Proxyman 2.33.0, Proxyman can prettify/beautify GraphQL's Query Value. To do it, please open Tools Menu -> Custom Previewer Tab -> Check GraphQL checkbox.

![Beautify GraphQL Query](/files/-MjJ6Jbk2YKgmnqmYc6u)

## 3. Show GraphQL Query Name on the main table view

It's possible to extract and display the Query Name. Please Right-click on the Column Header and enable it.

![Query Name from GrapQL Request](/files/-MVetX1HGlYXY9NQS7A3)

{% content-ref url="/pages/-MV5f93nk0kOoCemh3Ru" %}
[Custom Header Column](/basic-features/custom-header-column)
{% endcontent-ref %}

## 4. Debug GraphQL Requests (Legacy - Proxyman 2.26.0 and below)

GraphQL uses the same URL to query different responses from the server, current debugging tools (e.g. Map Local, Breakpoint, Map Remote) doesn't work well.

However, by using the Scripting Tool, we can easily achieve:

* Map Local for the response depends on QueryName
* Manipulate the query, body, header for GraphQL Requests and Response

### Map Local with the Scripting Tool

We can use the Scripting tool to map

1. Open Proxyman
2. Enable SSL Proxying on the GraphQL domain
3. Verify that you can see HTTPS requests from your domain
4. Right-Click on the flow -> Tool -> Scripting to create a script with the given URL
5. To import a local file: Click the More button -> Import JSON or Other files -> Then selecting your file
6. Use the following script shows you how to set a Local File to a GraphQL request with QueryName="user"

```javascript
// Import file from More Button -> Import JSON or Other files 
const file = require("@users/B02D96D5.default_message_32E64A5B.json");

function onRequest(context, url, request) {

  // 1. Extract the queryName from the request
  var queryName = request.body.query.match(/\S+/gi)[1].split('(').shift();
  
  // Or extract the operationName
  var operationName = request.body.operationName
  
  // 2. Save to sharedState
  sharedState.queryName = queryName
  sharedState.operationName = operationName
  
  // Done
  return request;
}

function onResponse(context, url, request, response) {

  // 3. Check if it's the request we need to map
  if (sharedState.queryName == "user") {
    
    // 4. Import the local file by Action Button -> Import
    // Get the local JSON file and set it as a body (like Map Local)
    response.headers["Content-Type"] = "application/json";
    response.body = file;
  }

  // Done
  return response;
}
```

### Manipulate Headers, Query, Body

1. Use the same code and change the queryName
2. Please use [the snipped code](/scripting/snippet-code#2-common-on-request-and-response) to change the values


# Network Conditions

Simulate slow network with various network profiles. Useful for testing

### 1. What's it?

Network Conditions (Network Throttling) v1 allows developers to simulate adverse networking environments. Proxyman provides various preset profiles:

| Profile              | Description                              |
| -------------------- | ---------------------------------------- |
| 100% Lost connection | 100 % lost all connection                |
| Very Bad Network     | Download/Upload: < 1mbps                 |
| Slow Network         | Download/Upload: 5-10 mbps               |
| Medium Network       | Download/Upload: 10-20 mbps              |
| 2G (EDGE)            | Download: <240kbps, Upload <200kbps      |
| 3G                   | Download: <780kbps, Upload <300kbps      |
| 4G (LTE)             | Download: 30-50mbps, Upload 5-10mbps     |
| Wi-Fi                | Download: 25-40mbps, Upload 15-30mbps    |
| Wi-Fi 802.11ac       | Download: 150-250mbps, Upload 70-100mbps |

### 2. Benefit?

* Various preset profiles: 3G, 4G, Wifi, Bad/Medium Network, etc.
* Help developers to simulate various network conditions (Download/Upload Bandwidth, Packets Dropped rate, delay).
* Easier to test your app under a particular network condition.
* Apply for **system-Wide** or **certain domains**.

{% hint style="info" %}
Network Conditions v1 does not allow you to customize a profile. We will implement it in v2.
{% endhint %}

{% hint style="info" %}
To better simulate the real-life, the download/upload bandwidth is not fixed, it might randomize in a given range.
{% endhint %}

### 3. How to use it?

You can access the feature by navigating to Tool -> Network Condition (CMD+SHIFT+J) or access from the right-menu context.

![Set Network Condition for particular domain](/files/-MVit7lBYfPWRzmass9F)

### 4. Alternative

* Network Link Conditions for macOS: <https://nshipster.com/network-link-conditioner/>


# Multiple Filters

## 1. What's it?

From build 2.22.0+, you can combine many filters at one time.

* Easily and quickly filter the request/response with complex filtered criteria
* Persist your last filter configs
* Handy Shortcuts
* Various Filters: URL, Request Header, Response Header, Body, Status Code, Method, Color, and Comment
* Combine with AND / OR all filters

![Mulitple Filter](/files/-MWwF9FpSzI60WypwUFV)

### 2. Shortcut

| Shortcut | Description                                  |
| -------- | -------------------------------------------- |
| ⌘F       | Display the filter and focus on the last one |
| ⌘N       | Clone new filter                             |
| ⇧⌘N      | Remove current Filter                        |
| ⌘↑       | Focus on the previous filter                 |
| ⌘↓       | Focus on the next filter                     |
| ESC      | Dismiss the filter                           |

{% hint style="info" %}
Proxyman limit the maximum filters is 10

For a Freemium version, it's limited at 2
{% endhint %}


# Custom Filters

How to use Custom Filter to save your filter criteria

## 1. What's it?

From Proxyman 4.11.0 or later, users can create a filter to save current filter configs and access it later.

* Able to create a custom Filter button on the Toolbar with the current filter config
* Manage the filter buttons: Create new, Override, Delete, and Rename.
* Save time ✅

## 2. How to use

#### Create new filter

1. Setup your filter config (Support Single or Multiple filters)
2. Click on the Save button -> Save -> Enter the name
3. A New Filter is added to the Filter Toolbar.

<figure><img src="/files/7CMPZTt7ubSD0JW9Kaj9" alt=""><figcaption><p>Create new custom filter</p></figcaption></figure>

#### Override

1. Change your filter config
2. Save button -> Override -> Select the filter that you'd like to override

<div data-full-width="true"><figure><img src="/files/l3bmHvQTlnFwBERcvHgQ" alt="" width="375"><figcaption><p>Override current filter</p></figcaption></figure></div>

#### Delete or Rename

1. Right-click on the filter button
2. Delete or Rename

<figure><img src="/files/yjbcwSE2qWkdGVLoi4WB" alt="" width="375"><figcaption><p>Delete or Rename</p></figcaption></figure>


# Publish to Gist

Publish Proxyman Log to Gist

## 1. What's it?

From Proxyman 2.28.0+, the developer can publish Request/Response data to Github Gist.

* Proxyman requires "Read/Write Gist" permission in order to publish a Gist on the user's behalf.
* If it's the first time, Proxyman will prompt a Github Authorization Page.

## 2. Benefit

* **Instantly** create a Gist from selected Request/Response that you can **quickly** share with your colleagues.
* Support Private and Private Gist.
* Only requires **"Read/Write Gist"** permission. No request for Email/Username/...
* The Github Access Token is securely stored in User Keychain.

Here is how the Gist looks like: <https://gist.github.com/NghiaTranUIT/e116a60e286c917a5cbfd61aff32194c>

![](/files/-Mb0fph-a8B9yc8jRme-)

## 3. How to use

1. Select your request on the main Table View
2. Right-Click to display a Menu Context -> Export -> Publish To Gist...

![](/files/-Mb0hNx-X6tXs5aGbMQJ)


# Reverse Proxy

### 1. What's it?

Reverse Proxy would create a **local WebServer** that transparently proxies your traffic to a remote server. By doing this way, Proxyman can capture and log your traffic.

Reverse Proxy is useful when you are working on a client that doesn't support HTTP/HTTPS Proxy or the HTTP Proxy config is too complicated.

For instance, the majority of Command-Line apps would not respect the system HTTP/HTTPS proxies, so Proxyman could not capture its traffic. To resolve it, you have to either:

* Explicitly config an HTTP/HTTPS Proxy. It's complicated and depends on the network library you are using. Check out this [troubleshooting](/troubleshooting/couldnt-see-any-requests-from-3rd-party-network-libraries) to know further.
* Use Reverse Proxy.

Reverse Proxy is available on Proxyman 2.29.0+.

### 2. Benefit

* Reverse Proxy feature: You can connect to Proxyman local WebServer, and it will forward your traffic to the remote host. No need to set up an HTTP/HTTPS Proxy on your client.
* Import Reverse Proxy Setting from Charles Proxy.
* Preserve Host in Header.
* Automatically select the available port when creating a new entry.
* Able to use Breakpoint, Map Local, Scripting for Reverse Proxy traffic 💯.

### 3. How to use

1. Access Reverse Proxy tool from Tools Menu -> Reverse Proxy
2. Create a new entry by entering a Remote Host and Remote Port. For the Local port, Proxyman would select automatically. You can change to a different port, but it must be available.
3. Save.
4. On your client application, change the URL to <http://localhost:\\>\<local\_port> (e.g. <http://localhost:10000>)
5. Make a request and inspect the traffic from the Proxyman app.

![Reverse Proxy Tool](/files/-MdAGoxm_NUHCiSvMu7x)

![Create new Reverse Proxy Entry](/files/-MdAGunvGvvXWx91ro2J)

{% hint style="info" %}
Proxyman would perform SSL Handshake to your Remote Server if the port is 443. Otherwise, it considers as a normal HTTP WebServer.
{% endhint %}

{% hint style="info" %}
**Preserve Host in Header Fields** allows you to preserve the original Host value. You should use it with caution because your remote server can reject the request due to a mismatched Host Value.
{% endhint %}


# Code Generator

## 1. What's it?

Code Generator is a useful tool that helps you automatically generate your HTTP/HTTPS Requests for particular code languages.

The following table will list all supported languages:

* cURL
* HTTPie
* HAR
* Postman Collection 2
* Axios
* Go
* Java + HTTPClient
* Javascript + jQuery
* Node + HTTP
* Node + Fetch
* Python + Request
* Objective-C + NSURLSession
* Swift + Alamofire 5
* Swift + Moya
* Swift + URLSession

![Generate Swift + Alamofire 5 Code](/files/-Mi4e7knCxyCTQxI4GiT)

## 2. How to open the Code Generator Tab?

1. On the Request Panel Tab -> Click on the "+" Button
2. New Windows appears -> Click on the "Code Generator" checkbox

<figure><img src="/files/08TbKxdRRlkjD0YstEVZ" alt=""><figcaption><p>How to open the Code Generator Tab</p></figcaption></figure>

* New Tab will add to the Request Panel -> Select any language to show the code

## 3. Missing your favorite library?

If you cannot find your library, you can:

* Create a [Ticket](https://github.com/ProxymanApp/Proxyman/issues) on Github.
* Fork [Code-Generator-Plugin Repository](https://github.com/ProxymanApp/code-generator-plugin) and open a PR. We appreciate your contribution 🙇‍♂️


# Diff

Diff HTTP Request and Response with ease

### 1. What's it?

During using Proxyman, you might face the situation to find the difference between requests and responses. The Diff tool would help you to:

* Diff two Requests or Response, include the URL, Method, Status Code, Headers, and the Text-based body.
* Render as Side-by-Side or Unified.
* Light and Dark Theme.
* Export as a unified file.
* Open the diff by 3rd-party applications, such as FileMerge.
* Highlight and add comments.

{% hint style="info" %}
This feature is only available for macOS 11.2 and later.
{% endhint %}

### 2. How to use it?

1. Select your requests on the main table view.
2. Right-Click -> Tools -> Add to Diff pool (Or using ⌘Y)
3. On the Diff window, select Left and Right Panel.
4. Proxyman performs the diff operation and displays it.

#### Side-by-Side mode

![Side By Side Mode](/files/z142Zhr4znXWZQ4UxTSM)

#### Unified Mode

![Unified Mode](/files/rEwdM3DhVcZdAC8obdA8)

### 3. Open with 3rd-party diff tools

* File Merge: Required Xcode to install
* Kaleidoscope: You have to install the `ksdiff` in the Kaleidoscope's preference.


# Access Control

## 1. What's it?

It's an advanced feature, which allows you to define how Remote Devices (iPhone, Android, other computers) can connect to the Proxyman app. It's designed for enterprise users for better security.

Access via **Tools Menu** -> Proxy Setting -> Access Control.

<table><thead><tr><th width="169">Mode</th><th>Description</th></tr></thead><tbody><tr><td>Allow All</td><td>All Remote Connections can connect to Proxyman (Default).</td></tr><tr><td>Disallow All</td><td>All Remote Connections are not allow to connect to Proxyman.</td></tr><tr><td>Specify Remote Device by IP</td><td>Define which device can connect to the Proxyman app.</td></tr></tbody></table>

<figure><img src="/files/c1BE6d9wXMTFvQPjwA0N" alt=""><figcaption><p>Access Control UI</p></figcaption></figure>

<figure><img src="/files/aQQHEyGvxOK1foVJcSyf" alt=""><figcaption><p>Prompt to allow unauthorized connections</p></figcaption></figure>

## 2. Override the Access Control mode by Command Lines

From Proxyman 4.4.0, it's possible to override the Access Control by the following CLI.

It's useful if your company would enforce the mode without using GUI.

```
$ defaults write ~/Library/Preferences/com.proxyman.NSProxy.plist accessControlModeString "allowAll"
$ defaults write ~/Library/Preferences/com.proxyman.NSProxy.plist accessControlModeString "disallowAll"
$ defaults write ~/Library/Preferences/com.proxyman.NSProxy.plist accessControlModeString "specificIP"
```


# DNS Spoofing

## 1. What's it?

DNS Spoofing allows developers:

* Provide a custom DNS for particular domains
* Able to map from a domain to different domains

<figure><img src="/files/Eph7Bc6PivWhcvCo2TQO" alt=""><figcaption><p>DNS Spoofing</p></figcaption></figure>

## 2. What is different with Map Remote?

DNS Spoofing is different than Map Remote by:

* The \`Host\` in the Request Header doesn't change
* The URL doesn't change

On the other hand, Map Remote allows you to change the Host Header and the mapped URL.

## 3. How to use it?

1. Simply create a new rule by opening the Tools Menu -> DNS Spoofing
2. Create new Rule with the Host name and Remote Address
3. Done ✅


# SOCKS Proxy

## 1. What's it?

From Proxyman 4.9.0, Proxyman supports SOCKS Proxy beside the normal HTTP/HTTPS Proxy.

* Support HTTPS over SOCKS Proxy: All debugging tools (e.g. Map Local, Breakpoint, ...) still work fine.
* Compatible with SOCKS 5

{% hint style="info" %}
Proxyman app doesn't automatically override the System SOCKS Proxy Setting at launch time. You have to manually enable it if needed.
{% endhint %}

## 2. How to use it?

1. Open the SOCKS Proxy Setting in Tools Menu -> Proxy Setting -> SOCKS Proxy Setting
2. By default, Proxyman listens on port 8889
3. On your client: Set the SOCKS proxy to 127.0.0.1 at port 8889

<figure><img src="/files/I7QYCemOoH0CgAt6UCsc" alt=""><figcaption><p>SOCKS Proxy</p></figcaption></figure>


# Swagger OpenAPI

How to export Proxyman Requests/Responses to Swagger OpenAPI 3.0 YAML format

## 1. OpenAPI

From Proxyman v5.14.0 or later, Proxyman can export Proxyman Requests/Responses to OpenAPI YAML format or HTML.

* Support YAML Format
* Support HTML - Swagger OpenAPI style
* Built-in in Proxyman, no need for any external dependencies.

<figure><img src="/files/D5syDqFu8mhdtemLPFgp" alt=""><figcaption><p>Export your requests/response to OpenAPI HTML Style</p></figcaption></figure>

## 2. How to use

1. Capture HTTPS requests with Proxyman. Follow the following setup guide:

* [iOS devices (iPhone, iPad)](/debug-devices/ios-device)
* [iOS Simulator](/debug-devices/ios-simulator)
* [Android devices](https://docs.proxyman.com/advanced-features/pages/-LlQ1Eao4IFC0QH6bL4W#id-1.-android-setup-guide)
* [Android Emulator](/debug-devices/android-device/automatic-script-for-android-emulator)
* [macOS (Web Browser)](/debug-devices/macos)

Verify Proxyman can capture & decrypt your HTTPS Requests/Responses

<figure><img src="/files/7efzBqAxDUTajAPkOdGK" alt=""><figcaption><p>Capture your HTTPS Request/Response</p></figcaption></figure>

2. Select your requests on the main table -> Right-Click -> Export -> OpenAPI -> Select either OpenAPI YAML or OpenAPI HTML
3. Done :white\_check\_mark:


# TLS Key Logging

Explain how to use TLS Key Logging with Proxyman to record TLS Session Keys. Useful for debugging with Wireshark


# Install Certificate

How to install and trust Proxyman certificate to Windows 10 / 11

## Install Certificates on Windows

In order to intercept encrypted HTTPS messages (Request or Response), you have to install **Proxyman CA Certificate** on your current Windows Machine.

You can install the Proxyman CA Certificate by navigating to

* **Certificate** menu -> **Install Certificate on this Windows**...

{% hint style="info" %}
The Proxyman Certificate is a self-signed certificate, which is generated on your machine. Proxyman never stores or transmits any personal data to Proxyman's server or 3rd-party.

Please check out the [Privacy Statement](https://proxyman.io/privacy) to understand what Proxyman obtains or not.

If you'd like to manually generate a Certificate on your machine then adding to Proxyman. Please check out the [Custom Certificate Doc](/advanced-features/custom-certificates#6-how-to-generate-self-signed-certificates-for-custom-root-certificate-that-comply-with-new-apples-security-requirements)
{% endhint %}

## 1. Automatic mode

<figure><img src="/files/TAwdTxWhIbc72Crf0f1X" alt=""><figcaption><p>Auto install the certificate on Windows machine</p></figcaption></figure>

Proxyman provides an automatic script to Install & Trust the Proxyman CA Certificate to the System.

* Certificate Menu -> Install Certificate for this Windows -> Click on the "Install & Trust" button
* Click YES on the System Prompt

<figure><img src="/files/fTULhiDOuGwDENbbWcoP" alt=""><figcaption><p>Grant permission to run the Automatic Script</p></figcaption></figure>

### Why do I need to grant permission?

Behind the scene, Proxyman would execute the following command with Admin Mode:

```bash
$ certutil -addstore "Root" <Certificate_Path>
```

{% hint style="info" %}
[certutil](https://learn.microsoft.com/en-us/windows-server/administration/windows-commands/certutil) is a built-in Windows command line to manage the certificate.
{% endhint %}

## 2. Manual Mode

If you don't have permission to execute the script, please do the following step:

1. Close Proxyman
2. Find a Proxyman CA Certificate at "C:\Users\\\<your\_username>\AppData\Roaming\Proxyman\certificate\certs\ca.cer"
3. Double-click to open it
4. Install Certificate -> Select "Current User" -> Select "Place all certificates in the following store" -> "Browse..."

<figure><img src="/files/Pnn56TMWlzFX1WddBcmW" alt=""><figcaption><p>Steps to install the certificate</p></figcaption></figure>

5\. Select Next -> Finish

6\. Select "YES" on the System Prompt.


# WSL

How to install \`adb\`, \`choco\` and  \`WSL\` for Windows.

### 1. What's it?

In order to use Automatic Script for Android Emulator, the following command line must be installed on your Windows machine:

* wsl
* choco (package manager for Windows)
* adb (Android Debug Bridge)

### 2. Install WSL on Windows 10/11

1. On Windows 10/11, search: **Command Prompt** app
2. Right-click on the app -> Select **Run as administrator** option.
3. When the App is opened, copy & paste the following command:

```bash
wsl --install
```

4. Restart your Windows to take effect -> After restarting, Windows will open the **Command Prompt** which asks the user to create a new Username / Password -> Follow this instruction
5. Open the Command Prompt app again, execute:

```
wsl
```

6. Verify that the command is successful, with no errors:

<figure><img src="/files/2HQJMQfMLmhMtuj8HITz" alt=""><figcaption></figcaption></figure>

7. Done ✅

### 2. Install **Choco** on Windows 10/11

1. Open PowerShell with Run as Administrator
2. Paste and run it:

```
Set-ExecutionPolicy Bypass -Scope Process -Force; [System.Net.ServicePointManager]::SecurityProtocol = [System.Net.ServicePointManager]::SecurityProtocol -bor 3072; iex ((New-Object System.Net.WebClient).DownloadString('https://community.chocolatey.org/install.ps1'))
```

3. Wait a few seconds for the command to complete.
4. If you don't see any errors, you are ready to use Chocolatey! Type choco or choco -? now, or see Getting Started for usage instructions.

Choco Installation Guide: <https://chocolatey.org/install#individual>

### 3. Install **adb** on Windows 10/11

1. Open PowerShell with Run as Administrator
2. Run:

```
choco install adb -y
```

3. Verify the **adb** is successfully installed and there is no error

### 4. ✅ Done. Try to Use Android Automatic Script again on Proxyman app

### 5. References:

* <https://learn.microsoft.com/en-us/windows/wsl/install>
* <https://pureinfotech.com/install-wsl-windows-11/#install_wsl2_single_command>


# Scripting

How to use the Scripting tool to modify the Request/Response by Javascript Code.

### 1. What's it?

Proxyman offers a scripting feature that the developer could write the JS code to manipulate the Request/Response in a flexible way.

### 2. Benefits

* Implement Map Local / Map Remote / Breakpoint by JS Code. **100x Faster**
* Change the **Request Content**, including Domain, Host, Scheme, Port, Path, HTTP Method, HTTP Headers, Query, Body (Encoded-Form, JSON, plain-text)
* Change the **Response Content**, including HTTP Status Code, HTTP Headers, and Body (JSON, Encoded-Form, plain-text, binary...)
* Provide plenty of built-in addons and libraries for common tasks, such as Hashing, Encode/Decode, JSON-Text transformer, Beautify,...
* Able to **write your own JS Addons or Libraries**
* Designed to replace Rewrite GUI Tool from Charles Proxy
* Assign and receive shared States between each script or current session with [ShareState or Environment Variables](/scripting/environment-variables)

<figure><img src="/files/41pC20RY3Ft3Bek1BGUR" alt=""><figcaption><p>Scripting Tool</p></figcaption></figure>

{% content-ref url="/pages/-MFT7Pgr2\_dzMuUJrv\_y" %}
[Snippet Code](/scripting/snippet-code)
{% endcontent-ref %}

### 3. How to use it?

You can access the Scripting Tool by:

* Script Menu -> Script List (⌥⌘I)
* Open Menu Context from Right Click on the Flow -> Tools -> Scripting

Please check out the [Snippet Code](/scripting/snippet-code) to see a collection of snippet JS codes for the Scripting Tool.

### 4. Scripting with GraphQL Requests

From Proxyman 2.27.0+, the Scripting Tool can work with a GraphQL Request by a specific QueryName. Please check out the following GraphQL Document.

{% content-ref url="/pages/-MQ\_uhE\_Ncnoi5qbw2KX" %}
[GraphQL](/advanced-features/graphql)
{% endcontent-ref %}

### 4.1 Scripting with Websocket

From Proxyman v6.2.0 or later, it's possible to use the Script to

* Modify the Websocket Request URL & Header
* Modify the Websocket Response Headers
* ❌ Can not modify the websocket message. Only URL and Headers are supported.
* Refer to this snippet code.

### 5. Examples

The following guide will show you how to write JS code to change the Request domain from Production to Localhost and change the Response Body

1. Make sure you enable SSL for this domain before creating the script.
2. Open the Scripting Tool and create a new Script Entry (⌘N). You can right-click on the Request -> Tools -> Scripting => Proxyman will create a Script too
3. Give the name and define a Matching Rule.
4. Ex: **Name**=Test on Localhost endpoint, **URL**=<https://proxyman.io>
5. Enable Run Script on **Request** and **Response** **checkbox**
6. Start writing JS code for `onRequest` function

**onRequest(context, url, request) {}**

```javascript
// Import UUID addons
const { uuidv4 } = require("@addons/UUID.js");

function onRequest(context, url, request) {
  // print log
  console.log(request);

  // Change Production domain -> Localhost
  request.method = "GET";
  request.scheme = "http";
  request.host = "localhost";
  request.port = 8000;
  
  // Add new header
  request.headers["X-New-Header"] = "Hello From Scripting feature";
  request.headers["UUID"] = uuidv4(); // generate random UUIDv4
  delete request.headers["Key-Need-Delete"];

  // Update or Add a new Query
  request.queries["name"] = "Proxyman";

  // Update Body
  var body = request.body;
  body["name"] = "Proxyman";
  request.body = body;
  
  // Or Map the body with a local file (Proxyman 2.25.0+)
  // request.bodyFilePath = "~/Desktop/mockdata.json";
  
  // Done
  return request;
}
```

### onRequest() Object Format

`context`, `url` and `request` Objects are defined by:

```javascript
// context (readonly)
{
    "scriptName": "<String> Your Script Name",
    "matchingRule": "<String> Your Matching Rule",
    "matchingMethod": "<String> Method",
    "isEnableOnRequest": "Bool",
    "isEnableOnResponse": "Bool",
    "filePath": "<String> Script path",
    "flow": { // Availble from 2.16.0+
        "serverPort": "443",
        "serverIpAddress": "104.18.230.83",
        "clientIpAddress": "192.168.0.102",
        "remoteDeviceName": "iPhone XR",
        "remoteDeviceIP": "192.168.0.102",
        "id": "51",
        "clientPath": null,
        "clientPort": "51494",
        "clientName": null,
        "mapRemoteOriginalURL": "<String> Original URL before Map Remote modification (nullable)"
    },
}

// url (readonly)
url: String // => Present the full URL

// request
{
    "method": "<String> HTTP Method. Accept string method. Ex: GET, POST, ...",
    "scheme": "<String> Accept http or https",
    "host": "<String> Host of the request. Ex: api.proxyman.io, localhost, ...",
    "path": "<String>: Path of the URL. Ex: /v1/data",
    "port": "<Int> Accept int port number. Ex: 443, 8080, ..",
    "queries": "<[String: Any]> A JS Object (Dictionary) contains key values of the query",
    "headers": "<[String: Any]> A JS Object (Dictionary) contains key values of the header",
    "body": "Depend on the Content-Type header. It might be a dictionary for JSON and form, Plain Text or Uint8Array",
    "bodyFilePath": "<String><Optional> Set a body with a local file. See example in Snippet Code Page"
    "rawBody": "<Readonly>: A raw body String or Uint8Array",
    "preserveHostHeader": "<Bool> Preserve the Host",
    "isURLEncoding": "<Bool> Determine if Proxyman will perform URLEncoding when constructing the final URL. Default is True"
}

```

{% hint style="info" %}
You can change any value of the request obj except `rawBody`
{% endhint %}

{% hint style="info" %}
If the **body** variable is invalid format due to incorrect Content-Type in the Header. Please consider using the **rawBody** and manually parse the string.
{% endhint %}

The type of `request.body` replies on the Content-Type Header.

| Content-Type Header                                                                 | request.body      |
| ----------------------------------------------------------------------------------- | ----------------- |
| application/json or JSON families                                                   | Javascript Object |
| application/x-www-form-urlencoded                                                   | Javascript Object |
| plain-text or text-based Content-Type, Ex: application/js, text/css, text/html, ... | String            |
| The rest: Binary Data (application/zip, application/octet-stream)                   | Uint8Array        |

Check out common JS code from Snipped Code Page

{% content-ref url="/pages/-MFT7Pgr2\_dzMuUJrv\_y" %}
[Snippet Code](/scripting/snippet-code)
{% endcontent-ref %}

7\. Start writing code on `onResponse` function

```javascript
function onResponse(context, url, request, response) {
  console.log(response);

  // Update or Add a new header
  response.headers["Content-Type"] = "application/json";

  // Update status Code
  response.statusCode = 500;

  // Update Body
  var body = response.body;
  body["new-key"] = "Proxyman";
  response.body = body;

  // Or Map the body with a local file (Proxyman 2.25.0+)
  // response.bodyFilePath = "~/Desktop/mockdata.json";
  
  // Done
  return response;
}
```

### onResponse() Objects Format

`context`, `url`, `request`, and `response` objects are defined by:

```javascript
// context (readonly): Same with onRequest

// url (readonly): Same with onRequest

// request (readonly): Same with onRequest

// response
{
    "statusCode": "<Int> Status Code. Ex: 200, 400, 404,...",
    "httpVersion": "<String><Readonly> The HTTP Version",
    "statusPhrase": "<String><Readonly> HTTP Status Phrase. Ex Not Found, OK, ...",
    "headers": "<[String: Any]> A JS Object (Dictionary) contains key values of the header",
    "body": "Depend on the Content-Type header. It might be a dictionary for JSON and form, PlainText or Uint8Array",
    "rawBody": "<Readonly>: A raw body String or Uint8Array",
    "bodyFilePath": "<String><Optional> Set a body with a local file. See example in Snippet Code Page"
}
```

{% hint style="info" %}
You can change `statusCode`, `headers` and `body` from the response Obj
{% endhint %}

{% hint style="info" %}
If the **body** variable is invalid format due to incorrect Content-Type in the Header. Please consider using **rawBody** and manually parse the string.
{% endhint %}

The type of `response.body` replies on the Content-Type Header

| Content-Type Header                                                                 | request.body      |
| ----------------------------------------------------------------------------------- | ----------------- |
| application/json or JSON families                                                   | Javascript Object |
| application/x-www-form-urlencoded                                                   | Javascript Object |
| plain-text or text-based Content-Type, Ex: application/js, text/css, text/html, ... | String            |
| The rest (application/zip, application/octet-stream)                                | Uint8Array        |

{% hint style="info" %}
You must return `request` and `response` object in `onRequest` and `onResponse` function
{% endhint %}

### 6. Built-in Addons and Libraries

Proxyman provides plenty of addons and libraries that help you achieve common tasks: Hashing, Encode/Decode, ...

{% content-ref url="/pages/-MFT7MEsYKXO3sdDuVbZ" %}
[Addons](/scripting/addons)
{% endcontent-ref %}

{% content-ref url="/pages/-MFaHCXXVpSbaf\_oBAt8" %}
[Built-in JS Libraries](/scripting/built-in-js-libraries)
{% endcontent-ref %}

{% content-ref url="/pages/-MFT7Pgr2\_dzMuUJrv\_y" %}
[Snippet Code](/scripting/snippet-code)
{% endcontent-ref %}

### 7. Debugging JS Error

On certain occasions, you might encounter Javascript errors due to syntax errors, invalid code, ... You can debug by looking at error messages on the console or using `console.log().`

### 8. Use Scripting as a Mock API

From Proxyman 2.32.0, we can use the Scripting Tool as a Mock API. It means your request would never hit the server, and you have to define a Response Body. This behavior is the same with Map Local.

This feature is useful when the actual Restful API is not available yet. You can define and test it locally.

To enable the Mock API:

1. Open the Scripting Tool -> Select the Script
2. Enable Run as Mock API checkbox.

![Enable Mock API](/files/-MjmnK40Iy1mMdQaU3mL)

Then you can define a Response as usual:

```javascript
function onResponse(context, url, request, response) {

  // Init new body
  var body = {};
  body["new-key"] = "Proxyman";
  response.body = body;

  // Or map from a file
  // response.bodyFilePath = "~/Desktop/myfile.json"
  
  // Done
  return response;
}
```

### 9. Notes

* You must return `request` and `response` Object in `onRequest` and `onResponse` function.
* **Proxyman 4.16.0 or later**: Proxyman now converts the Binary Data to **Uint8Array**
* Proxyman 4.15.0 or earlier: Since Javascript doesn't have the Data object type, the Data Body will convert to **Base64 Encoded String** in Javascript. To pass Uint8Array, blob, or ArrayBuffer to the body, make sure you convert to **Base64 Encoded String.**


# async/await Request

How to use async/await for JS Script in the Scripting Tool

## 1. What's it?

From Proxyman macOS v3.5.0 and Windows/Linux v2.11.0 or later, you can use `async / await` to make an HTTP/HTTPS call for retrieving external resources inside your Script.

{% hint style="info" %}

* On macOS: Use \`$http\`
* On Windows/Linux: Use built-in \`axios\`
  {% endhint %}

#### Sample: POST Request with JSON Body (macOS)

```javascript
async function onResponse(context, url, request, response) {  
  // Define JSON Body and Header
  // Make sure "Content-Type" is "application/json"
  var param = {
    body: {
      "user": {
        "name": "Proxyman"
      }
    },
    headers: {
      "Content-Type": "application/json"
    }
  }

  // POST request with await
  var output = await $http.post("https://httpbin.org/post", param);
  
  // Get Status Code
  console.log(output.statusCode);
  
  // Get body
  console.log(output.body)
  
  // Get header
  console.log(output.headers)
  
  // Done
  return response;
}
```

## 2. How to use on macOS?

#### Method

```javascript
var output = await $http.get("https://httpbin.org/anything");
var output = await $http.post("https://httpbin.org/anything");
var output = await $http.put("https://httpbin.org/anything");
var output = await $http.update("https://httpbin.org/anything");
var output = await $http.delete("https://httpbin.org/anything");
```

#### Output format

```javascript
var output = await $http.get("https://httpbin.org/anything");
console.log(output)

// print
{
    "statusCode": <Int>,
    "headers": <Object>,
    "body": <Object>
}
```

#### Sample Code

* [GET Request with Query](/scripting/snippet-code#get-request-with-query)
* [POST Request with JSON Body](/scripting/snippet-code#post-request-with-json-body)
* [POST Request with application/x-www-form-urlencoded body](/scripting/snippet-code#post-request-with-application-x-www-form-urlencoded-body)
* [PUT / PATCH / DELETE Request](/scripting/snippet-code#put-patch-delete-request)

{% hint style="info" %}
Please checkout the [HTTP Snippet code](/scripting/snippet-code#make-async-await-http-request) for more sample code.
{% endhint %}

## 3. How to use on Windows/Linux?

Proxyman Windows/Linux ships with a built-in [axios](https://github.com/axios/axios) library, it means we can use the axios syntax to make HTTP(s) requests.

For example:

```javascript
async function getUser() {
  try {
    const response = await axios.get('/user?ID=12345');
    console.log(response);
  } catch (error) {
    console.error(error);
  }
}
```

## 4. Notes

* Make sure you defined the **async** function on `onRequest()` and `onResponse()`:

```javascript
async function onRequest(context, url, request) {
    var output = await $http.get("https://httpbin.org/get");
    return request;
}

async function onResponse(context, url, request, response) {
    var output = await $http.get("https://httpbin.org/get");
    return response;
}
```

* Request Timeout is 10 seconds.
* The inline HTTP Request doesn't go through the Proxyman Proxy, so it isn't affected by other debugging tools.
* Use can use `await $http.get()` on both `onRequest()` and `onResponse()`
* Make sure the Body type is matched with the Content-Type header.

**JSON Body with application/json**

```javascript
var param = {
    body: {
      "name": "Proxyman",
    },
    headers: {
      "Content-Type": "application/json"
    }
  }
```

**Encoded form Body with application/x-www-form-urlencoded**

```javascript
var param = {
    body: {
      "key1": "value1",
      "key2": "value2"
    },
    headers: {
      "Content-Type": "application/x-www-form-urlencoded"
    }
  }
```


---

[Next Page](/llms-full.txt/1)